How Does It Work: IPTables

Source: CyberPunk
What is a Firewall ?
A firewall is a system that provides network security by filtering incoming and outgoing network traffic based on a set of user-defined rules. In general, the purpose of a firewall is to reduce or eliminate the occurrence of unwanted network communications while allowing all legitimate communication to flow freely. In most server infrastructures, firewalls provide an essential layer of security that, combined with other measures, prevent attackers from accessing your servers in malicious ways.
A firewall typically establishes a barrier between a trusted, secure internal network and another outside network, such as the Internet, that is assumed to not be secure or trusted. Firewalls are often categorized as either network firewalls or host-based firewalls. Network firewalls are a software appliance running on general purpose hardware or hardware-based firewall computer appliances that filter traffic between two or more networks. Host-based firewalls provide a layer of software on one host that controls network traffic in and out of that single machine. Routers that pass data between networks contain firewall components and can often perform basic routing functions as well, Firewall appliances may also offer other functionality to the internal network they protect such as acting as a DHCP or VPN server for that network.
TCP network traffic moves around a network in packets, which are containers that consist of a packet header—this contains control information such as source and destination addresses, and packet sequence information—and the data (also known as a payload). While the control information in each packet helps to ensure that its associated data gets delivered properly, the elements it contains also provides firewalls a variety of ways to match packets against firewall rules.
It is important to note that successfully receiving incoming TCP packets requires the receiver to send outgoing acknowledgment packets back to the sender. The combination of the control information in the incoming and outgoing packets can be used to determine the connection state (e.g. new, established, related) of between the sender and receiver.
Types of Firewalls
There are different types of firewalls depending on where the communication is taking place, where the communication is intercepted and the state that is being traced.
Network layer or packet filters
Network layer firewalls, also called packet filters, operate at a relatively low level of the TCP/IP protocol stack, not allowing packets to pass through the firewall unless they match the established rule set. The firewall administrator may define the rules; or default rules may apply. The term “packet filter” originated in the context of BSD operating systems.
Network layer firewalls generally fall into two sub-categories, stateful and stateless.
Stateful firewalls
maintain context about active sessions, and use that “state information” to speed packet processing. Any existing network connection can be described by several properties, including source and destination IP address, UDP or TCP ports, and the current stage of the connection’s lifetime (including session initiation, handshaking, data transfer, or completion connection). If a packet does not match an existing connection, it will be evaluated according to the ruleset for new connections. If a packet matches an existing connection based on comparison with the firewall’s state table, it will be allowed to pass without further processing.
Stateless firewalls
require less memory, and can be faster for simple filters that require less time to filter than to look up a session. They may also be necessary for filtering stateless network protocols that have no concept of a session. However, they cannot make more complex decisions based on what stage communications between hosts have reached.
Newer firewalls can filter traffic based on many packet attributes like source IP address, source port, destination IP address or port, destination service like WWW or FTP. They can filter based on protocols, TTL values, netblock of originator, of the source, and many other attributes.
Commonly used packet filters on various versions of Unix are IPFilter (various), ipfw (FreeBSD/Mac OS X), NPF (NetBSD), PF (OpenBSD, and some other BSDs), iptables/ipchains (Linux).
Application-layer
Application-layer firewalls work on the application level of the TCP/IP stack (i.e., all browser traffic, or all telnet or ftp traffic), and may intercept all packets traveling to or from an application. They block other packets (usually dropping them without acknowledgment to the sender).
On inspecting all packets for improper content, firewalls can restrict or prevent outright the spread of networked computer worms and trojans. The additional inspection criteria can add extra latency to the forwarding of packets to their destination.
Application firewalls function by determining whether a process should accept any given connection. Application firewalls accomplish their function by hooking into socket calls to filter the connections between the application layer and the lower layers of the OSI model. Application firewalls that hook into socket calls are also referred to as socket filters. Application firewalls work much like a packet filter but application filters apply filtering rules (allow/block) on a per process basis instead of filtering connections on a per port basis. Generally, prompts are used to define rules for processes that have not yet received a connection. It is rare to find application firewalls not combined or used in conjunction with a packet filter.
Also, application firewalls further filter connections by examining the process ID of data packets against a ruleset for the local process involved in the data transmission. The extent of the filtering that occurs is defined by the provided ruleset. Given the variety of software that exists, application firewalls only have more complex rulesets for the standard services, such as sharing services. These per process rulesets have limited efficacy in filtering every possible association that may occur with other processes. Also, these per process rulesets cannot defend against modification of the process via exploitation, such as memory corruption exploits. Because of these limitations, application firewalls are beginning to be supplanted by a new generation of application firewalls that rely on mandatory access control (MAC), also referred to as sandboxing, to protect vulnerable services.
Proxies
A proxy server (running either on dedicated hardware or as software on a general-purpose machine) may act as a firewall by responding to input packets (connection requests, for example) in the manner of an application, while blocking other packets. A proxy server is a gateway from one network to another for a specific network application, in the sense that it functions as a proxy on behalf of the network user.
Proxies make tampering with an internal system from the external network more difficult and misuse of one internal system would not necessarily cause a security breach exploitable from outside the firewall (as long as the application proxy remains intact and properly configured). Conversely, intruders may hijack a publicly reachable system and use it as a proxy for their own purposes; the proxy then masquerades as that system to other internal machines. While use of internal address spaces enhances security, crackers may still employ methods such as IP spoofing to attempt to pass packets to a target network.
Network address translation
Firewalls often have network address translation (NAT) functionality, and the hosts protected behind a firewall commonly have addresses in the “private address range”, as defined in RFC 1918. Firewalls often have such functionality to hide the true address of protected hosts. Originally, the NAT function was developed to address the limited number of IPv4 routable addresses that could be used or assigned to companies or individuals as well as reduce both the amount and therefore cost of obtaining enough public addresses for every computer in an organization. Hiding the addresses of protected devices has become an increasingly important defense against network reconnaissance.
Firewalls are also broadly categorized as hardware or software. While both have their advantages and disadvantages, the decision to use a firewall is far more important than deciding which type you use.
Hardware
Typically called network firewalls, these external devices are positioned between your computer and the Internet (or other network connection). Many vendors and some Internet service providers (ISPs) offer integrated small office / home office (SOHO) routers that also include firewall features. Hardware-based firewalls are particularly useful for protecting multiple computers and control the network activity that attempts to pass through them. The advantage of hardware-based firewalls is that they are separate devices running their own operating systems, so they provide an additional line of defense against attacks when compared to system or host-level protections and are usually much faster than software firewalls.
Software
Most operating systems include a built-in firewall feature that should be enabled for added protection even if you have an external firewall. Firewall software can also be obtained as separate software from your local computer store, software vendor, or ISP. If you download firewall software from the Internet, make sure it is from a reputable source (i.e., an established software vendor or service provider) and offered via a secure site. The advantage of software firewalls is their ability to control the specific network behavior of individual applications on a system. Relying on a software firewall alone does provide some protection. However, realize that having the firewall on the same computer as the information you’re trying to protect may hinder the firewall’s ability to detect and stop malicious activity. This is especially true if your computer is already compromised by malware.
Firewall Rules
Network traffic that traverses a firewall is matched against rules to determine if it should be allowed through or not. Traffic is matched against a list of firewall rules in a sequence, or chain, from first to last. More specifically, once a rule is matched, the associated action is applied to the network traffic in question. In our example, if an accounting employee attempted to establish an SSH connection to the server they would be rejected based on rule 2, before rule 3 is even checked. A system administrator, however, would be accepted because they would match only rule 3.
It is typical for a chain of firewall rules to not explicitly cover every possible condition. For this reason, firewall chains must always have a default policy specified, which consists only of an action (accept, reject, or drop).
As network traffic, from the perspective of a server, can be either incoming or outgoing, a firewall maintains a distinct set of rules for either case. Traffic that originates elsewhere, incoming traffic, is treated differently than outgoing traffic that the server sends. It is typical for a server to allow most outgoing traffic because the server is usually, to itself, trustworthy. Still, the outgoing rule set can be used to prevent unwanted communication in the case that a server is compromised by an attacker or a malicious executable.
In order to maximize the security benefits of a firewall, you should identify all of the ways you want other systems to interact with your server, create rules that explicitly allow them, then drop all other traffic. Keep in mind that the appropriate outgoing rules must be in place so that a server will allow itself to send outgoing acknowledgements to any appropriate incoming connections. Also, as a server typically needs to initiate its own outgoing traffic for various reasons—for example, downloading updates or connecting to a database—it is important to include those cases in your outgoing rule set as well.
IPTables
In the Linux ecosystem, iptables is a widely used firewall tool that interfaces with the kernel’s netfilter packet filtering framework. For users and administrators who don’t understand the architecture of these systems, creating reliable firewall policies can be daunting, not only due to challenging syntax, but also because of number of interrelated parts present in the framework.
The iptables firewall works by interacting with the packet filtering hooks in the Linux kernel’s networking stack. These kernel hooks are known as the netfilter framework.
Every packet that enters networking system (incoming or outgoing) will trigger these hooks as it progresses through the stack, allowing programs that register with these hooks to interact with the traffic at key points. The kernel modules associated with iptables register at these hooks in order to ensure that the traffic conforms to the conditions laid out by the firewall rules.
Netfilter Hooks
As packets progress through the stack, they will trigger the kernel modules that have registered with netfilter hooks. The hooks that a packet will trigger depends on whether the packet is incoming or outgoing, the packet’s destination, and whether the packet was dropped or rejected at a previous point.
The following hooks represent various well-defined points in the networking stack:
NF_IP_PRE_ROUTING
This hook will be triggered by any incoming traffic very soon after entering the network stack. This hook is processed before any routing decisions have been made regarding where to send the packet.
NF_IP_LOCAL_IN
This hook is triggered after an incoming packet has been routed if the packet is destined for the local system.
NF_IP_FORWARD
This hook is triggered after an incoming packet has been routed if the packet is to be forwarded to another host.
NF_IP_LOCAL_OUT
This hook is triggered by any locally created outbound traffic as soon it hits the network stack.
NF_IP_POST_ROUTING
This hook is triggered by any outgoing or forwarded traffic after routing has taken place and just before being put out on the wire.
Kernel modules that wish to register at these hooks must provide a priority number to help determine the order in which they will be called when the hook is triggered. This provides the means for multiple modules (or multiple instances of the same module) to be connected to each of the hooks with deterministic ordering. Each module will be called in turn and will return a decision to the netfilter framework after processing that indicates what should be done with the packet.
IPTables Tables and Chains
The iptables firewall uses tables to organize its rules. These tables classify rules according to the type of decisions they are used to make. For instance, if a rule deals with network address translation, it will be put into the nat table. If the rule is used to decide whether to allow the packet to continue to its destination, it would probably be added to the filter table.
Within each iptables table, rules are further organized within separate “chains”. While tables are defined by the general aim of the rules they hold, the built-in chains represent the netfilter hooks which trigger them. Chains basically determine when rules will be evaluated.
The names of the built-in chains mirror the names of the netfilter hooks they are associated with:
PREROUTING
Triggered by the NF_IP_PRE_ROUTING hook.
INPUT
Triggered by the NF_IP_LOCAL_IN hook.
FORWARD
Triggered by the NF_IP_FORWARD hook.
OUTPUT
Triggered by the NF_IP_LOCAL_OUT hook.
POSTROUTING
Triggered by the NF_IP_POST_ROUTING hook.
Chains allow the administrator to control where in a packet’s delivery path a rule will be evaluated. Since each table has multiple chains, a table’s influence can be exerted at multiple points in processing. Because certain types of decisions only make sense at certain points in the network stack, every table will not have a chain registered with each kernel hook.
Which Tables are Available?
The Filter Table
The filter table is one of the most widely used tables in iptables. The filter table is used to make decisions about whether to let a packet continue to its intended destination or to deny its request. In firewall parlance, this is known as “filtering” packets. This table provides the bulk of functionality that people think of when discussing firewalls.
The NAT Table
The nat table is used to implement network address translation rules. As packets enter the network stack, rules in this table will determine whether and how to modify the packet’s source or destination addresses in order to impact the way that the packet and any response traffic are routed. This is often used to route packets to networks when direct access is not possible.
The Mangle Table
The mangle table is used to alter the IP headers of the packet in various ways. For instance, you can adjust the TTL (Time to Live) value of a packet, either lengthening or shortening the number of valid network hops the packet can sustain. Other IP headers can be altered in similar ways. This table can also place an internal kernel “mark” on the packet for further processing in other tables and by other networking tools. This mark does not touch the actual packet, but adds the mark to the kernel’s representation of the packet.
The Raw Table
The iptables firewall is stateful, meaning that packets are evaluated in regards to their relation to previous packets. The connection tracking features built on top of the netfilter framework allowiptables to view packets as part of an ongoing connection or session instead of as a stream of discrete, unrelated packets. The connection tracking logic is usually applied very soon after the packet hits the network interface. The raw table has a very narrowly defined function. Its only purpose is to provide a mechanism for marking packets in order to opt-out of connection tracking.
The Security Table
The security table is used to set internal SELinux security context marks on packets, which will affect how SELinux or other systems that can interpret SELinux security contexts handle the packets. These marks can be applied on a per-packet or per-connection basis.
So Which Chains are Implemented in Each Table?
So far we have talked about tables and chains separately. Now let’s go over which chains are available in each table.
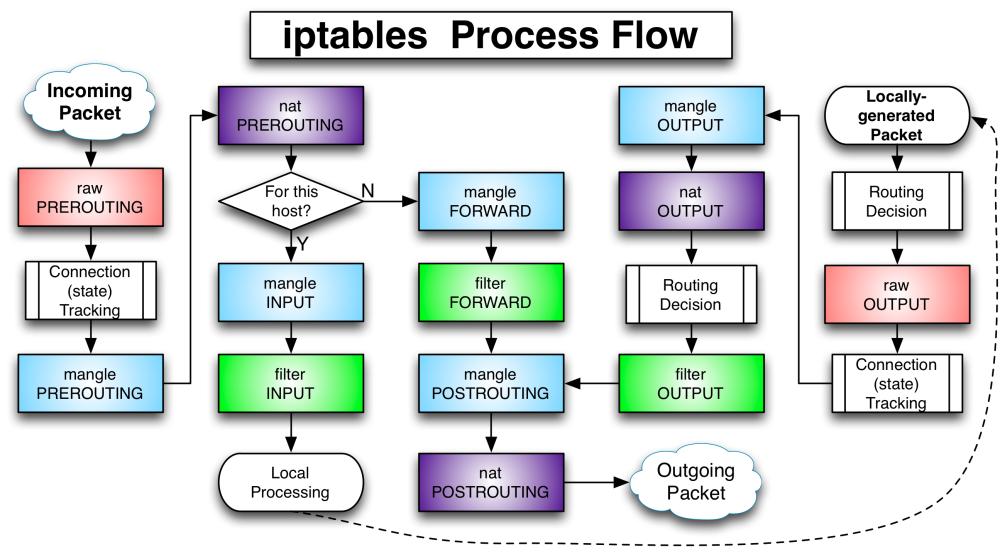
Assuming that the server knows how to route a packet and that the firewall rules permit its transmission, the following flows represent the paths that will be traversed in different situations:
- Incoming packets destined for the local system: PREROUTING -> INPUT
- Incoming packets destined to another host: PREROUTING -> FORWARD -> POSTROUTING
- Locally generated packets: OUTPUT -> POSTROUTING
The best way to describe this visually is through the flow chart that Phil Hagens made:
IPTables Rules
Rules are placed within a specific chain of a specific table. As each chain is called, the packet in question will be checked against each rule within the chain in order. Each rule has a matching component and an action component.
IPTables Matching Rules
The matching portion of a rule specifies the criteria that a packet must meet in order for the associated action (or “target”) to be executed.
The matching system is very flexible and can be expanded significantly with iptables extensions available on the system. Rules can be constructed to match by protocol type, destination or source address, destination or source port, destination or source network, input or output interface, headers, or connection state among other criteria. These can be combined to create fairly complex rule sets to distinguish between different traffic.
Targets
A target is the action that are triggered when a packet meets the matching criteria of a rule. Targets are generally divided into two categories:
Terminating targets
Terminating targets perform an action which terminates evaluation within the chain and returns control to the netfilter hook. Depending on the return value provided, the hook might drop the packet or allow the packet to continue to the next stage of processing.
Non-terminating targets
Non-terminating targets perform an action and continue evaluation within the chain. Although each chain must eventually pass back a final terminating decision, any number of non-terminating targets can be executed beforehand.
The availability of each target within rules will depend on context. For instance, the table and chain type might dictate the targets available. The extensions activated in the rule and the matching clauses can also affect the availability of targets.
There’s also a special class of non-terminating target: the jump target. Jump targets are actions that result in evaluation moving to a different chain for additional processing.
Rules can be placed in user-defined chains in the same way that they can be placed into built-in chains. The difference is that user-defined chains can only be reached by “jumping” to them from a rule (they are not registered with a netfilter hook themselves).
User-defined chains act as simple extensions of the chain which called them. For instance, in a user-defined chain, evaluation will pass back to the calling chain if the end of the rule list is reached or if a RETURN target is activated by a matching rule. Evaluation can also jump to additional user-defined chains.
This construct allows for greater organization and provides the framework necessary for more robust branching.
Connection Tracking
Connection tracking allows iptables to make decisions about packets viewed in the context of an ongoing connection. The connection tracking system provides iptables with the functionality it needs to perform “stateful” operations. Connection tracking is applied very soon after packets enter the networking stack. The raw table chains and some basic sanity checks are the only logic that is performed on packets prior to associating the packets with a connection.
The system checks each packet against a set of existing connections and it will update the state of the connection in its store if needed or add new connections to the system when necessary. Packets that have been marked with the NOTRACK target in one of the raw chains will bypass the connection tracking routines.
Available Connection States
Connections tracked by the connection tracking system will be in one of the following states:
NEW
When a packet arrives that is not associated with an existing connection, but is not invalid as a first packet, a new connection will be added to the system with this label. This happens for both connection-aware protocols like TCP and for connectionless protocols like UDP.
ESTABLISHED
A connection is changed from NEW to ESTABLISHED when it receives a valid response in the opposite direction. For TCP connections, this means a SYN/ACK and for UDP and ICMP traffic, this means a response where source and destination of the original packet are switched.
RELATED
Packets that are not part of an existing connection, but are associated with a connection already in the system are labeled RELATED. This could mean a helper connection, as is the case with FTP data transmission connections, or it could be ICMP responses to connection attempts by other protocols.
INVALID
Packets can be marked INVALID if they are not associated with an existing connection and aren’t appropriate for opening a new connection, if they cannot be identified, or if they aren’t routable among other reasons.
UNTRACKED
Packets can be marked as UNTRACKED if they’ve been targeted in a raw table chain to bypass tracking.
SNAT
A virtual state set when the source address has been altered by NAT operations. This is used by the connection tracking system so that it knows to change the source addresses back in reply packets.
DNAT
A virtual state set when the destination address has been altered by NAT operations. This is used by the connection tracking system so that it knows to change the destination address back when routing reply packets.
The states tracked in the connection tracking system allow administrators to craft rules that target specific points in a connection’s lifetime. This provides the functionality needed for more thorough and secure rules.
Now that you understand the basic inner-workings of IPTables and netfilter, we can move to more practical examples
List Rules by Specification
To list out all of the active iptables rules by specification, run the iptables command with the -S option:
sudo iptables -S
-P INPUT DROP
-P FORWARD DROP
-P OUTPUT ACCEPT
-N ICMP
-N TCP
-N UDP
-A INPUT -m conntrack --ctstate RELATED,ESTABLISHED -j ACCEPT
-A INPUT -i lo -j ACCEPT
-A INPUT -m conntrack --ctstate INVALID -j DROP
-A INPUT -p udp -m conntrack --ctstate NEW -j UDP
-A INPUT -p tcp -m tcp --tcp-flags FIN,SYN,RST,ACK SYN -m conntrack --ctstate NEW -j TCP
-A INPUT -p icmp -m conntrack --ctstate NEW -j ICMP
-A INPUT -p udp -j REJECT --reject-with icmp-port-unreachable
-A INPUT -p tcp -j REJECT --reject-with tcp-reset
-A INPUT -j REJECT --reject-with icmp-proto-unreachable
-A TCP -p tcp -m tcp --dport 22 -j ACCEPT
List Specific Chain
If you want to limit the output to a specific chain (INPUT, OUTPUT, TCP, etc.), you can specify the chain name directly after the -S option. For example, to show all of the rule specifications in the TCP chain, you would run this command:
sudo iptables -S TCP
-N TCP
-A TCP -p tcp -m tcp --dport 22 -j ACCEPT
List Rules as Tables
Listing the iptables rules in the table view can be useful for comparing different rules against each other. To output all of the active iptables rules in a table, run the iptables command with the -L option:
sudo iptables -L
This will output all of current rules sorted by chain.
If you want to limit the output to a specific chain (INPUT, OUTPUT, TCP, etc.), you can specify the chain name directly after the -L option.
Let’s take a look at an example INPUT chain:
sudo iptables -L INPUT
Chain INPUT (policy DROP)
target     prot opt source               destination
ACCEPT     all  --  anywhere             anywhere             ctstate RELATED,ESTABLISHED
ACCEPT     all  --  anywhere             anywhere
DROP       all  --  anywhere             anywhere             ctstate INVALID
UDP        udp  --  anywhere             anywhere             ctstate NEW
TCP        tcp  --  anywhere             anywhere             tcp flags:FIN,SYN,RST,ACK/SYN ctstate NEW
ICMP       icmp --  anywhere             anywhere             ctstate NEW
REJECT     udp  --  anywhere             anywhere             reject-with icmp-port-unreachable
REJECT     tcp  --  anywhere             anywhere             reject-with tcp-reset
REJECT     all  --  anywhere             anywhere             reject-with icmp-proto-unreachable
The first line of output indicates the chain name (INPUT, in this case), followed by its default policy (DROP). The next line consists of the headers of each column in the table, and is followed by the chain’s rules. Let’s go over what each header indicates:
target
If a packet matches the rule, the target specifies what should be done with it. For example, a packet can be accepted, dropped, logged, or sent to another chain to be compared against more rules
prot
The protocol, such as tcp, udp, icmp, or all
opt
Rarely used, this column indicates IP options
source
The source IP address or subnet of the traffic, or anywhere
destination
The destination IP address or subnet of the traffic, or anywhere
The last column, which is not labeled, indicates the options of a rule. That is, any part of the rule that isn’t indicated by the previous columns. This could be anything from source and destination ports, to the connection state of the packet.
Show Packet Counts and Aggregate Size
When listing iptables rules, it is also possible to show the number of packets, and the aggregate size of the packets in bytes, that matched each particular rule. This is often useful when trying to get a rough idea of which rules are matching against packets. To do so, simply use the -L and -v option together.
For example, let’s look at the INPUT chain again, with the -v option:
sudo iptables -L INPUT -vChain INPUT (policy DROP 0 packets, 0 bytes)
pkts bytes target prot opt in out source destination
284K 42M ACCEPT all -- any any anywhere anywhere ctstate RELATED,ESTABLISHED
0 0 ACCEPT all -- lo any anywhere anywhere
0 0 DROP all -- any any anywhere anywhere ctstate INVALID
396 63275 UDP udp -- any any anywhere anywhere ctstate NEW
17067 1005K TCP tcp -- any any anywhere anywhere tcp flags:FIN,SYN,RST,ACK/SYN ctstate NEW
2410 154K ICMP icmp -- any any anywhere anywhere ctstate NEW
396 63275 REJECT udp -- any any anywhere anywhere reject-with icmp-port-unreachable
2916 179K REJECT all -- any any anywhere anywhere reject-with icmp-proto-unreachable
0 0 ACCEPT tcp -- any any anywhere anywhere tcp dpt:ssh ctstate NEW,ESTABLISHED
Reset Packet Counts and Aggregate Size
If you want to clear, or zero, the packet and byte counters for your rules, use the -Z option. They also reset if a reboot occurs. This is useful if you want to see if your server is receiving new traffic that matches your existing rules.
To clear the counters for all chains and rules, use the -Z option by itself:
sudo iptables -Z
To clear the counters for all rules in a specific chain, use the -Z option and specify the chain. For example, to clear the INPUT chain counters run this command:
sudo iptables -Z INPUT
If you want to clear the counters for a specific rule, specify the chain name and the rule number. For example, to zero the counters for the 1st rule in the INPUT chain, run this:
sudo iptables -Z INPUT 1
Delete Rule by Specification
One of the ways to delete iptables rules is by rule specification. To do so, you can run the iptables command with the -D option followed by the rule specification. If you want to delete rules using this method, you can use the output of the rules list, iptables -S, for some help.
For example, if you want to delete the rule that drops invalid incoming packets (-A INPUT -m conntrack –ctstate INVALID -j DROP), you could run this command:
sudo iptables -D INPUT -m conntrack --ctstate INVALID -j DROPDelete Rule by Chain and Number
The other way to delete iptables rules is by its chain and line number. To determine a rule’s line number, list the rules in the table format and add the –line-numbers option:
sudo iptables -L --line-numbers

Chain INPUT (policy DROP)
num  target     prot opt source               destination
1    ACCEPT     all  --  anywhere             anywhere             ctstate RELATED,ESTABLISHED
2    ACCEPT     all  --  anywhere             anywhere
3    DROP       all  --  anywhere             anywhere             ctstate INVALID
4    UDP        udp  --  anywhere             anywhere             ctstate NEW
5    TCP        tcp  --  anywhere             anywhere             tcp flags:FIN,SYN,RST,ACK/SYN ctstate NEW
6    ICMP       icmp --  anywhere             anywhere             ctstate NEW
7    REJECT     udp  --  anywhere             anywhere             reject-with icmp-port-unreachable
8    REJECT     tcp  --  anywhere             anywhere             reject-with tcp-reset
9    REJECT     all  --  anywhere             anywhere             reject-with icmp-proto-unreachable
10   ACCEPT     tcp  --  anywhere             anywhere             tcp dpt:ssh ctstate NEW,ESTABLISHED
...
This adds the line number to each rule row, indicated by the num header.
Once you know which rule you want to delete, note the chain and line number of the rule. Then run the iptables -D command followed by the chain and rule number.
Example – if we want to delete the input rule that drops invalid packets:
sudo iptables -D INPUT 3
Flush a Chain
Iptables offers a way to delete all rules in a chain, or flush a chain. This section will cover the variety of ways to do this.
Flush a Single Chain
To flush a specific chain, which will delete all of the rules in the chain, you may use the -F, or the equivalent –flush, option and the name of the chain to flush.
For example, to delete all of the rules in the INPUT chain, run this command:
sudo iptables -F INPUT
Flush All Chains
To flush all chains, which will delete all of the firewall rules, you may use the -F, or the equivalent –flush, option by itself:
sudo iptables -F
Flush All Rules, Delete All Chains, and Accept All
First, set the default policies for each of the built-in chains to ACCEPT. The main reason to do this is to ensure that you won’t be locked out from your server via SSH:
iptables -P INPUT ACCEPT
iptables -P FORWARD ACCEPT
iptables -P OUTPUT ACCEPT
Then flush the nat and mangle tables, flush all chains (-F), and delete all non-default chains (-X):
iptables -t nat -F
iptables -t mangle -F
iptables -F
iptables -X
Your firewall will now allow all network traffic. If you list your rules now, you will will see there are none, and only the three default chains (INPUT, FORWARD, and OUTPUT) remain.
Installing the Persistent Firewall Service
The iptables-persistent package allow us to save our rule sets and have them automatically applied at boot:
sudo apt-get update
sudo apt-get install iptables-persistent
During the installation, you’ll be asked whether you want to save your current rules. Say “yes”. We will be editing the generated rules files momentarily.
Generally Useful Rules
Allow Loopback Connections
The loopback interface, also referred to as lo, is what a computer uses to for network connections to itself. Anything localhost (ie ping 127.0.0.1), database connections which do not use sockets etc. :
iptables -A INPUT -i lo -j ACCEPT
iptables -A OUTPUT -o lo -j ACCEPT
Allow Established and Related Incoming Connections
Allow established and related incoming traffic, so that the server will allow return traffic to outgoing connections initiated by the server itself:
iptables -A INPUT -m conntrack --ctstate ESTABLISHED,RELATED -j ACCEPT
Allow Established Outgoing Connections
Allow outgoing traffic of all established connections, which are typically the response to legitimate incoming connections:
iptables -A OUTPUT -m conntrack --ctstate ESTABLISHED -j ACCEPT
Internal to External
Assuming eth0 is your external network, and eth3 is your internal network, this will allow your internal to access the external:
iptables -A FORWARD -i eth3 -o eth0 -j ACCEPT
Drop Invalid Packets
Some network traffic packets get marked as invalid. Sometimes it can be useful to log this type of packet but often it is fine to drop them:
iptables -A INPUT -m conntrack --ctstate INVALID -j DROP
Block an IP Address
To block network connections that originate from a specific IP address, 1.1.1.1 for example:
iptables -A INPUT -s 1.1.1.1 -j DROP
If you want to reject the connection instead, which will respond to the connection request with a “connection refused” error, replace “DROP” with “REJECT”:
iptables -A INPUT -s 1.1.1.1 -j REJECT
Block Connections to a Network Interface
To block connections from a specific IP address, e.g. 1.1.1.1, to a specific network interface, e.g. eth0:
iptables -A INPUT -i eth0 -s 1.1.1.1 -j DROP
Allow All Incoming SSH
To allow all incoming SSH connections:
iptables -A INPUT -p tcp --dport 22 -m conntrack --ctstate NEW,ESTABLISHED -j ACCEPT
Allow Incoming SSH from Specific IP address or subnet
To allow incoming SSH connections from a specific IP address or subnet, specify the source:
iptables -A INPUT -p tcp -s 1.1.1.0/24 --dport 22 -m conntrack --ctstate NEW,ESTABLISHED -j ACCEPT
Allow Outgoing SSH
If your firewall OUTPUT policy is not set to ACCEPT, and you want to allow outgoing SSH connections—your server initiating an SSH connection to another server—you can run these commands:
iptables -A OUTPUT -p tcp --dport 22 -m conntrack --ctstate NEW,ESTABLISHED -j ACCEPT
Allow Incoming Rsync from Specific IP Address or Subnet
Rsync, which runs on port 873, can be used to transfer files from one computer to another:
iptables -A INPUT -p tcp -s 1.1.1.0/24 --dport 873 -m conntrack --ctstate NEW,ESTABLISHED -j ACCEPT
Allow All Incoming HTTP
To allow all incoming HTTP (port 80) connections:
iptables -A INPUT -p tcp --dport 80 -m conntrack --ctstate NEW,ESTABLISHED -j ACCEPT
Allow All Incoming HTTPS
To allow all incoming HTTPS (port 443) connections run these commands:
iptables -A INPUT -p tcp --dport 443 -m conntrack --ctstate NEW,ESTABLISHED -j ACCEPT
Allow All Incoming HTTP and HTTPS
If you want to allow both HTTP and HTTPS traffic, you can use the multiport module:
iptables -A INPUT -p tcp -m multiport --sports 80,443 -m conntrack --ctstate NEW,ESTABLISHED -j ACCEPT
Allow MySQL from Specific IP Address or Subnet
To allow incoming MySQL connections from a specific IP address or subnet:
iptables -A INPUT -p tcp -s 1.1.1.0/24 --dport 3306 -m conntrack --ctstate NEW,ESTABLISHED -j ACCEPT
Allow MySQL to Specific Network Interface
To allow MySQL connections to a specific network interface:
iptables -A INPUT -i eth3 -p tcp --dport 3306 -m conntrack --ctstate NEW,ESTABLISHED -j ACCEPT
Block Outgoing SMTP Mail
If your server shouldn’t be sending outgoing mail, you may want to block that kind of traffic:
iptables -A OUTPUT -p tcp --dport 25 -j REJECT
Allow All Incoming SMTP
To allow your server to respond to SMTP connections:
sudo iptables -A INPUT -p tcp --dport 25 -m conntrack --ctstate NEW,ESTABLISHED -j ACCEPT
Note: It is common for SMTP servers to use port 587 for outbound mail.
Allow All Incoming IMAP
To allow your server to respond to IMAP connections, port 143:
sudo iptables -A INPUT -p tcp --dport 143 -m conntrack --ctstate NEW,ESTABLISHED -j ACCEPT
Allow All Incoming IMAPS
To allow your server to respond to IMAPS connections, port 993:
sudo iptables -A INPUT -p tcp --dport 993 -m conntrack --ctstate NEW,ESTABLISHED -j ACCEPT
Allow All Incoming POP3
To allow your server to respond to POP3 connections, port 110:
sudo iptables -A INPUT -i -p tcp --dport 110 -m conntrack --ctstate NEW,ESTABLISHED -j ACCEPT
Allow All Incoming POP3S
To allow your server to respond to POP3S connections, port 995:
sudo iptables -A INPUT -p tcp --dport 995 -m conntrack --ctstate NEW,ESTABLISHED -j ACCEPT
Remove Blocked IP
Type the following command to list current IPs in tables:
 iptables -L -n
 iptables -L -n -v
 iptables -L chain-name -n -v
List existing chains with line number
To display line number along with other information, enter:
 iptables -L INPUT -n --line-numbers
 iptables -L OUTPUT -n --line-numbers
 iptables -L OUTPUT -n --line-numbers | less
 iptables -L chain-name -n -v --line-numbers
 iptables -L chain-name -n -v --line-numbers | grep 1.1.1.1
You will get the list of all blocked IP. Look at the number on the left, then use number to delete it. For example delete line number 10 (subner 1.1.0.0/16), enter:
iptables -D INPUT 10
You can also use the following syntax to delete / unblock an IP use the following syntax:
 iptables -D INPUT -s xx.xxx.xx.xx -j DROP
 iptables -D INPUT -s xx.xxx.xx.xx/yy -j DROP
 iptables -D chain-name -s 1.1.1.1 -d 0/0 -j DROP
 iptables -D chain-name -s 1.1.1.2/29 -d 0/0 -j DROP
Creating IPtables Policy
Implementing the Basic Firewall Policy
To implement firewall policy edit the /etc/iptables/rules.v4 and /etc/iptables/rules.v6 files. Open the rules.v4 file in your text editor:
nano /etc/iptables/rules.v4
Inside, you will see a file that looks something like this:
# Generated by iptables-save v1.4.21 on Tue Aug 30 21:15:50 2015
*filter
:INPUT ACCEPT [0:0]
:FORWARD ACCEPT [0:0]
:OUTPUT ACCEPT [0:0]
COMMIT
# Completed on Tue Aug 30 21:10:15 2015
Replace the contents with:
*filter
# Allow all outgoing, but drop incoming and forwarding packets by default
:INPUT DROP [0:0]
:FORWARD DROP [0:0]
:OUTPUT ACCEPT [0:0]

# Custom per-protocol chains
:UDP - [0:0]
:TCP - [0:0]
:ICMP - [0:0]

# Acceptable UDP traffic

# Acceptable TCP traffic
-A TCP -p tcp --dport 22 -j ACCEPT

# Acceptable ICMP traffic

# Boilerplate acceptance policy
-A INPUT -m conntrack --ctstate ESTABLISHED,RELATED -j ACCEPT
-A INPUT -i lo -j ACCEPT

# Drop invalid packets
-A INPUT -m conntrack --ctstate INVALID -j DROP

# Pass traffic to protocol-specific chains
## Only allow new connections (established and related should already be handled)
## For TCP, additionally only allow new SYN packets since that is the only valid
## method for establishing a new TCP connection
-A INPUT -p udp -m conntrack --ctstate NEW -j UDP
-A INPUT -p tcp --syn -m conntrack --ctstate NEW -j TCP
-A INPUT -p icmp -m conntrack --ctstate NEW -j ICMP

# Reject anything that's fallen through to this point
## Try to be protocol-specific w/ rejection message
-A INPUT -p udp -j REJECT --reject-with icmp-port-unreachable
-A INPUT -p tcp -j REJECT --reject-with tcp-reset
-A INPUT -j REJECT --reject-with icmp-proto-unreachable

# Commit the changes
COMMIT

*raw
:PREROUTING ACCEPT [0:0]
:OUTPUT ACCEPT [0:0]
COMMIT

*nat
:PREROUTING ACCEPT [0:0]
:INPUT ACCEPT [0:0]
:OUTPUT ACCEPT [0:0]
:POSTROUTING ACCEPT [0:0]
COMMIT

*security
:INPUT ACCEPT [0:0]
:FORWARD ACCEPT [0:0]
:OUTPUT ACCEPT [0:0]
COMMIT

*mangle
:PREROUTING ACCEPT [0:0]
:INPUT ACCEPT [0:0]
:FORWARD ACCEPT [0:0]
:OUTPUT ACCEPT [0:0]
:POSTROUTING ACCEPT [0:0]
COMMIT
Save and close the file.
You can test the file for syntax errors :
sudo iptables-restore -t /etc/iptables/rules.v4
Next, open the /etc/iptables/rules.v6 file to modify the IPv6 rules:
sudo nano /etc/iptables/rules.v6
We can block all IPv6 traffic by replacing the contents of the file with the below configuration:
*filter
:INPUT DROP [0:0]
:FORWARD DROP [0:0]
:OUTPUT DROP [0:0]
COMMIT

*raw
:PREROUTING DROP [0:0]
:OUTPUT DROP [0:0]
COMMIT

*nat
:PREROUTING DROP [0:0]
:INPUT DROP [0:0]
:OUTPUT DROP [0:0]
:POSTROUTING DROP [0:0]
COMMIT

*security
:INPUT DROP [0:0]
:FORWARD DROP [0:0]
:OUTPUT DROP [0:0]
COMMIT

*mangle
:PREROUTING DROP [0:0]
:INPUT DROP [0:0]
:FORWARD DROP [0:0]
:OUTPUT DROP [0:0]
:POSTROUTING DROP [0:0]
COMMIT
Save and close the file.
To test this file for syntax errors:
ip6tables-restore -t /etc/iptables/rules.v6
When both rules files report no syntax errors, you can apply the rules:
service iptables-persistent reload
This will immediately implement the policy outlined in your files. You can verify this by listing the iptables rules currently in use:
iptables -S
ip6tables -S
These firewall rules will be re-applied at each boot.
Create default policy using the IPTables command ?
iptables applies each of the rules immediately. Rule ordering is very important !
Creating a Protocol-Specific Chains
It is recommended to create protocol-specific chains to hold the rules that create exceptions to deny policy for exposed services:
iptables -N UDP
iptables -N TCP
iptables -N ICMP
Adding an exception to these chains is very. To add an exception for SSH traffic [Example]:
sudo iptables -A TCP -p tcp --dport 22 -j ACCEPT
Additional TCP services can be added by repeating the command above with the port number replaced.
General Purpose Accept and Deny Rules
The INPUT chain, where all incoming traffic begins filtering, is the perfect lace for general purpose rules. These rules are some common sense rules that set the baseline for firewall by accepting traffic that’s low risk (local traffic and traffic that’s associated with connections we’ve already checked) and dropping traffic that is clearly not useful (invalid packets).
To create an exception to accept all traffic that is part of an established connection or is related to an established connection:
iptables -A INPUT -m conntrack --ctstate ESTABLISHED,RELATED -j ACCEPT
This rule uses the conntrack extension, which provides internal tracking so that iptables has the context it needs to evaluate packets as part of larger connections instead of as a stream of discrete, unrelated packets. TCP is a connection-based protocol, so an established connection is fairly well-defined. For UDP and other connectionless protocols, established connections refer to traffic that has seen a response (the source of the original packet will the destination of the response packet, and vice versa). A related connection refers to a new connection that has been initiated in association with an existing connection. The classic example here is an FTP data transfer connection, which would be related to the FTP control connection that has already been established.
The local loopback interface should also be accepted. This is traffic generated by the server and destined for the server. It is used by services on the host to communicate with one another:
sudo iptables -A INPUT -i lo -j ACCEPT
Packets can be invalid for a number of reasons. They may refer to connections that do not exist, they may be destined for interfaces, addresses, or ports that do not exist, or they may simply be malformed. To deny all invalid packets:
iptables -A INPUT -m conntrack --ctstate INVALID -j DROP
Creating the Jump Rules to the Protocol-Specific Chains
After creating General Purpose Rules we need to direct traffic in the INPUT chain into the appropriate Protocol-Specific Chains. We can match on protocol type to send it to the right chain:
iptables -A INPUT -p udp -m conntrack --ctstate NEW -j UDP
iptables -A INPUT -p tcp --syn -m conntrack --ctstate NEW -j TCP
iptables -A INPUT -p icmp -m conntrack --ctstate NEW -j ICMP
Reject All Remaining Traffic
If a packet that was passed to a protocol-specific chain and did not match any of the rules, control should be passed back to the INPUT chain. Anything that reaches this point should not be allowed in by the firewall.
The REJECT target can specify the outbound messaging and mimic the response to the client. The response is dependent on the protocol used by the client.
Attempting to reach a closed UDP port will result in an ICMP “port unreachable” message:
sudo iptables -A INPUT -p udp -j REJECT --reject-with icmp-port-unreachable
Attempting to establish a TCP connection on a closed port results in a TCP RST response:
sudo iptables -A INPUT -p tcp -j REJECT --reject-with tcp-reset
and all other clients, should receive an ICMP “protocol unreachable” message to indicate that the server doesn’t respond to packets of that type:
sudo iptables -A INPUT -j REJECT --reject-with icmp-proto-unreachable
Adjusting Default Policies
Adding default policy to DROP as a precautionary measure
sudo iptables -P INPUT DROP
sudo iptables -P FORWARD DROP
sudo iptables -F, your current SSH connection will be dropped! Flushing with sudo iptables-persistent flush is a better way to clear rules since it will reset the default policy as well.Saving IPTables Rules
sudo service iptables-persistent save
This will overwrite your /etc/iptables/rules.v4 and /etc/iptables/rules.v6 files.