Automating the Deployment of a Scalable WordPress Site

Introduction
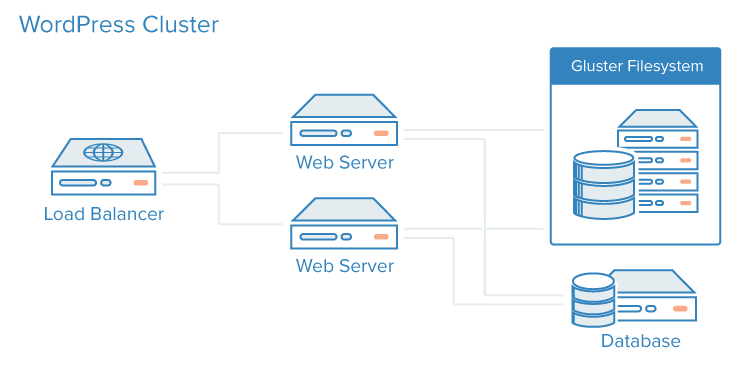
In this guide we will create and deploy a scalable WordPress instance consisting of a MySQL database server, a GlusterFS distributed filesystem, Nginx web servers and an Nginx load balancer. By using user-data and droplet meta-data we will automate the deployment of our site. Finally we will provide a Ruby script which will automate this entire process and ease the creation of scalable WordPress sites. Through this tutorial you will learn about the power and flexibility of user-data and droplet meta-data in deploying services on DigitalOcean.
Step One – Planning our Deployment
The deployment we create in this tutorial will consist of a single MySQL database server, multiple GlusterFS servers in a cluster, multiple Nginx web servers and a single Nginx load balancer.
Before we begin we should know:
- What size droplet we will use for our MySQL server
- How many GlusterFS nodes we will create
- What size our GlusterFS nodes will be
- How many web server nodes we will need
- What size droplets we will use for our web servers
- What size droplet we will use for our load balancer
- The domain name we will use for our new site
We can add additional nodes or scale up the nodes we created if we need to later. Once we have decided on these details we can begin deploying our site.
Step Two – Deploying MySQL
We will begin by deploying our MySQL server. To do this we will create a default Ubuntu 14.04 x64 droplet using the following user-data.
#!/bin/bash
export DEBIAN_FRONTEND=noninteractive;
export PUBLIC_IP=$(curl -s http://169.254.169.254/metadata/v1/interfaces/public/0/ipv4/address)
export PRIVATE_IP=$(curl -s http://169.254.169.254/metadata/v1/interfaces/private/0/ipv4/address)
apt-get update;
apt-get -y install mysql-server;
mysqladmin -u root create wordpress;
mysqladmin -u root password "mysql_password";
sed -i.bak "s/127.0.0.1/$PRIVATE_IP/g" /etc/mysql/my.cnf;
service mysql restart;
mysql -uroot -pmysql_password -e "CREATE USER 'wordpress'@'%' IDENTIFIED BY 'mysql_password'";
mysql -uroot -pmysql_password -e "GRANT ALL PRIVILEGES ON wordpress.* TO 'wordpress'@'%'";
This user-data script will perform the following functions on our new droplet:
First we export a variable which tells apt-get that we are running in non-interactive mode to prevent it from prompting for any input when it installs packages.
export DEBIAN_FRONTEND=noninteractive;
Next we use droplet meta-data to get the droplet’s public and private IP addresses and assign them to variables:
export PUBLIC_IP=$(curl -s http://169.254.169.254/metadata/v1/interfaces/public/0/ipv4/address)
export PRIVATE_IP=$(curl -s http://169.254.169.254/metadata/v1/interfaces/private/0/ipv4/address)
Note: Droplet Meta-Data is not available in NYC1, NYC2, and AMS1 at this time.
We then use apt to install the MySQL server.
apt-get update;
apt-get -y install mysql-server;
Now we need to create a new database called « wordpress »
mysqladmin -u root create wordpress;
Then we set a password for our MySQL root user.
mysqladmin -u root password "mysql_password";
Since our MySQL server will be accepting queries from our web servers we need to have it listen on the private IP address rather than only on localhost. To do this we will use sed to update the MySQL configuration file by doing a find and replace and then restart the service.
sed -i.bak "s/127.0.0.1/$PRIVATE_IP/g" /etc/mysql/my.cnf;
service mysql restart;
Finally we will create a new MySQL user called wordpress and give it permission to access the wordpress database.
mysql -uroot -pmysql_password -e "CREATE USER 'wordpress'@'%' IDENTIFIED BY 'mysql_password'";
mysql -uroot -pmysql_password -e "GRANT ALL PRIVILEGES ON wordpress.* TO 'wordpress'@'%'";
By deploying our new droplet with this user-data script we will have a configured MySQL server listening on it’s private IP address and with our configured database and user without ever logging in via ssh or the console.
Step Three – Deploying GlusterFS
Before deploying our GlusterFS cluster we need to decide how many nodes we will deploy. There are two variables that will go into this decision. First we need to decide how much space we need and then we need to decide on a replica setting to use. The replica setting tells GlusterFS how many copies of any file to store. For example, a replica setting of 2 will mean that every file is duplicated on at least 2 servers. This will cut our available storage in half since we are keeping two copies of each file but will provide improved redundancy. The number of GlusterFS nodes we create must be a multiple of our replica setting. For a cluster with a replica setting of 2 we will need to create our nodes in a multiple of 2 (so 2, 4, 6, or 8 nodes would be acceptable).
For this example we will deploy a 4 node GlusterFS cluster using a replica setting of 2.
For our first 3 nodes we will use the following user-data script:
#!/bin/bash
export DEBIAN_FRONTEND=noninteractive;
apt-get update;
apt-get install -y python-software-properties;
add-apt-repository -y ppa:gluster/glusterfs-3.5;
apt-get update;
apt-get install -y glusterfs-server;
Again, we first set the DEBIAN_FRONTEND variable so apt knows that we are running in non-interactive mode:
export DEBIAN_FRONTEND=noninteractive;
We then update our apt database and install python-software-properties which is needed to add the PPA for GlusterFS.
apt-get update;
apt-get install -y python-software-properties;
Next we will add the GlusterFS PPA so we can grab our deb packages.
add-apt-repository -y ppa:gluster/glusterfs-3.5;
Then we will update our apt database again and install glusterfs-server.
apt-get install -y glusterfs-server;
For our first three nodes this is all we need to do. Make a note of the private IP addresses assigned to each of these new droplets as we will need them when creating our final GlusterFS node and creating our volume.
For our final node we will use the following user-data script:
#!/bin/bash
export DEBIAN_FRONTEND=noninteractive;
export PRIVATE_IP=$(curl -s http://169.254.169.254/metadata/v1/interfaces/private/0/ipv4/address)
apt-get update;
apt-get install -y python-software-properties;
add-apt-repository -y ppa:gluster/glusterfs-3.5;
apt-get update;
apt-get install -y glusterfs-server;
sleep 30;
gluster peer probe node1_private_ip;
gluster peer probe node2_private_ip;
gluster peer probe node3_private_ip;
gluster volume create file_store replica 2 transport tcp node1_private_ip:/gluster node2_private_ip:/gluster node3_private_ip:/gluster $PRIVATE_IP:/gluster force;
gluster volume start file_store;
Note: If you do not want to enable replication you should not include the "replica" setting in your "volume create" command.
The first section of this user-data script is pretty similar to the one we used on the other GlusterFS nodes though we are assigning our new droplet’s private IP to the $PRIVATE_IP variable. Once glusterfs-server is installed though we do some additional work.
First our script will wait 30 seconds for the new glusterfs-server to start up and be available.
sleep 30
Then we probe the three GlusterFS droplets we created earlier in order to add all four to a cluster.
gluster peer probe node1_private_ip;
gluster peer probe node2_private_ip;
gluster peer probe node3_private_ip;
Next we will create our GlusterFS volume named « filestore » with a replica setting of 2 and including all four of our nodes. Since we wont know the IP address of our newest node yet we will use the $PRIVATEIP variable for it.
gluster volume create file_store replica 2 transport tcp node1_private_ip:/gluster node2_private_ip:/gluster node3_private_ip:/gluster $PRIVATE_IP:/gluster force;
Finally we will start the new volume to make it accessible from our clients:
gluster volume start file_store;
We now have a distributed filesystem where we can keep our WordPress files that will be accessible to all our web server nodes.
Step Four – Deploying Nginx Web Servers
Now that we have a database server and a distributed filesystem all set we can deploy our web servers. We will use the following user-data script to deploy our first Nginx web server node and configure our WordPress installation inside our GlusterFS volume.
#!/bin/bash
export DEBIAN_FRONTEND=noninteractive;
export PRIVATE_IP=$(curl -s http://169.254.169.254/metadata/v1/interfaces/private/0/ipv4/address)
apt-get update;
apt-get -y install nginx glusterfs-client php5-fpm php5-mysql;
sed -i s/;cgi.fix_pathinfo=1/cgi.fix_pathinfo=0/g /etc/php5/fpm/php.ini;
mkdir /gluster;
mount -t glusterfs gluter_node_private_ip:/file_store /gluster;
echo "gluster_node_private_ip:/file_store /gluster glusterfs defaults,_netdev 0 0" >> /etc/fstab;
mkdir /gluster/www;
wget https://raw.githubusercontent.com/ryanpq/do-wpc/master/default -O /etc/nginx/sites-enabled/default;
service nginx restart;
# Get WordPress Files
wget https://wordpress.org/latest.tar.gz -O /root/wp.tar.gz;
tar -zxf /root/wp.tar.gz -C /root/;
cp -Rf /root/wordpress/* /gluster/www/.;
cp /gluster/www/wp-config-sample.php /gluster/www/wp-config.php;
sed -i "s/'DB_NAME', 'database_name_here'/'DB_NAME', 'wordpress'/g" /gluster/www/wp-config.php;
sed -i "s/'DB_USER', 'username_here'/'DB_USER', 'wordpress'/g" /gluster/www/wp-config.php;
sed -i "s/'DB_PASSWORD', 'password_here'/'DB_PASSWORD', 'mysql_password'/g" /gluster/www/wp-config.php;
sed -i "s/'DB_HOST', 'localhost'/'DB_HOST', 'mysql_private_ip'/g" /gluster/www/wp-config.php;
chown -Rf www-data:www-data /gluster/www;
This script is a bit more complicated than our previous ones so lets break it down step by step.
First we will again set the DEBIANFRONTEND variable as we have in our previous scripts and populate our $PRIVATEIP variable.
export DEBIAN_FRONTEND=noninteractive;
export PRIVATE_IP=$(curl -s http://169.254.169.254/metadata/v1/interfaces/private/0/ipv4/address)
Next we will update our apt database and install Nginx, the glusterfs client, and the php libraries we will need.
apt-get update;
apt-get -y install nginx glusterfs-client php5-fpm php5-mysql;
Then we will use sed’s find and replace functionality to update our php.ini file and set the cgi.fixpathinfo variable to 0.
sed -i s/;cgi.fix_pathinfo=1/cgi.fix_pathinfo=0/g /etc/php5/fpm/php.ini;
Now we’ll create a folder called /gluster in the root of our disk image and mount our GlusterFS volume there. Then we will create an fstab entry so our GlusterFS volume is automatically mounted when the droplet boots.
mkdir /gluster;
mount -t glusterfs gluter_node_private_ip:/file_store /gluster;
echo "gluster_node_private_ip:/file_store /gluster glusterfs defaults,_netdev 0 0" >> /etc/fstab;
Then we will create a folder called www in our GlusterFS volume. This folder will act as our web root.
mkdir /gluster/www;
Next we will pull a new nginx configuration file from a remote server. This file will set our web root to /gluster/www and ensure nginx is configured to use PHP. You can view this configuration file here. Once we have replaced our nginx configuration file we will restart the service for this change to take effect.
wget https://raw.githubusercontent.com/ryanpq/do-wpc/master/default -O /etc/nginx/sites-enabled/default;
service nginx restart;
Now we will grab a copy of the latest version of WordPress, extract it and copy it’s contents to our new web root.
wget https://wordpress.org/latest.tar.gz -O /root/wp.tar.gz;
tar -zxf /root/wp.tar.gz -C /root/;
cp -Rf /root/wordpress/* /gluster/www/.;
Next we will copy the sample WordPress configuration file to wp-config.php
cp /gluster/www/wp-config-sample.php /gluster/www/wp-config.php;
And update it’s variables to match our new environment, again using sed’s find and replace function.
sed -i "s/'DB_NAME', 'database_name_here'/'DB_NAME', 'wordpress'/g" /gluster/www/wp-config.php;
sed -i "s/'DB_USER', 'username_here'/'DB_USER', 'wordpress'/g" /gluster/www/wp-config.php;
sed -i "s/'DB_PASSWORD', 'password_here'/'DB_PASSWORD', 'mysql_password'/g" /gluster/www/wp-config.php;
sed -i "s/'DB_HOST', 'localhost'/'DB_HOST', 'mysql_private_ip'/g" /gluster/www/wp-config.php;
And finally we will make sure that the files in our web root are owned by the user www-data which our nginx process will be running as.
chown -Rf www-data:www-data /gluster/www;
We now have our first web server node all set up and ready to receive requests.
Since each of our web server nodes shares the same GlusterFS volume for storage there are fewer steps for each additional node we create. For additional nodes we will use the following user-data script:
#!/bin/bash
export DEBIAN_FRONTEND=noninteractive;
export PRIVATE_IP=$(curl -s http://169.254.169.254/metadata/v1/interfaces/private/0/ipv4/address)
apt-get update;
apt-get -y install nginx glusterfs-client php5-fpm php5-mysql;
sed -i s/;cgi.fix_pathinfo=1/cgi.fix_pathinfo=0/g /etc/php5/fpm/php.ini;
mkdir /gluster;
mount -t glusterfs gluster_node_private_ip:/file_store /gluster;
echo "gluster_node_private_ip:/file_store /gluster glusterfs defaults,_netdev 0 0" >> /etc/fstab;
mkdir /gluster/www;
wget https://raw.githubusercontent.com/ryanpq/do-wpc/master/default -O /etc/nginx/sites-enabled/default;
service nginx restart;
For our additional web nodes we will still be installing the same packages, mounting our GlusterFS volume and replacing our Nginx configuration file but we will not need to do any setup of our WordPress instance since we did this when creating our first node.
Step Five – Deploying our Load Balancer
The final step in this deployment is to create our load balancer. We will be using another Nginx server for this purpose. To set up this node we will use the following user-data script:
#!/bin/bash
export DEBIAN_FRONTEND=noninteractive;
apt-get update;
apt-get -y install nginx;
lbconf="
server {
    listen 80 default_server;
    listen [::]:80 default_server ipv6only=on;

    root /usr/share/nginx/html;
    index index.php index.html index.htm;

    location / {
      proxy_pass  http://backend;
      include proxy_params;
    }

}

upstream backend  {
    ip_hash;
    server web_node_1_private_ip
    server web_node_2_private_ip
}
"
echo $lbconf > /etc/nginx/sites-enabled/default;
service nginx restart;
For our load balancer’s user-data script we will be building our Nginx configuration directly in the script. We start off much as we did with our other droplets by ensuring that apt knows we are running in non-interactive mode.
export DEBIAN_FRONTEND=noninteractive;
Then we will install Nginx:
apt-get update;
apt-get -y install nginx;
Next we will create our new nginx configuration in a variable called lbconf. Adding an entry for each of our web servers in the upstream backend section.
lbconf="
server {
    listen 80 default_server;
    listen [::]:80 default_server ipv6only=on;

    root /usr/share/nginx/html;
    index index.php index.html index.htm;

    location / {
      proxy_pass  http://backend;
      include proxy_params;
    }

}

upstream backend  {
    ip_hash;
    server web_node_1_private_ip
    server web_node_2_private_ip
}
"
We will then write the lbconf variable to our nginx configuration file, replacing it’s current content.
echo $lbconf > /etc/nginx/sites-enabled/default;
And finally, we’ll restart Nginx for this configuration to take effect.
service nginx restart;
Step Six – Setting up DNS
Now, before we access our new WordPress site via the browser we should set up a DNS entry for it. We will do this via the control panel.
In the DigitalOcean control panel click on DNS. In the Add Domain form enter your domain name and select your load balancer droplet from the drop-down menu, then click Create Domain.
In order to use the www subdomain for your site you will need to create another record in this new domain.
Click Add Record and choose the CNAME record type. In the name field enter www and in the hostname field enter @. This will direct requests for the www subdomain to the same location as your main domain (your load balancer droplet).
Step Seven – Configure WordPress
Now that we have launched all our droplets and configured our domain we can access our new WordPress site by visiting our newly configured domain in a web browser.

We will be prompted here to create a user account and give our new site a name. Once we have done this our deployment is complete and we can begin using the new site.
Automating the Process
Now that we can create our WordPress deployment without ever needing to ssh into a droplet we can take things a step further and automate this process using the DigitalOcean API.
A sample Ruby script has been created based on this tutorial which will prompt the user to provide the relevant details and then automatically deploy a new scablable WordPress instance. You can find this script on GitHub.
Next Steps
We now have a scalable WordPress deployment but there are additional steps we can take to ensure our new site is secure and stable.
- Set up a firewall on your droplets to prevent unauthorized access.
- Change your ssh port and restrict ssh access.
- Restrict access to your GlusterFS volume.
Source: DigitalOcean