HowTo: Make Ubuntu a Perfect Mac File Server and Time Machine Volume

 For quite some time I use my Ubuntu machine as a file and backup server for all Macs in my network which is perfectly accessible from the Finder in Mac OS X. There are some instructions available in the web for this task but all failed in my case so I wrote my own tutorial with all the steps needed for it to work properly.
So here’s my little Tutorial for connecting Mac OS X Leopard with Ubuntu and using your Ubuntu machine as a backup volume for Time Machine but all steps can be reproduced on every Linux box and they work with Mac OS X 10.4 Tiger too. At the end of this tutorial you will have a server which shows up in the Finder sidebar and behaves just like a Mac server when accessing it from your Macs. To be perfectly integrated with Mac OS X we’re going to use Apple’s Filing Protocol (AFP) for network and file sharing.
Although this Tutorial involves using the Terminal in Ubuntu and looks a bit geeky it’s very easy even for beginners. I have tried to explain all steps and Terminal commands so you may learn a bit about the Terminal too. At the end of the article you can download my Server Displays icon pack quickly made by me with custom icons for a Mac, Ubuntu and Windows server.
Personally I use a fresh installation of Ubuntu 8.04 Hardy Heron Desktop version (32bit on one machine, 64bit on the other) and Mac OS X Leopard (10.5.3 and later) to connect to them. On my Ubuntu boxes there’s no other file sharing protocol like samba (Windows sharing) or NFS activated.
Rumors are Apple will add some undocumented AFP commands with the Mac OS X 10.5.6 update which therefor won’t be supported by the current Netatalk package (and maybe never will). So be sure to check the latest comments on this article when the 10.5.6 update is out to see if this rumor is true and if there are problems caused by that.
Here are the steps involved in setting up your Ubuntu box as a Mac file server:
- Modify and install Netatalk (Open Source AFP implementation)
- Configure Netatalk
- Configure shared volumes (and Time Machine volume)
- Install Avahi (Open Source Bonjour implementation)
- Configure Avahi and advertise services
- Configure TimeMachine
- Conclusion, Problems and more informations
- Downloading and using the Server Display Icons
- Translations Of This Article
1. Modify and install Netatalk
 Netatalk is the Open Source implementation of AFP. Mac OS X requires encryption to work properly but the standard package of
 netatalk provided in the Ubuntu repositories doesn’t include this feature. So we have to build our own netatalk package from the sources with the encryption feature enabled.
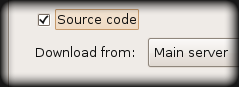
First you have to enable the Source Code repositories via System > Administration > Software Sources under the Ubuntu Software tab. Check the Source Code Box, click Close and choose Reload in the next dialogue.
Alessandro has built a nice .deb package for i386 machines. Although written in italian you can follow the necessary code snippets for installing this package in his blog post. If the install package works for you just skip the following self compiling process and head over to the Configure Netatalk section.
Now fire up your Terminal under Applications > Accessories and execute the following lines (separately). You have to type Y for yes when Terminal asks you if it should continue:
sudo apt-get build-dep netatalk
sudo apt-get install cracklib2-dev fakeroot libssl-dev
sudo apt-get source netatalk
cd netatalk-2*
Now you have downloaded the source code of Netatalk to your home folder, installed some required packages for building Netatalk and changed the directory to the downloaded folder.
Next you have to build the Netatalk package with the encryption option enabled:
sudo DEB_BUILD_OPTIONS=ssl dpkg-buildpackage -rfakeroot
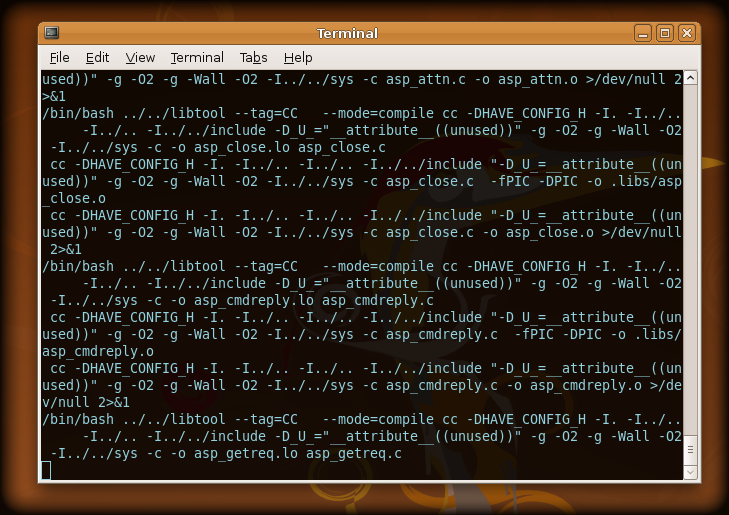
Depending on your hardware this may take a while but you can enjoy the geeky build output in your Terminal:
If everything went through without errors (except the signing warnings, can be ignored) you can install the recently created package:
sudo dpkg -i ~/netatalk_2*.deb
To stop Ubuntu from overwriting your custom Netatalk package you should set its state to hold. This will cause the Netatalk package being grayed out in the Software Update dialogue:
echo "netatalk hold" | sudo dpkg --set-selections
Now you have successfully build and installed your custom Netatalk package which now has support for encrypted logins. Now let’s configure the whole thing.
2. Configure Netatalk
First you should deactivate services provided by Netatalk which are not needed if you just want to use your Ubuntu box for file sharing. This will speed up the response and startup time of Netatalk dramatically. For instance Netatalk starts the old AppleTalk protocol by default which is just needed for pre OS X systems. So we’re going to use the graphical editor gedit for stopping unneeded services:
sudo gedit /etc/default/netatalk
gedit should pop up with the defined file loaded as superuser (needed for saving). Find the “#Set which daemons to run” part and replace the default values with these to enable just AFP and disable all unneeded services. Let the cnid_meta daemon run too and if you want to share your Linux connected printer with your Mac also enable the pap daemon (set to yes):
ATALKD_RUN=no
PAPD_RUN=no
CNID_METAD_RUN=yes
AFPD_RUN=yes
TIMELORD_RUN=no
A2BOOT_RUN=no
Here it’s very important to run the cnid_meta daemon because this service will handle all the metadata for us (namely the reosurce fork) which would get lost due to the fact that your Linux box isn’t formatted as Apple’s HFS . If you’re interested what the other services could do: atalkd is the AppleTalk daemon (pre-OSX file sharing, old printing), timelord can make your Linux box a network time server and please don’t ask me for what a2boot is good for (If you know it, post it in the comments please / Kelly suggests it’s a netboot server for client Macs).
Press Ctrl S to save the document or choose File > Save. Next we have to edit the main config file for AFP sharing called afpd.conf:
sudo gedit /etc/netatalk/afpd.conf
Scroll to the very bottom of the document and add this to the bottom (replace the whole line in case there’s already one). This is one line so be sure that there’s no line break in your afpd.conf file:
-transall -uamlist uams_randnum.so,uams_dhx.so -nosavepassword -advertise_ssh
Press Ctrl S to save the document or choose File > Save.
3. Configure shared Volumes
 Now we have to tell the
 afpd daemon what Volumes to share. This is defined in the AppleVolumes.default file inside /etc/netatalk/. The following line will open this file in the gedit editor with superuser privileges (required for saving) where we can define our shared volumes:
sudo gedit /etc/netatalk/AppleVolumes.default
Scroll to the bottom of the document and define your Volume shares. By adding the following line you will share each users home directory with the user name as the Volume name. To make things more secure you can define all users who are allowed to connect to your Ubuntu box via AFP:
~/ "$u" allow:username1,username2 cnidscheme:cdb
Because we want to use the Ubuntu machine as a backup server for Time Machine you should define a second volume just for Time Machine. Create a new folder in your home directory first and name it TimeMachine (or anything you like). Then add the following line to your AppleVolumes.default. This is one line so be sure that there’s no line break in your AppleVolumes.default file:
/home/username/TimeMachine TimeMachine allow:username1,username2 cnidscheme:cdb options:usedots,upriv
Thanks to tsanga for pointing out the usedots and upriv options. The usedots option is required if you want to use invisible files and folders (those starting with a dot in the name). Otherwise afpd would encode them as :2e which is bad if you have to use invisible files (like .htaccess). If you’re on Leopard and have no Tiger installed Macs in your network or mixed OS X versions in your network you should use the upriv option which adds support for AFP3 unix privileges. If you have Macs with Tiger installed just use options:usedots to avoid unexpected behavior:
/home/username/TimeMachine TimeMachine allow:username1,username2 cnidscheme:cdb options:usedots
Finally if you want more stability and can accept slower file transfers you can use the dbd cnidscheme (cnidscheme:dbd).
Press Ctrl S to save the document or choose File > Save. Of course you can define every folder you like or even an attached USB disk. Just define the correct path. External drives in Ubuntu should be found under /media
Finally restart Netatalk to activate the changes:
sudo /etc/init.d/netatalk restart
Although we now have a fully configured AFP file server it will not show up in the Finder sidebar on Mac OS X Leopard (but it’s reachable via Go > Connect to Server… in the Finder). Macs use a service called Bonjour for the sidebar thing (and for a lot of other cool stuff) and on the Linux side we can have this functionality with the Open Source implementation of Bonjour, called Avahi.
4. Install Avahi
 So the Avahi daemon will advertise all defined services across your network just like Bonjour do. So let’s install the avahi daemon and the mDNS library used for imitating the Bonjour service. When fully configured this will cause all Macs in your network to discover your Ubuntu box automatically:
sudo apt-get install avahi-daemon
sudo apt-get install libnss-mdns
To make everything work properly you have to edit the nsswitch.conf file:
sudo gedit /etc/nsswitch.conf
Just add “mdns” at the end of the line that starts with “hosts:”. Now the line should look like this:
hosts: files mdns4_minimal [NOTFOUND=return] dns mdns4 mdns
Press Ctrl S to save the document or choose File > Save.
5. Configure Avahi and advertise services
Next we have to tell Avahi which services it should advertise across the network. In our case we just want to advertise AFP sharing. This is done by creating a xml-file for each service inside /etc/avahi/services/ following a special syntax. Let’s create a xml-file for the afpd service with the following line:
sudo gedit /etc/avahi/services/afpd.service
A blank document should open in gedit. Now paste the following into the document and save the file by pressing Ctrl S or by choosing File > Save:
<?xml version="1.0" standalone='no'?><!--*-nxml-*-->
<!DOCTYPE service-group SYSTEM "avahi-service.dtd">
<service-group>
    <name replace-wildcards="yes">%h</name>
    <service>
        <type>_afpovertcp._tcp</type>
        <port>548</port>
    </service>
    <service>
        <type>_device-info._tcp</type>
        <port>0</port>
        <txt-record>model=Xserve</txt-record>
    </service>
</service-group>
update: The last part is used to assign a specific (Apple) hardware model to your Linux box. In this example your server will be advertised as an XServe and will be shown with this icon in the Finder sidebar. This will come in handy when you want to use your own icon for it or the one’s made by me provided within this article. Thanks to Simon Wheatley for figuring this out. Additionally you can use these models in this file: RackMac (same as Xserve), PowerBook, PowerMac, Macmini, iMac, MacBook, MacBookPro, MacBookAir, MacPro, AppleTV1,1, AirPort
Finally restart the avahi daemon to activate all changes:
sudo /etc/init.d/avahi-daemon restart
Now you have configured the Avahi daemon to advertise AFP sharing across your network which will cause your Ubuntu box to show up in Finder’s sidebar in Mac OS X Leopard. In Mac OS X 10.4 Tiger your Ubuntu server should now be visible under Network.
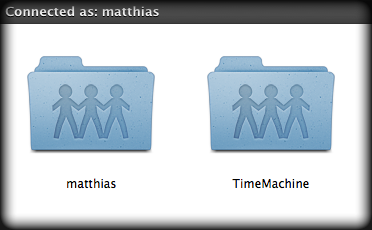
Now you’re done with setting up AFP file sharing on your Ubuntu box and advertising it across the network for Finder’s sidebar. Check if everything works as intended by clicking on your Ubuntu server in Finder and clicking on the “Connect As” button. Enter your username and password (the ones you’re using on your Ubuntu machine) and you should see the Volumes we defined earlier with the AppleVolumes.default file:
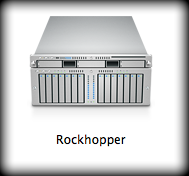
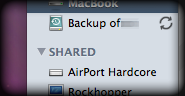
 Another side effect of using AFP is that your Ubuntu box will show up as a nice Apple Cinema Display icon instead of the BSOD windows icon. Here you see my Ubuntu server showing up in Finder as Rockhopper:
 update: If you’ve followed the revised version of this article your Linux box should now be represented by a Xserve icon in Finder:
6. Configure Time Machine
 update 07/14/2008: On the Mac side you have to enable the option to use network volumes as Time Machine drives first. Without it your freshly shared and advertised network volume won’t show up in the disk selection dialogue in Time Machine. This is a hidden option not accessible via the graphical user interface so you have to copy & paste this in Terminal (it’s one line):
defaults write com.apple.systempreferences TMShowUnsupportedNetworkVolumes 1
Thanks to FoolsRun and tsanga for pointing this out in the comments
Now just mount the “TimeMachine” Volume first and choose it as a backup disk in the Time Machine system preferences. Time Machine will create a sparsebundle disk image inside the volume and mounts that too. This is needed because the hard drive on your Ubuntu box is formatted as ext3 or Reiserfs and not the native Mac format HFS . Because Time Machine backups everything to the disk image all metadata (like creation dates etc.) will be preserved.
When your first Time Machine backup is done you can remove all Volumes and the next time Time Machine starts it will automagically mount the disk image from your TimeMachine volume on your Ubuntu box without mounting the whole TimeMachine volume:
7. Conclusion, Problems and more informations
You see that Linux and Ubuntu can be configured to behave like Macs in your network. But it’s sad, that you have to fire up the Terminal to achieve this. I hope especially the Ubuntu team will simplify this in future versions. Another sad thing is that Ubuntu is missing a useful avahi/Bonjour and AFP implementation for Nautilus, the file manager. So there’s no way to access your Mac from Ubuntu via AFP in the file manager. In my network I use SSH to access the Macs from Ubuntu or Linux by allowing Remote Login on the Macs in the Sharing preferences. But there’s a command line based AFP client available called afps-ng which uses the FUSE system.
Some other strategies of connecting Ubuntu/Linux and Mac OS X would involve sharing via Samba (Windows sharing) or NFS but according to my experiences nothing beats the speed, stability and secureness of AFP.
But if you’re interested you can have a look at this post on the ubuntuforums to learn how to setup NFS for file sharing between Ubuntu and Mac OS X Leopard.
Although I have checked all log files while using file sharing and especially while Time Machine is running and found no errors or warnings I cannot guarantee it’s working without errors or backup data loss on your system too. So I encourage you to check the system logs on Ubuntu AND on Mac OS X with the Console app in your Utilities folder. If you see no errors or warnings this configuration should be pretty bullet proof in terms of stability.
Finally the only problem remaining is that your Ubuntu or Linux box isn’t formatted as journaled HFS so some scenarios would fail or make problems. This can include having your iTunes, iPhoto or Aperture library on your Ubuntu server. But the cnid_meta daemon will always try handle that for us. This will cause some hidden folders to show up in Ubuntu which are used to store all the metadata required to almost reproduce a HFS file system. But if you ever run into problems you can easily resolve these by creating sparse disk images on your server with the Disk Utility built into Mac OS X. Just create a new sparse disk image on your desktop, copy it to your mounted Ubuntu volume and mount the copied disk image by double clicking it. Now you can put all the files and libraries in it which depends on HFS
Problems with creating the backup disk image
If time Machine says “The backup disk image could not be created” during the first backup attempt you can do the following to avoid this problem and some others (backup fail due to permissions):
In short, you have to create the backup disk image on your Desktop and copy it to your mounted Time Machine volume. But Time Machine creates a unique filename for the disk image and we can find out this name with a little trick:
First open up the Console from your Applications > Utilities folder and open the Time Machine preferences. In Time Machine preferences set your backup volume back to none. After that reselect your mounted Time Machine volume. The counter should start and Time Machine’s big button will change to on. When the backup tries to start and fail have a look at your Console (Click All Messages in the sidepane). There should be a line telling you the name of the disk image:
Creating disk image /Volumes/TimeMachine/computername_0014e3856bd0.sparsebundle
The computername should be the name you have assigned to your Mac. Now just click on that line and hit command C to copy the message.
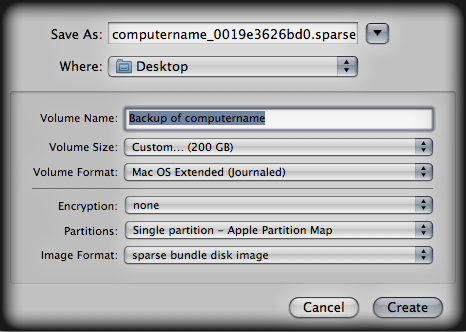
Now Open Disk Utility from your Applications > Utilities folder and click on New Image in the toolbar. Now just hit Command V in the Save As field and remove everything before the name of the sparsebundle.
The secret number Time Machine adds to your computer name is nothing more than the MAC address of the network device that your Mac uses to talk to your server, as Simulacrum and Todd found out in the comments. As he points out you can open up Network Utility and under the info tab you’ll find a field called “Hardware Address”. Just remove the colons and you have the number Time Machine adds to the disk image name.
In the field volume name write Backup of computername. Now FIRST chose sparse bundle disk image as the image format and THEN adjust the volume size to the size of your internal harddrive (minimum, choose more if you like) afterwards. Remember that Disk Utility won’t let you make a bigger image file as you have physical hard drive space available if you don’t chose sparse bundle disk image as the image format first. For reference have a look at this screenshot:
Select your Desktop as destination and click create. After the creation is finished drag the created disk image to your mounted Time Machine volume (you can delete the disk image on your desktop when copy is finished). Finally go to Time Machine preferences and start your backup again and everything should work as expected now. After the first backup (this can take a long time depending on your harddrive) you can unmount your Time Machine volume and the next time Time Machine starts it will grab and mount the sparse bundle disk image automatically (with “Backup of computername” as the volume name).
Firewall Settings
As Kevin points out in the comments you would have to adjust any firewall you use. But the standard Ubuntu installation won’t use any Firewall.
In short you have to allow communications over port 548 and 5353.
“Connection Failed”
If you get one of those errors:
Connection Failed - There was an error connection to the server. Check the server name or IP address and try again
or
There was an error connecting to the server. Check the server name or IP address and try again. If you are unable to resolve the problem contact your system administrator.
you should first be sure you have either no firewall on your Ubuntu box in use or have it configured to allow AFP communications as suggested in the above paragraph.
Remember that this error can be caused by a myriad of problems and just a lot of other configurations on your side. So you should try a minimal way: On my Ubuntu boxes I have no other file sharing protocol like samba or NFS enabled (even not installed) so the samba hostname and the AFP hostname can’t interfere with each other. Also I’ve left the Workgroup field blank under System > Administration > Network > General tab.
If you still can’t connect to your Ubuntu box you can edit your /etc/hosts file as I’ve pointed out in the comments:
sudo gedit /etc/hosts
Add the following two lines at the very top of the file.
127.0.0.1 localhost
127.0.1.1 Rockhopper.local Rockhopper
My server is named Rockhopper, adjust the name according to your server name. There should be some sort of name already but the important part here is the servername.local which is the AFP way of server names. If there are any other numbers at the beginning in your file leave them as they are.
If that won’t solve the connection problems you can test out Eric’s solution as suggested in the comments which would involve removing and reinstalling netatalk.
Sorry I can’t give you any other solutions for that but in most cases it’s some sort of network misconfiguration outside of netatalk or avahi and on Linux these can be a lot of configurations on your side I can’t know of. And since I’m not able to reproduce these errors I can’t investigate in them.
But for those people still having problems with these error messages: On Mac OS X have a look in the Console app inside your Utilities folder. Click on “All Messages” in the left sidebar, try to connect to your Ubuntu box in Finder and see the messages in Console. These are the “real” error messages which normally will lead you to a solution.
-5014 error
Some people have problems when connecting to an AFP share and get a -5014 error. As J5 pointed out in the comments you have to delete the hidden .AppleDB folders on your Ubuntu box and restart netatalk afterwards:
sudo /etc/init.d/netatalk restart
Time Machine Full System Restore
In case of a full system restore you would have to boot your Mac from the Mac OS X installation DVD (the one delivered with your Mac) by pressing the c key during boot. Your Mac will start with a minimal UI where you have a Utilities section in the top menu bar. There you’ll find “Restore from a Time Machine Backup” but it won’t find your network share with your Time Machine backup. Luckily Dmitry Nedospasov found a way to manage this by simply mounting your Time Machine network share with the Terminal (which you can find under Utilities in the menu bar too) by utilizing the following syntax (shamelessly copied from Dmitry):
mount -t afp afp://username:password@hostname/ShareName /Volumes/ShareMount
Replace everything instead of /Volumes with your matching names. You can test if your network share was properly mounted by doing
ls /Volumes
which outputs the content of the Volumes folder and you should see your network share.
Now you can close the Terminal and select “Restore from Time Machine Backup” from the Utilities entry in the menu bar and select your mounted Time Machine backup and thats it. Oh, needless to say: a gigabit ethernet connection will speed things up dramatically even compared to n-WLAN.
Netatalk backup disk reaching maximum capacity
As Seron pointed out in the comments, there is some discussion on the net regarding problems with Netatalk and TimeMachine when the backup disk reaches maximum capacity. This is due to missing support for the AFP commands FPSyncDir aka commands 78 and 78 in Netatalk. As a commenter in an ArsTechnica forum says: “As soon as your backup volume will reach max capacity, it will self destruct because of it.”
In the forum you’ll also find some links to various patches to avoid problems with that. If you have tested such patch please post your experiences in the comments for this article.
More Articles
- In case you want to connect your iPhone via AFP: An AFP Server on your iPhone. This uses the Netatalk package too
- Netatalk 2.0 manual
- All possible AppleVolumes.default options (part of the Netatalk manual)
- Overview and templates about services Avahi can advertise
- In-depth article about Sparse Bundle disk images
- How-to: Get files off a Time Machine backup without using your Mac: In case you have to access Time Machine backups from Ubuntu or any other Linux system
- Using NetBSD, with guest account: Johannes laid down the steps to use NetBSD instead of Ubuntu.
8. Downloading and using the Server Display Icons
 I’ve quickly crafted a custom icon for your Ubuntu server. It’s the Apple Cinema Display with the default wallpaper of Ubuntu 8.04 called Hardy Heron. Additionally I’ve included an icon with the default Leopard and the default Vista wallpaper to represent your Leopard and Windows server too (The default Mac server icon uses the old Tiger wallpaper).
Here you can see the icons included in the Server Displays icon pack:

Because I’ve just modified Apple’s standard icons these icons are just available via this blog post and they will not show up in my Goodies section. Just download the whole package directly via this link.
How to use the icons
In the avahi configuration part in this article you have assigned the Xserve device info to your afpd.service file. All you have to do is to replace the generic Xserve icon (or whatever model you have assigned in your afpd.service file) with an icon from this icon package. Just rename the Ubuntu Server.icns to com.apple.xserve.icns and navigate to
/System/Library/CoreServices/CoreTypes.bundle/Contents/Resources
Drag & drop the renamed file into this path and replace the generic icon (making a backup before doing that is a good idea) and after a logout all your avahi advertised Ubuntu servers should be displayed with the new icon (assuming that you assigned a device model in avahi).
If you’ve used another model in your afpd.service file, browse the Resources of CoreTypes.bundle to get to know the correct filename for the device icon and replace that file.
As for the Windows Vista server icon: Just rename the Windows Server.icns file to public.generic-pc.icns and navigate to
/System/Library/CoreServices/CoreTypes.bundle/Contents/Resources
Now drag & drop the renamed file into this path and replace the generic icon (making a backup before doing that is a good idea) and after a logout all your Windows servers should be displayed with the new icon.
update: A solution for the icon problem is here: Simon Wheatley figured out how to assign a different icon to your avahi advertised Linux box. All you have to do is assigning a device info part at the end of the avahi service file for AFP. I’ve updated this article to include this part. Please head back to the Configure Avahi and advertise services part in this article and edit your afpd.service file again if you’ve followed the first revision of this article.
![]()
![]() Congratulations! You finally arrived at the end of my article. There’s a good chance that your coffee or tea cup is now empty. But before making your next coffee you should share this article on your favorite social website. Your vote is highly appreciated! After you’ve finished voting and making your next coffee or tea you could subscribe to my RSS-Feed, discuss this article or buy me my next coffee.
Congratulations! You finally arrived at the end of my article. There’s a good chance that your coffee or tea cup is now empty. But before making your next coffee you should share this article on your favorite social website. Your vote is highly appreciated! After you’ve finished voting and making your next coffee or tea you could subscribe to my RSS-Feed, discuss this article or buy me my next coffee.
Source: kremalicious.com