How to enable SSL for MySQL server and client with ssh

MySQL secure SSH
When users want to have a secure connection to their MySQL server, they often rely on VPN or SSH tunnels. Yet another option for securing MySQL connections is to enable SSL wrapper on an MySQL server. Each of these approaches has its own pros and cons. For example, in highly dynamic environments where a lot of short-lived MySQL connections occur, VPN or SSH tunnels may be a better choice than SSL as the latter involves expensive per-connection SSL handshake computation. On the other hand, for those applications with relatively few long-running MySQL connections, SSL based encryption can be reasonable. Since MySQL server already comes with built-in SSL support, you do not need to implement a separate security layer like VPN or SSH tunnel, which has their own maintenance overhead.
The implementation of SSL in an MySQL server encrypts all data going back and forth between a server and a client, thereby preventing potential eavesdropping or data sniffing in wide area networks or within data centers. In addition, SSL also provides identify verification by means of SSL certificates, which can protect users against possible phishing attacks.
In this article, we will show you how to enable SSL on MySQL server. Note that the same procedure is also applicable to MariaDB server.
Creating Server SSL Certificate and Private Key
We have to create an SSL certificate and private key for an MySQL server, which will be used when connecting to the server over SSL.
First, create a temporary working directory where we will keep the key and certificate files.
$ sudo mkdir ~/cert
$ cd ~/cert
Make sure that OpenSSL is installed on your system where an MySQL server is running. Normally all Linux distributions have OpenSSL installed by default. To check if OpenSSL is installed, use the following command.
$ openssl version
OpenSSL 1.0.1f 6 Jan 2014
Now go ahead and create the CA private key and certificate. The following commands will create ca-key.pem and ca-cert.pem.
$ openssl genrsa 2048 > ca-key.pem
$ openssl req -sha1 -new -x509 -nodes -days 3650 -key ca-key.pem > ca-cert.pem
The second command will ask you several questions. It does not matter what you put in these field. Just fill out those fields.
The next step is to create a private key for the server.
$ openssl req -sha1 -newkey rsa:2048 -days 730 -nodes -keyout server-key.pem > server-req.pem
This command will ask several questions again, and you can put the same answers which you have provided in the previous step.
Next, export the server’s private key to RSA-type key with this command below.
$ openssl rsa -in server-key.pem -out server-key.pem
Finally, generate a server certificate using the CA certificate.
$ openssl x509 -sha1 -req -in server-req.pem -days 730 -CA ca-cert.pem -CAkey ca-key.pem -set_serial 01 > server-cert.pem
Configuring SSL on MySQL Server
After the above procedures, we should have a CA certificate, a server’s private key and its certificate. The next step is to configure our MySQL server to use the key and certificates.
Before configuring the MySQL server, check whether the SSL options are enabled or disabled. For that, log in to the MySQL server, and type the query below.
mysql> SHOW GLOBAL VARIABLES LIKE 'have_%ssl';
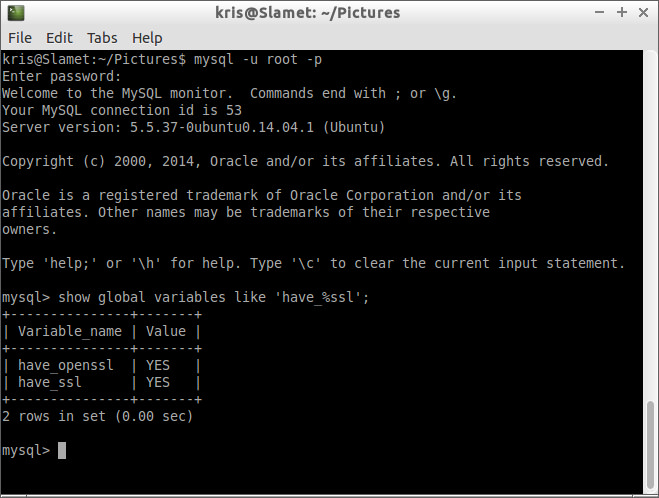
The result of this query will look like the following.

Note that the default value of ‘have_openssl’ and ‘have_ssl’ variables is ‘disabled’ as shown above. To enable SSL in the MySQL server, go ahead and follow the steps below.
1. Copy or move ca-cert.pem, server-cert.pem, and server-key.pem under /etc directory.
$ sudo mkdir /etc/mysql-ssl
$ sudo cp ca-cert.pem server-cert.pem server-key.pem /etc/mysql-ssl
2. Open my.cnf of the server using a text editor. Add or un-comment the lines that look like below in [mysqld] section. These should point to the key and certificates you placed in /etc/mysql-ssl.
[mysqld]ssl-ca=/etc/mysql-ssl/ca-cert.pemssl-cert=/etc/mysql-ssl/server-cert.pemssl-key=/etc/mysql-ssl/server-key.pem
3. In my.cnf, also find « bind-address = 127.0.0.1« , and change it to:
bind-address = *
That way, you can connect to the MySQL server from another host.
4. Restart MySQL service.
$ sudo service mysql restart
or:
$ sudo systemctl restart mysql
or:
$ sudo /etc/init.d/mysql restart
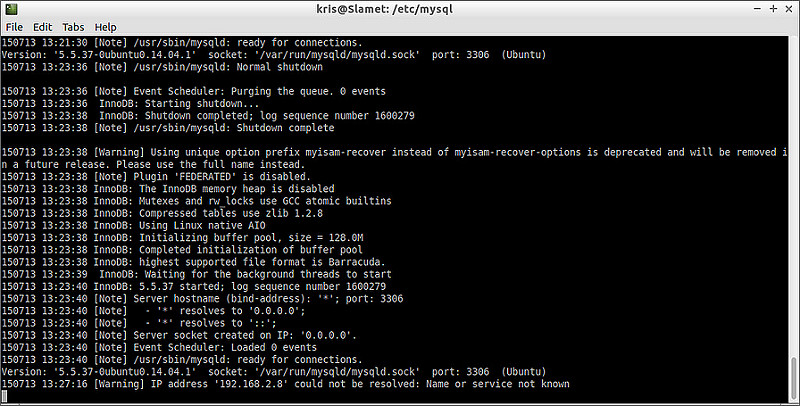
You can check whether the SSL configuration is working or not by examining the MySQL error log file (e.g., /var/log/mysql/mysql.log). If no warning or error is shown in the error log (like the screenshot below), it means that SSL configuration works okay.
Another way to verify SSL configuration is by re-running the ‘have_%ssl’ query inside the MySQL server.
mysql> SHOW GLOBAL VARIABLES LIKE 'have_%ssl';
Creating a User with SSL Privilege
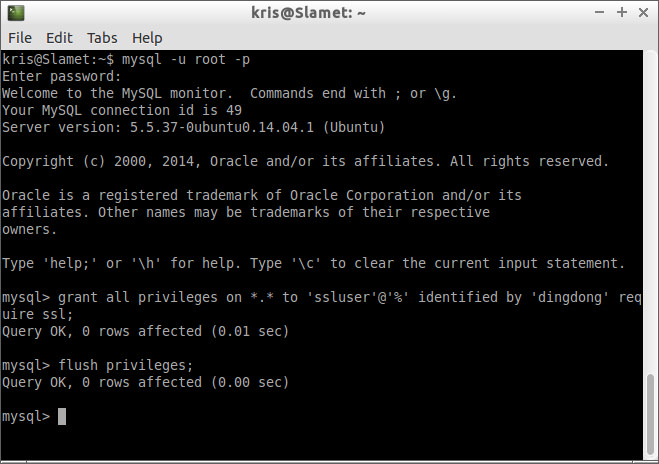
After the server-side SSL configuration is finished, the next step is to create a user who has a privilege to access the MySQL server over SSL. For that, log in to the MySQL server, and type:
mysql> GRANT ALL PRIVILEGES ON *.* TO ‘ssluser’@’%’ IDENTIFIED BY ‘dingdong’ REQUIRE SSL;
mysql> FLUSH PRIVILEGES;
Replace ‘ssluser’ (username) and ‘dingdong’ (password) with your own.
If you want to give a specific ip address (e.g., 192.168.2.8) from which the user will access the server, use the following query instead.
mysql> GRANT ALL PRIVILEGES ON *.* TO ‘ssluser’@’192.168.2.8’ IDENTIFIED BY 'dingdong' REQUIRE SSL;
mysql> FLUSH PRIVILEGES;
Configure SSL on MySQL Client
Now that MySQL server-side configuration is done, let’s move to the client side. For MySQL client, we need to create a new key and certificate based on server’s CA key and certificate.
Run the following commands on the MySQL server host where the server’s CA key and certificate reside.
$ openssl req -sha1 -newkey rsa:2048 -days 730 -nodes -keyout client-key.pem > client-req.pem
Similar to server-side configuration, the above command will ask several questions. Just fill out the fields like we did before.
We also need to convert the generated client key into RSA type as follows.
$ openssl rsa -in client-key.pem -out client-key.pem
Finally we need to create a client certificate using the server’s CA key and certificate.
$ openssl x509 -sha1 -req -in client-req.pem -days 730 -CA ca-cert.pem -CAkey ca-key.pem -set_serial 01 > client-cert.pem
Now transfer the ca-cert.pem, client-cert.pem, and client-key.pem files to to any host where you want to run MySQL client.
On the client host, use the following command to connect to the MySQL server with SSL.
$ mysql --ssl-ca=ca-cert.pem --ssl-cert=client-cert.pem --ssl-key=client-key.pem -h <mysql-server-ip-address> -u ssluser -p
After typing the ssluser‘s password, you will see the MySQL prompt as usual.
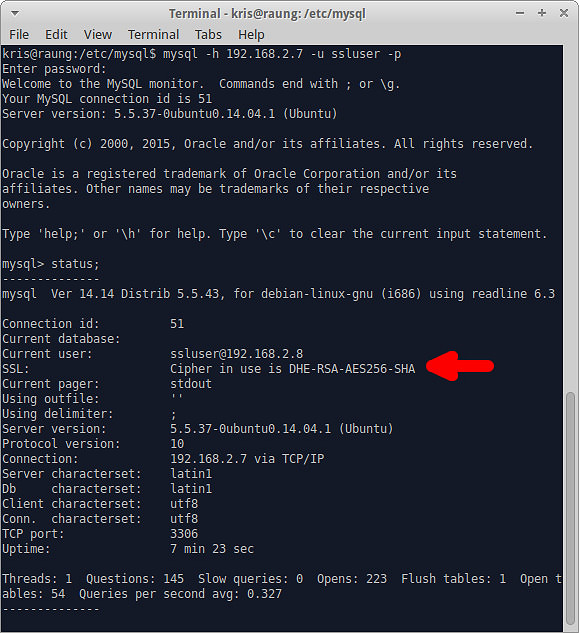
To check whether you are on SSL, type status command at the prompt.
mysql> status;
If you are connected over SSL, it will show you the cipher information in the SSL field as shown below.
If you do not want to specify client certificate and key information in the command line, you can create ~/.my.cnf file, and put the following information under [client] section.
[client]ssl-ca=/path/to/ca-cert.pemssl-cert=/path/to/client-cert.pemssl-key=/path/to/client-key.pem
With that, you can simply use the following command line to connect to the server over SSL.
$ mysql -h <mysql-server-ip-address> -u ssluser -p
Source: Xmodulo