How-To Factory Reset MacBook Air and other macs with macOS

There are many reasons why you’d want to reset your MacBook Air to factory settings. Perhaps your Mac is showing just a too much little lag. Maybe you want to reset for better overall performance, are thinking of giving away or selling your MacBook after you purchase or receive the latest Mac model. For whatever reason, you need to set your Mac back to its factory defaults.

Since our Macs hold so much of our personal and private data, it’s imperative to clean out our machines when selling or giving away our favorite older Macs. And it’s particularly useful for the new user to have a nice clean machine that’s returned to its native factory state.
Checklist Before You Start ANY Factory Reset
Resetting to High Sierra? Or using APFS?
High Sierra uses Apple’s latest file system called APFS. Many users have encountered problems when resetting their Macs and MacBooks to High Sierra and APFS. In particular, they report getting the error message “Could not create a Preboot Volume for APFS install.”
Since it is still easily days working and using High Sierra, we don’t recommend factory resetting for Macs running High Sierra and APFS. Let’s wait until the dust settles and we have more guidance from Apple on how to reset APFS disks the right way. It’s certainly confusing when re-formatting your Mac’s hard drive when using macOS High Sierra! From what we understand, if you for whatever reason do need to reformat your hard drive, you should still choose macOS Extended (Journaled) AND NOT the new file system APFS. We contacted Apple and they instructed us to continue recommending Extended (Journaled.)
However, if you went ahead (or decide to try it anyway) and run into this error message, we have a few tips.
- FIRST shutdown your Mac, then press Option + Command + R when you turn it back on. This opens up Internet Recovery—try reinstalling High Sierra from here. You may need to try these steps, including a shutdown, a couple of times
If that doesn’t work, try this reader tip (we haven’t replicated this problem, so attempt this one at your own risk)
- Don’t re-install High Sierra!
- Instead, delete your drive until you have no visible drive
- Shut down your Mac and then hold command + R and boot up your Mac into Recovery Mode
- Open Disk Utility from the Recovery partition and delete your drive by selecting the minus button on the top right (Do NOT ERASE the drive—just remove it via the minus (-) sign)
- Once Deleted shut down your Mac a second time
- Restart in Internet Recovery Mode by pressing the Option + Command + R to boot from the internet
- Open Disk Utilities again and create a Drive using the plus button. Rename the drive Macintosh HD and choose Mac OS Extended (journaled)
- The goal is to return the drive to macOS Sierra (not High Sierra) or whatever nearest available version of OS your Mac came with
- If you still want High Sierra, update it from the Mac App Store
BackUp!
Yes, backup everything with Time Machine or another application, preferably following the 2X2 rule with two cloud and two physical (local or remote) backups. And consider using drive cloning apps like Carbon Copy Cloner, Super Duper, ChronoSync, or similar. These types of apps create identical clones (or copies) of your drive, and unlike Time Machine, they are fully bootable backups. If ever something goes wrong with your Mac, you can boot your computer from these clones.

Turn Off FileVault (if used)
FileVault uses full-disk encryption to help prevent unauthorized access to information on your startup disk. Most people do not have this feature turned on. But it’s always best to check. If you always log in with your account password, you may have FileVault on. That’s because when FileVault is on, your Mac always requires that you log in with your password.

Disable FileVault
- Go to System Preferences > Security & Privacy
- Click the FileVault tab
- Select the Lock button
- Enter an administrator name and password
- Click Turn Off FileVault
- Restart
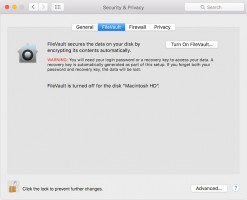
Once your Mac starts up, decryption of your startup disk occurs in the background. And this takes time. Check progress in the FileVault section of Security & Privacy preferences.
Remove iTunes Authorizations
iTunes has a built-in authorization tool. When you authorize your MacBook or another device, you give it permission to access all your apps, audiobooks, books, music, movies, and other content. But you are only allowed to authorize up to 5 computers. So if you are selling or giving away your MacBook, you want to make sure you deauthorize that particular computer.

Don’t worry, you don’t lose any content, and nothing is deleted from your computer. When you deauthorize a computer, you only prevent it from accessing protected content. And if needed, you can authorize your computer later.
Don’t save this step for later. It’s best to deauthorize through iTunes on your PC while you still have possession. If you sell or give away a computer that still has one of your five authorizations, you then need to deauthorize all of your computers and then re-authorize each one that you still use. That’s a heck of a lot of trouble and time for something you can do now before you give away or sell. Plus, it’s simple!
Deauthorize a Mac or PC
- Open iTunes
- Sign in with your Apple ID if needed
- From the menu bar at the top of your screen or iTunes window, choose Account > Authorizations > Deauthorize This Computer
- Enter your Apple ID and password, press Return, and click Deauthorize
For Windows users only
If you neglected to deauthorize your computer before you reinstalled Windows, upgraded your RAM, hard disk, or other system components, your computer might have multiple authorizations. If you suspect that’s your situation, check your authorizations from the iTunes menu bar and choose Account > View My Account. On the Account Information page, navigate to the Apple ID Summary section, scrolling to Computer Authorizations.
Here you see the number of computers that you’ve authorized in the past. Unfortunately, it does not list the names of those computers. So if that number is not in agreement with you, try to deauthorize your computer a few times until it’s no longer authorized.
Alternatively, select Deauthorize all computers to clean your five authorizations. Then reauthorize all your computers one at a time (up to 5.)
As a side note, you are not able to authorize a computer from another computer or your iPhone, iPad, or iPod touch. Additionally, you don’t authorize your iPhone, iPad, or iPod touch. iDevices do not count against your available authorizations.
Deactivate Programs and Remove Other Authorizations
Many third-party applications include machine authorizations and activations, particularly image, sound, and video editing programs. For example, most Adobe programs require activation. Application Activation is the process of connecting a particular application to a valid user license. You must activate your application before you can use it.
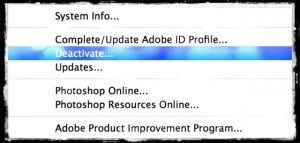
On the other hand, deactivation disconnects an application from a valid user license. Once deactivated, you can reactivate that license at any time, on any computer. You do not need to uninstall an application from your PC to deactivate it. Despite conventional wisdom, uninstalling an application does not necessarily deactivate its license.
So check your list of applications, looking for any programs that require activation keys. Once located, go to the program’s menu bar and find the deactivation or deauthorize link.
Sign Out of iCloud
If you use Find My Mac, be sure to archive or make copies of your iCloud data before proceeding.

Go to the Apple menu at the top left of your screen and select System Preferences. Then choose iCloud and click Sign Out. Make sure you remove all your personal data by clicking “Delete From Mac” on each of the pop-ups. Your iCloud contacts, calendars, and other iCloud data are then removed from your Mac.
Sign Out of iMessage
In your Messages app, choose Preferences > Accounts. Select your iMessage account and click Sign Out.
Factory Reset MacBook Air and other Macs With macOS Recovery
macOS Recovery is part of your built-in recovery system on your Mac. Its utilities allow you fully erase the internal hard drive. If selling or giving away, you want to reinstall macOS in a way that clears your Mac of anything and everything associated with you, your data, or your Apple ID.
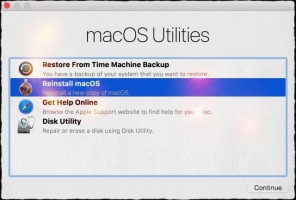
Start up or Restart using macOS Recovery
If you’re selling or giving away your Mac
- Turn on or restart your MacBook and hold down the Option+Command (⌘)+ R keys. When you see the Apple logo, release. When you see the Utilities window, startup is completed.
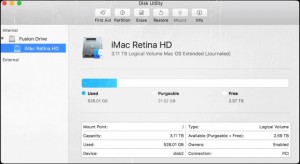
- Use Disk Utility to erase your startup disk AND any other internal hard disk
- Select your drive’s name from the left side list and click the Erase
- In the Format menu, choose Mac OS Extended (Journaled) or for Macs using High Sierra and above choose APFS, type a new name for your disk (we recommend the default name Macintosh HD) and click Erase.
- Warning! This erases all the information on the disk, including ALL of your personal files and data
- Erasing takes time, so practice patience!
- Once disk is erased, quit Disk Utility
- From the Recovery Menu, select Reinstall macOS and follow the on-screen instructions
- If you experience problems with your APFS (High Sierra) install, try using internet recovery instead by shutting down and pressing Option+Command+R
- When done, your MacBook restarts to a setup assistant and the Welcome screen. To leave the Mac in a factory default, don’t continue with the installation of your system. Press Command-Q, then click Shut Down
- The new owner then completes the steps of the setup assistant using their information and Apple ID
If you’re keeping your MacBook
- Turn on or restart your MacBook and hold down both the Command (⌘)+ R keys. When you see the Apple logo, release
- Use Disk Utility to erase your startup disk AND any other internal hard disk
- Select your drive’s name from the left side list and click the Erase
- In the Format menu, choose Mac OS Extended (Journaled) or for High Sierra and above APFS, type a new name for your disk (we recommend the default name Macintosh HD) and click Erase.
- Warning! This erases all the information on the disk, including ALL of your personal files and data
- Erasing takes time, so practice patience!
- Once disk is erased, quit Disk Utility
- From the Recovery Menu, select Reinstall macOS and follow the on-screen instructions
- If you experience problems with APFS and High Sierra installs, try internet recovery mode instead, restart and press Option + Command + R
- When done, your MacBook restarts to a setup assistant. Enter in your information as requested
Other ways to reinstall macOS (not factory reset)
If you made a Time Machine backup, restore from your Time Machine backup. A restore erases the disk and then replaces everything on that disk with macOS and all your other data from your Time Machine backup. To do this, start up with macOS Recovery and choose Restore From Time Machine Backup. Follow the onscreen instructions.

You can also reinstall macOS from the Mac App Store. Open the App Store and use the Search field to find it. Once located, download and install it from that product page. For some unknown reason, macOS Sierra doesn’t appear in your App Purchased tab.
Wrap Up
Let’s face it; even the best digital citizens find that their MacBook Air’s and other Macs’ performance get slower over time. I mean, this is life, and things happen. We install a lot of applications, updates, and maybe even do some poking about the system operating software using Terminal or third-party apps. This is real and expected use. It’s the value and the price of experience.
So when your Mac just isn’t performing as well as it can; rather than deleting apps one-by-one or trying little fixes and hacks here and there, perform a reinstallation of macOS! And start your next day with a clean OS slate.
If you’re selling or giving away your older Mac, resetting your Mac to factory settings is a must for you and the buyer or recipient. Restoring the mac’s factory settings gives you peace of mind that none of your data is accessible to the new owner. And the new owner starts off with a fresh start–no clutter remaining from all your previous applications, preferences, etc.
So be nice to yourself and the new owner by removing and securing your data through a factory reset on your Mac! And never, ever forget to backup your data first through Time Machine or your backup method of choice, before performing ANY of the steps to reset your operating system.