Auto-Brightness is a screen setting on the iPhone and iPad which causes the device to automatically adjust the display brightness depending on ambient lighting conditions. For example, if you’re outdoors or in bright lighting, the screen would adjust to be brighter so that it is more visible, and if you’re in a dim room or outdoors at night, the screen would adjust to lower the brightness so that the screen isn’t as glaringly bright. Auto-brightness in iOS also can improve battery life by adjusting the brightness of the iPhone or iPad display down as the ambient lighting permits.
Advanced Mac users may find it useful to run macOS or Mac OS X in a virtual machine atop their existing Mac operating system. Creating a virtual machine for Mac OS is now easier than ever before, and we’ll show you how to set up easy Mac virtual machines on a Mac.
For some quick background, virtualization allows you to run another operating system in a confined virtual machine atop an existing operating system through an application layer. This means there is no disk partitioning involved, the virtualized operating system runs just like any other application on your computer. We have covered this broad topic many times before for purposes like running Windows 10 on a Mac with a VM, to running Ubuntu Linux in VirtualBox, to Snow Leopard in a VM, and others. In the guide here, we will be creating a Macintosh virtual machine for running Mac OS on top of Mac OS, which can be helpful for testing out different apps and operating system versions, amongst other purposes.
Apple uses its App Store to distribute its software, like new Mac operating systems. It’s convenient, but sometimes it can take a while for a download to finish. And if you have multiple Macs, it’s inefficient to download the new OS to each and every Mac.
That’s why I like to make a bootable external drive for the sole purpose of installing the Mac operating system. When I need to tend to a bunch of Macs, it’s much faster to use a bootable drive instead of going to each Mac, launching the App Store, searching for the operating system, downloading it (after entering my Apple ID), and then running the installer.
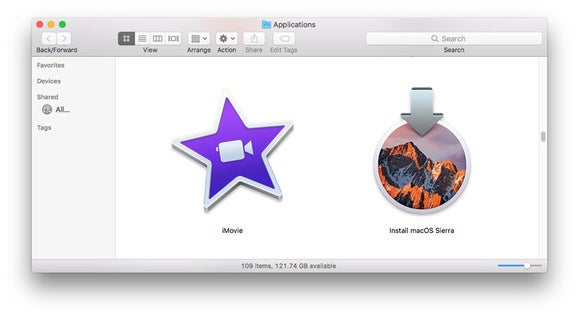
You can create a bootable USB flash drive with the macOS Sierra installer that’s now available. The installer software will take up nearly 5GB of storage space. Here’s how to create a bootable macOS Sierra installer drive.
Launch the App Store app, then look for macOS Sierra in the store. (Here’s a link.) Click on the Download button, and your Mac will download the installer to your Applications folder. If it automatically launches after download, quit the installer.
Keep the installer in the Applications folder.
If you’ve already upgraded your Mac to Sierra, the installer is removed from the Applications folder. You can download it again if you go to Purchased in the App Store. Look for macOS Sierra in the list of apps that you’ve bought, and click on the Download button. If it automatically launches after download, quit the installer.
Many of these instructions were intentionally left out because used incorrectly they can confuse the calculator and cause either a lockup or a « Memory Lost » state. (If you get into the former state, you may need to remove the batteries to reset the calculator.)
You should backup anything important before first engaging in Synthetic Programming.
How Synthetic Instructions Work
HP-41 instructions are one or more bytes long. The calculator will only allow certain sequences, but with the tool below, you’ll be able create new sequences by entering code that the calculator allows and then grabbing bytes out of this code to create different instructions. These new sequences allow access to additional characters, additional sounds, more alpha editing commands, easy control of the calculator through direct access to system registers, etc. They make it possible to do new things and to reduce the size and execution time of programs. The byte grabber described below will allow you to remove individual bytes from programs you create so the the bytes that remain are interpreted differently.
Creating a Byte Grabber
You can use the following steps to create a Byte Grabber. Make sure to follow the steps exactly. If it doesn’t work the first time, try again. Note that the first step is a master clear so save anything important to cards, tape, or disk now!
Remove any accessory modules.
Do a Master clear by holding down the backspace key while turning on the calculator. The Display will show MEMORY LOST.
Assign « + » to the LN key by pressing ASN ALPHA + ALPHA LN.
Assign « DEL » to the LOG key by pressing ASN ALPHA D E L ALPHA LOG.
Press PRGM to witch to program mode. The display should show 00 REG 45.
Start catalog 1 by pressing CATALOG 1 and press R/S immediately before the display blinks. If the display blinks, you waited too long. Repeat this step as many times as necessary to get the R/S pressed before the display blinks. (The display will show the .END. instruction both before and after the blink, but you must press R/S before the blink.)
Press the ALPHA key to go into Alpha mode.
Press the backspace key. The display should now show 4094 RCL 01.
Press ALPHA to leave Alpha mode.
Press GTO .005 and you should see 05 LBL 03.
Press USER (if necessary) to enter User mode.
Press LOG 003 which uses the assignment you made earlier to DEL 3 steps. You should now see 04 STO 01.
Press ALPHA to go back into Alpha mode.
Press ? A A A A A A (Everything after the first A will probably display as « -« s.) Press exactly 6 A’s!
Press PRGM to leave program mode and ALPHA to leave Alpha mode.
Press GTO . . (press both dots)
The byte grabber should now be assigned to the LN key. Press AND HOLD the LN key which should display XROM 28,63. Keep holding the key until the calculator displays NULL because you don’t want to execute the byte grabber now. This would be a good time to save the calculator’s status on a card by pressing XEQ ALPHA W S T S ALPHA in case you accidentally destroy the byte grabber later.
Be careful in using the byte grabber. You may get a « MEMORY LOST » or lock the calculator if you use it incorrectly. If the latter happens, remove the batteries for a few seconds and return them. If that doesn’t work, try turning the calculator on a few times with the batteries out or leave them out for several hours. Lire la suite…
The PDP-12 was a 12 bit machine introduced in 1969. It sold for $27,900. The PDP-12 was designed as a successor to the LINC-8 and was compatible with LINC-8 software.
Programmed Data Processor (PDP) was a series of minicomputers made and marketed by the Digital Equipment Corporationfrom 1957 to 1990. The name « PDP » intentionally avoided the use of the term « computer » because, at the time of the first PDPs, computers had a reputation of being large, complicated, and expensive machines, and the venture capitalists behind Digital (especially Georges Doriot) would not support Digital’s attempting to build a « computer »; the word « minicomputer » had not yet been coined.[citation needed] So instead, Digital used their existing line of logic modules to build a Programmed Data Processor and aimed it at a market that could not afford the larger computers.
The various PDP machines can generally be grouped into families based on word length.
Members of the PDP series include:
PDP-1
The original PDP, an 18-bit machine used in early time-sharing operating system work, and prominent in MIT’s early hacker culture, which was to lead to the (Massachusetts) Route 128 hardware startup belt (DEC’s second home, Prime Computer, etc.). What is believed to be the first video game, Spacewar!, was developed for this machine, along with the first known word processing program for a general-purpose computer, « Expensive Typewriter ».
PDP-2
A number reserved for an unbuilt, undesigned 24-bit design.
PDP-3
First DEC-designed (for US « black budget » outfits) 36-bit machine, though DEC did not offer it as a product. The only PDP-3 was built by the CIA’s Scientific Engineering Institute (SEI) in Waltham, MA to process radar cross section data for the Lockheed A-12 reconnaissance aircraft in 1960.[1][2] Architecturally it was essentially a PDP-1 controlling[citation needed] a PDP-1 stretched to 36-bit word width.[3] Lire la suite…