A Shell Primer: Master Your Linux, OS X, Unix Shell Environment

On a Linux or Unix-like systems each user and process runs in a specific environment. An environment includes variables, settings, aliases, functions and more. Following is a very brief introduction to some useful shell environment commands, including examples of how to use each command and setup your own environment to increase productivity in the command prompt.
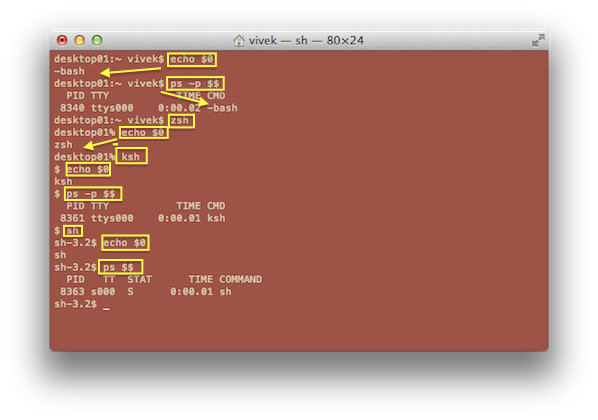
Finding out your current shell
Type any one of the following command at the Terminal app:
ps $$
ps -p $$
OR
echo "$0"
Sample outputs:


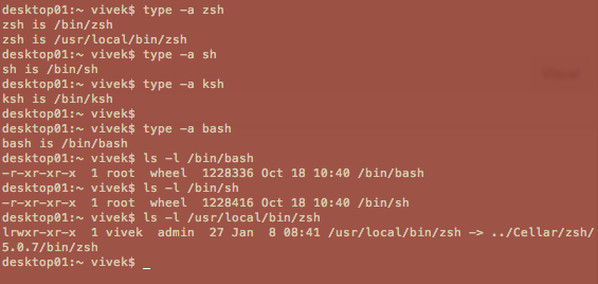
Finding out installed shells
To find out the full path for installed shell type:
type -a zsh
type -a ksh
type -a sh
type -a bash
Sample outputs:
The /etc/shells file contains a list of the shells on the system. For each shell a single line should be present, consisting of the shell’s path, relative to root. Type the following cat command to see shell database:
cat /etc/shells
Sample outputs:
# List of acceptable shells for chpass(1).
# Ftpd will not allow users to connect who are not using
# one of these shells.

/bin/bash
/bin/csh
/bin/ksh
/bin/sh
/bin/tcsh
/bin/zsh
/usr/local/bin/fish
Changing your current shell temporarily
Just type the shell name. In this example, I’m changing from bash to zsh:
zsh
You just changed your shell temporarily to zsh. Also known as subshell. To exit from subshell/temporary shell, type the following command or hit CTRL-d:
exit
Finding out subshell level/temporary shell nesting level
The $SHLVL incremented by one each time an instance of bash is started. Type the following command:
echo "$SHLVL"
Sample outputs:

Changing your current shell permanently with chsh command
Want to change your own shell from bash to zsh permanently? Try:
chsh -s /bin/zsh
Want to change the other user’s shell from bash to ksh permanently? Try:
sudo chsh -s /bin/ksh userNameHere
Finding out your current environment
You need to use the env env | more env | less env | grep ‘NAME’
Sample outputs:
TERM_PROGRAM=Apple_Terminal
SHELL=/bin/bash
TERM=xterm-256color
TMPDIR=/var/folders/6x/45252d6j1lqbtyy_xt62h40c0000gn/T/
Apple_PubSub_Socket_Render=/tmp/launch-djaOJg/Render
TERM_PROGRAM_VERSION=326
TERM_SESSION_ID=16F470E3-501C-498E-B315-D70E538DA825
USER=vivek
SSH_AUTH_SOCK=/tmp/launch-uQGJ2h/Listeners
__CF_USER_TEXT_ENCODING=0x1F5:0:0
PATH=/usr/bin:/bin:/usr/sbin:/sbin:/usr/local/bin:/opt/X11/bin:/usr/local/go/bin:/usr/local/sbin/modemZapp:/Users/vivek/google-cloud-sdk/bin
__CHECKFIX1436934=1
PWD=/Users/vivek
SHLVL=2
HOME=/Users/vivek
LOGNAME=vivek
LC_CTYPE=UTF-8
DISPLAY=/tmp/launch-6hNAhh/org.macosforge.xquartz:0
_=/usr/bin/env
OLDPWD=/Users/vivek
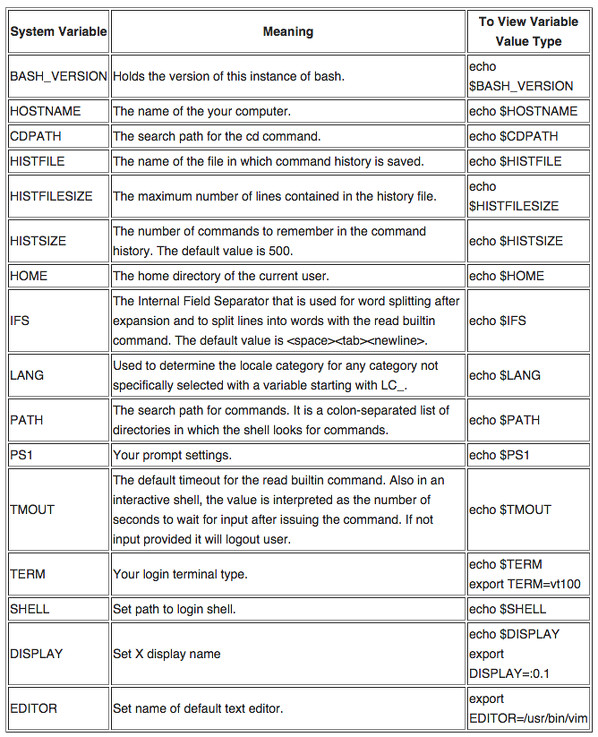
Here is a table of commonly used bash shell variables:
Warning: It is always a good idea not to change the following environment variables. Some can be changed and may results into unstable session for you:
SHELL
UID
RANDOM
PWD
PPID
SSH_AUTH_SOCK
USER
HOME
LINENO
Displays the values of environment variables
Use any one of the following command to show the values of environment variable called HOME:
## Use printenv ##
printenv HOME

## or use echo ##
echo "$HOME"

# or use printf for portability ##
printf "%s\n" "$HOME"
Sample outputs:
/home/vivek
Adding or setting a new variables
The syntax is as follows in bash or zsh or sh or ksh shell:
## The syntax is ##
VAR=value
FOO=bar

## Set the default editor to vim ##
EDITOR=vim
export $EDITOR

## Set default shell timeout for security ##
TMOUT=300
export TMOUT

## You can directly use export command to set the search path for commands ##
export PATH=$PATH:$HOME/bin:/usr/local/bin:/path/to/mycoolapps
Again, use the printenv or echo or printf command to see the values of environment variables called PATH, EDITOR, and TMOUT:
printenv PATH
echo "$EDITOR"
printf "%s\n" $TMOUT
How do I change an existing environment variables?
The syntax is as follows:
export VAR=value
## OR ##
VAR=value
export $VAR

## Change the default editor from vim to emacs ##
echo "$EDITOR" ## <--- print vim
EDITOR=emacs   ## <--- change it
export $EDITOR ## <--- export it for next session too
echo "$EDITOR" ## <--- print emacs
The syntax is as follows for the tcsh shell for adding or changing a variables:
## Syntax
setenv var value
printenv var

## Set foo variable with bar as a value ##
setenv foo bar
echo "$foo"
printenv foo

## Set PATH variable ##
setenv PATH $PATH\:$HOME/bin
echo "$PATH"

## set PAGER variable ##
setenv PAGER most
printf "%s\n" $PAGER
Finding your bash shell configuration files
Type the following command to list your bash shell files, enter:
ls -l ~/.bash* ~/.profile /etc/bash* /etc/profile
Sample output:
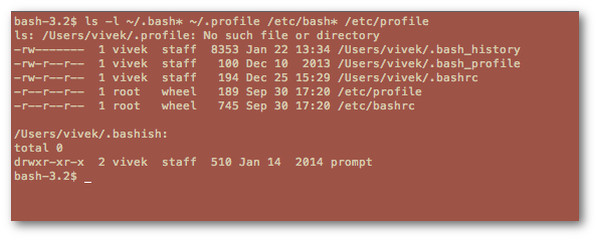
To look at all your bash config files, enter:
less ~/.bash* ~/.profile /etc/bash* /etc/profile
You can edit bash config files one by one using the text editor such as vim or emacs:
vim ~/.bashrc
To edit files located in /etc/, type:
## first make a backup.. just in case
sudo cp -v /etc/bashrc /etc/bashrc.bak.22_jan_15

########################################################################
## Alright, edit it to your hearts content and by all means, have fun ##
## with your environment or just increase the productivity :)         ##
########################################################################
sudo vim /etc/bashrc
Confused by Bash shell Initialization files?
The following « bash file initialization » graph will help you:
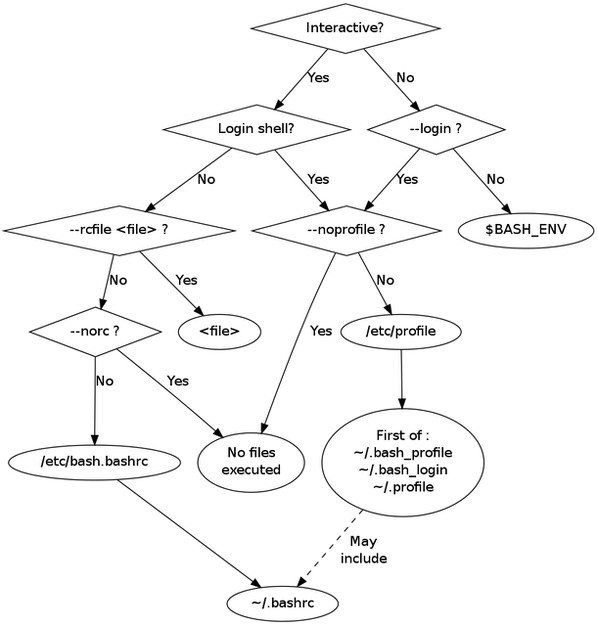
Depending on which shell is set up as your default, your user profile or system profile can be one of the following:
Finding your zsh shell configuration files
The zsh wiki recommend the following command:
strings =zsh | grep zshrc
Sample outputs:
/etc/zshrc
.zshrc
Type the following command to list your zsh shell files, enter:
ls -l /etc/zsh/* /etc/profile ~/.z*
To look at all your zsh config files, enter:
less /etc/zsh/* /etc/profile ~/.z*
Finding your ksh shell configuration files
- See ~/.profile or /etc/profile file.
Finding your tcsh shell configuration files
- See ~/.login, ~/.cshrc for the C shell.
- See ~/.tcshrc and ~/.cshrc for the TC shell.
Can I have a script like this execute automatically every time I login?
Yes, add your commands or aliases or other settings to ~/.bashrc (bash shell) or ~/.profile (sh/ksh/bash) or ~/.login (csh/tcsh) file.
Can I have a script like this execute automatically every time I logout?
Yes, add your commands or aliases or other settings to ~/.bash_logout (bash) or ~/.logout (csh/tcsh) file.
History: Getting more info about your shell session
Just type the history command to see session history:
history
Sample outputs:
    9  ls
   10  vi advanced-cache.php
   11  cd ..
   12  ls
   13  w
   14  cd ..
   15  ls
   16  pwd
   17  ls
   ....
   ..
   ...
   91  hddtemp /dev/sda
   92  yum install hddtemp
   93  hddtemp /dev/sda
   94  hddtemp /dev/sg0
   95  hddtemp /dev/sg1
   96  smartctl -d ata -A /dev/sda | grep -i temperature
   97  smartctl -d ata -A /dev/sg1 | grep -i temperature
   98  smartctl  -A /dev/sg1 | grep -i temperature
   99  sensors
Type history 20 to see the last 20 commands from your history:
history 20
Sample outputs:
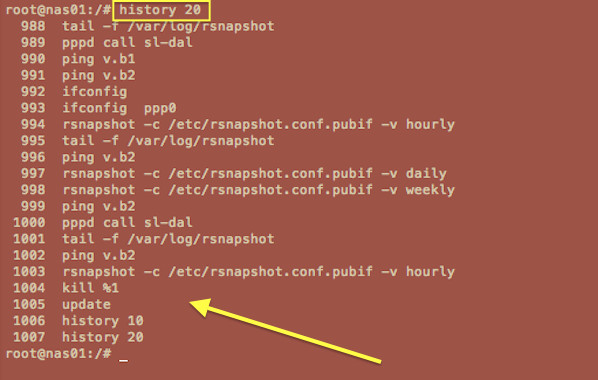
You can reuses commands. Simply hit [Up] and [Down] arrow keys to see previous commands. Press [CTRL-r] from the shell prompt to search backwards through history buffer or file for a command. To repeat last command just type !! at a shell prompt:
ls -l /foo/bar
!!
To see command #93 (hddtemp /dev/sda)from above history session, type:
!93
Changing your identity with sudo or su
The syntax is as follows:
su userName

## To log in as a tom user ##
su tom

## To start a new login shell for tom user ##
su tom

## To login as root user ##
su -

## The sudo command syntax (must be configured on your system) ##
sudo -s
sudo tom
See « Linux Run Command As Another User » post for more on sudo, su and runuser commands.
Shell aliases
An alias is nothing but shortcut to commands.
Listing aliases
Type the following command:
alias
Sample outputs:
alias ..='cd ..'
alias ...='cd ../../../'
alias ....='cd ../../../../'
alias .....='cd ../../../../'
alias .4='cd ../../../../'
alias .5='cd ../../../../..'
alias bc='bc -l'
alias cd..='cd ..'
alias chgrp='chgrp --preserve-root'
alias chmod='chmod --preserve-root'
alias chown='chown --preserve-root'
alias cp='cp -i'
alias dnstop='dnstop -l 5 eth1'
alias egrep='egrep --color=auto'
alias ethtool='ethtool eth1'
Create an alias
The bash/zsh syntax is:
alias c='clear'
alias down='sudo /sbin/shutdown -h now'
Type c alias for the system command clear, so we can type c instead of clear command to clear the screen:
c
Or type down to shutdown the Linux based server:
down
You can create as many aliases you want. See « 30 Handy Bash Shell Aliases For Linux / Unix / Mac OS X » for practical usage of aliases on Unix-like system.
Shell functions
Bash/ksh/zsh functions allows you further customization of your environment. In this example, I’m creating a simple bash function called memcpu() to display top 10 cpu and memory eating process:
memcpu() { echo "*** Top 10 cpu eating process ***"; ps auxf | sort -nr -k 3 | head -10;
echo  "*** Top 10 memory eating process ***"; ps auxf | sort -nr -k 4 | head -10;  }
Just type memcpu to see the info on screen:
memcpu

*** Top 10 cpu eating process ***
nginx    39559 13.0  0.2 264020 35168 ?        S    04:26   0:00      \_ /usr/bin/php-cgi
nginx    39545  6.6  0.1 216484 13088 ?        S    04:25   0:04      \_ /usr/bin/php-cgi
nginx    39471  6.2  0.6 273352 81704 ?        S    04:22   0:17      \_ /usr/bin/php-cgi
nginx    39544  5.7  0.1 216484 13084 ?        S    04:25   0:03      \_ /usr/bin/php-cgi
nginx    39540  5.5  0.1 221260 19296 ?        S    04:25   0:04      \_ /usr/bin/php-cgi
nginx    39542  5.4  0.1 216484 13152 ?        S    04:25   0:04      \_ /usr/bin/php-cgi
nixcraft 39543  5.3  0.1 216484 14096 ?        S    04:25   0:04      \_ /usr/bin/php-cgi
nixcraft 39538  5.2  0.1 221248 18608 ?        S    04:25   0:04      \_ /usr/bin/php-cgi
nixcraft 39539  5.0  0.1 216484 16272 ?        S    04:25   0:04      \_ /usr/bin/php-cgi
nixcraft 39541  4.8  0.1 216484 14860 ?        S    04:25   0:04      \_ /usr/bin/php-cgi

*** Top 10 memory eating process ***
498      63859  0.5  4.0 2429652 488084 ?      Ssl   2014 177:41 memcached -d -p 11211 -u memcached -m 2048 -c 18288 -P /var/run/memcached/memcached.pid -l 10.10.29.68 -L
mysql    64221  4.2  3.4 4653600 419868 ?      Sl    2014 1360:40  \_ /usr/libexec/mysqld --basedir=/usr --datadir=/var/lib/mysql --user=mysql --log-error=/var/log/mysqld.log --open-files-limit=65535 --pid-file=/var/run/mysqld/mysqld.pid --socket=/var/lib/mysql/mysql.sock
nixcraft 39418  0.4  1.1 295312 138624 ?       S    04:17   0:02  |   \_ /usr/bin/php-cgi
nixcraft 39419  0.5  0.9 290284 113036 ?       S    04:18   0:02  |   \_ /usr/bin/php-cgi
nixcraft 39464  0.7  0.8 294356 99200 ?        S    04:20   0:02  |   \_ /usr/bin/php-cgi
nixcraft 39469  0.3  0.7 288400 91256 ?        S    04:20   0:01  |   \_ /usr/bin/php-cgi
nixcraft 39471  6.2  0.6 273352 81704 ?        S    04:22   0:17      \_ /usr/bin/php-cgi
vivek    39261  2.2  0.6 253172 82812 ?        S    04:05   0:28      \_ /usr/bin/php-cgi
squid     9995  0.0  0.5 175152 72396 ?        S     2014  27:00  \_ (squid) -f /etc/squid/squid.conf
cybercit  3922  0.0  0.4 303380 56304 ?        S    Jan10   0:13  |   \_ /usr/bin/php-cgi
See « how to write and use shell functions » for more information.
Putting it all together: Customizing your Linux or Unix bash shell working environment
Now, you are ready to configure your environment using bash shell. I’m only covering bash. But the theory remains same from zsh, ksh and other common shells. Let us see how to adopt shell to my need as a sysadmin. Edit your ~/.bashrc file and append settings. Here are some useful configuration options for you.
#1: Setting up bash path and environment variables
# Set path ##
export PATH=$PATH:/usr/local/bin:/home/vivek/bin:/opt/firefox/bin:/opt/oraapp/bin

# Also set path for cd command
export CDPATH=.:$HOME:/var/www
Use less or most command as a pager:
export PAGER=less
Set vim as default text editor for us:
export EDITOR=vim
export VISUAL=vim
export SVN_EDITOR="$VISUAL"
Set Oracle database specific stuff:
export ORACLE_HOME=/usr/lib/oracle/xe/app/oracle/product/10.2.0/server
export ORACLE_SID=XE
export NLS_LANG=$($ORACLE_HOME/bin/nls_lang.sh)
Set JAVA_HOME and other paths for java as per java version:
export JAVA_HOME=/usr/lib/jvm/java-6-sun/jre

# Add ORACLE, JAVA to PATH
export PATH=$PATH:$ORACLE_HOME/bin:$JAVA_HOME/bin
Secure my remote SSH login using keychain for password less login:
# No need to input password again ever
/usr/bin/keychain $HOME/.ssh/id_rsa
source $HOME/.keychain/$HOSTNAME-sh
Finally, turn on bash command completion
source /etc/bash_completion
#2: Setting up bash command prompt
PS1='{\u@\h:\w }\$ '#3: Setting default file permissions
## Set default to 644 ##
umask 022
#4: Control your shell history settings
# Dont put duplicate lines in the history
HISTCONTROL=ignoreboth

# Ignore these commands
HISTIGNORE="reboot:shutdown *:ls:pwd:exit:mount:man *:history"

# Set history length via HISTSIZE and HISTFILESIZE
export HISTSIZE=10000
export HISTFILESIZE=10000

# Add timestamp to history file.
export HISTTIMEFORMAT="%F %T "

#Append to history, don't overwrite
shopt -s histappend
#5: Set the time zone for your session
## set to IST for my own session ##
TZ=Asia/Kolkata
#6: Setting up shell line editing interface
## use a vi-style line editing interface for bash from default emacs mode ##
set -o vi
#7: Setting up your favorite aliases
## add protection ##
alias rm='rm -i'
alias cp='cp -i'
alias mv='mv -i'

## Memcached ##
alias mcdstats='/usr/bin/memcached-tool 10.10.29.68:11211 stats'
alias mcdshow='/usr/bin/memcached-tool 10.10.29.68:11211 display'
alias mcdflush='echo "flush_all" | nc 10.10.29.68 11211'

## Default command options ##
alias vi='vim'
alias grep='grep --color=auto'
alias egrep='egrep --color=auto'
alias fgrep='fgrep --color=auto'
alias bc='bc -l'
alias wget='wget -c'
alias chown='chown --preserve-root'
alias chmod='chmod --preserve-root'
alias chgrp='chgrp --preserve-root'
alias rm='rm -I --preserve-root'
alias ln='ln -i'
Here are some additional OS X Unix bash shell aliases:
# Open desktop apps from bash
alias preview="open -a '$PREVIEW'"
alias safari="open -a safari"
alias firefox="open -a firefox"
alias chrome="open -a google\ chrome"
alias f='open -a Finder '

# Get rid of those .DS_Store files
alias dsclean='find . -type f -name .DS_Store -delete'
#8: Colour my world
# Get colored grep output
alias grep='grep --color=auto'
export GREP_COLOR='1;33'

# colored ls too
export LSCOLORS='Gxfxcxdxdxegedabagacad'
# Gnu/linux ls
ls='ls --color=auto'

# BSD/os x ls command
# alias ls='ls -G'
#9: Setting up your favorite bash functions
# Show top 10 history command on screen
function ht {
  history | awk '{a[$2]++}END{for(i in a){print a[i] " " i}}' | sort -rn | head
}

# Wrapper for host and ping command
# Accept http:// or https:// or ftps:// names for domain and hostnames
_getdomainnameonly(){
	local h="$1"
	local f="${h,,}"
	# remove protocol part of hostname
        f="${f#http://}"
        f="${f#https://}"
	f="${f#ftp://}"
	f="${f#scp://}"
	f="${f#scp://}"
	f="${f#sftp://}"
	# remove username and/or username:password part of hostname
	f="${f#*:*@}"
	f="${f#*@}"
	# remove all /foo/xyz.html*
	f=${f%%/*}
	# show domain name only
	echo "$f"
}


ping(){
	local array=( $@ )  		# get all args in an array
	local len=${#array[@]}          # find the length of an array
	local host=${array[$len-1]}     # get the last arg
	local args=${array[@]:0:$len-1} # get all args before the last arg in $@ in an array
	local _ping="/bin/ping"
	local c=$(_getdomainnameonly "$host")
	[ "$t" != "$c" ] && echo "Sending ICMP ECHO_REQUEST to \"$c\"..."
	# pass args and host
	$_ping $args $c
}

host(){
	local array=( $@ )
	local len=${#array[@]}
	local host=${array[$len-1]}
	local args=${array[@]:0:$len-1}
	local _host="/usr/bin/host"
	local c=$(_getdomainnameonly "$host")
	[ "$t" != "$c" ] && echo "Performing DNS lookups for \"$c\"..."
  	$_host $args $c
}
#10: Configure bash shell behavior via shell shopt options command
Finally, you can make changes to your bash shell environment using set and shopt commands:
# Correct dir spellings
shopt -q -s cdspell

# Make sure display get updated when terminal window get resized
shopt -q -s checkwinsize

# Turn on the extended pattern matching features
shopt -q -s extglob

# Append rather than overwrite history on exit
shopt -s histappend

# Make multi-line commandsline in history
shopt -q -s cmdhist

# Get immediate notification of background job termination
set -o notify

# Disable [CTRL-D] which is used to exit the shell
set -o ignoreeof
Conclusion
This post is by no means comprehensive. It provided a short walkthrough of how to customize your enviorment. For a thorough look at bash/ksh/zsh/csh/tcsh capabilities, I suggest you read the man page by typing the following command:
man bash
man zsh
man tcsh
man ksh
Source: nixCraft