Linux and Unix Test Disk I/O Performance With dd Command

Source: nixCraft
How can I use dd command on a Linux to test I/O performance of my hard disk drive? How do I check the performance of a hard drive including the read and write speed on a Linux operating systems?
You can use the following commands on a Linux or Unix-like systems for simple I/O performance test:
dd command : It is used to monitor the writing performance of a disk device on a Linux and Unix-like system.
hdparm command : It is used to get/set hard disk parameters including test the reading and caching performance of a disk device on a Linux based system.
In this tutorial you will learn how to use the dd command to test disk I/O performance.
Use dd command to monitor the reading and writing performance of a disk device:
- Open a shell prompt.
- Or login to a remote server via ssh.
- Use the dd command to measure server throughput (write speed)
dd if=/dev/zero of=/tmp/test1.img bs=1G count=1 oflag=dsync
- Use the dd command to measure server latency
dd if=/dev/zero of=/tmp/test2.img bs=512 count=1000 oflag=dsync
Understanding dd command options
In this example, I’m using RAID-10 (Adaptec 5405Z with SAS SSD) array running on a Ubuntu Linux 14.04 LTS server. The basic syntax is:
 dd if=/dev/input.file of=/path/to/output.file bs=block-size count=number-of-blocks oflag=dsync
 ## GNU dd syntax ##
 dd if=/dev/zero of=/tmp/test1.img bs=1G count=1 oflag=dsync
 ## OR alternate syntax for GNU/dd ##
 dd if=/dev/zero of=/tmp/testALT.img bs=1G count=1 conv=fdatasync
Sample outputs:
Please note that one gigabyte was written for the test and 135 MB/s was server throughput for this test. Where,
if=/dev/zero (if=/dev/input.file): The name of the input file you want dd the read from.of=/tmp/test1.img (of=/path/to/output.file): The name of the output file you want dd write the input.file to.bs=1G (bs=block-size): Set the size of the block you want dd to use. 1 gigabyte was written for the test.count=1 (count=number-of-blocks): The number of blocks you want dd to read.oflag=dsync (oflag=dsync): Use synchronized I/O for data. Do not skip this option. This option get rid of caching and gives you good and accurate resultsconv=fdatasyn: Again, this tells dd to require a complete « sync » once, right before it exits. This option is equivalent to oflag=dsync.
In this example, 512 bytes were written one thousand times to get RAID10 server latency time:
dd if=/dev/zero of=/tmp/test2.img bs=512 count=1000 oflag=dsync
Sample outputs:
1000+0 records in
1000+0 records out
512000 bytes (512 kB) copied, 0.60362 s, 848 kB/s
Please note that server throughput and latency time depends upon server/application load too. So I recommend that you run these tests on a newly rebooted server as well as peak time to get better idea about your workload. You can now compare these numbers with all your devices.
But why the server throughput and latency time are so low?
Low values does not mean you are using slow hardware. The value can be low because of the HARDWARE RAID10 controller’s cache.
Use hdparm command to see buffered and cached disk read speed
I suggest you run the following commands 2 or 3 times Perform timings of device reads for benchmark and comparison purposes:
Buffered disk read test for /dev/sda ##
hdparm -t /dev/sda1
## OR ##
hdparm -t /dev/sda
To perform timings of cache reads for benchmark and comparison purposes again run the following command 2-3 times (note the -T option):
Cache read benchmark for /dev/sda ###
hdparm -T /dev/sda1
## OR ##
hdparm -T /dev/sda
OR combine both tests:
hdparm -Tt /dev/sda
Sample outputs:
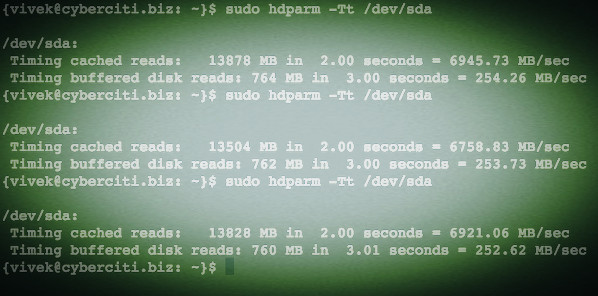
Again note that due to filesystems caching on file operations, you will always see high read rates.
Use dd command on Linux to test read speed
To get accurate read test data, first discard caches before testing by running the following commands:
flush
echo 3 | sudo tee /proc/sys/vm/drop_caches
time time dd if=/path/to/bigfile of=/dev/null bs=8k
Linux Laptop example
Run the following command:
Debian Laptop Throughput With Cache ##
dd if=/dev/zero of=/tmp/laptop.bin bs=1G count=1 oflag=direct

### Deactivate the cache ###
hdparm -W0 /dev/sda

### Debian Laptop Throughput Without Cache ##
dd if=/dev/zero of=/tmp/laptop.bin bs=1G count=1 oflag=direct
Apple OS X Unix (Macbook pro) example
GNU dd has many more options but OS X/BSD and Unix-like dd command need to run as follows to test real disk I/O and not memory add sync option as follows:
Run command 2-3 times to get good results ###
time sh -c "dd if=/dev/zero of=/tmp/testfile bs=100k count=1k && sync"
Sample outputs:
1024+0 records in
1024+0 records out
104857600 bytes transferred in 0.165040 secs (635346520 bytes/sec)

real	0m0.241s
user	0m0.004s
sys	0m0.113s
So I’m getting 635346520 bytes (635.347 MB/s) write speed on my MBP.
Not a fan of command line…?
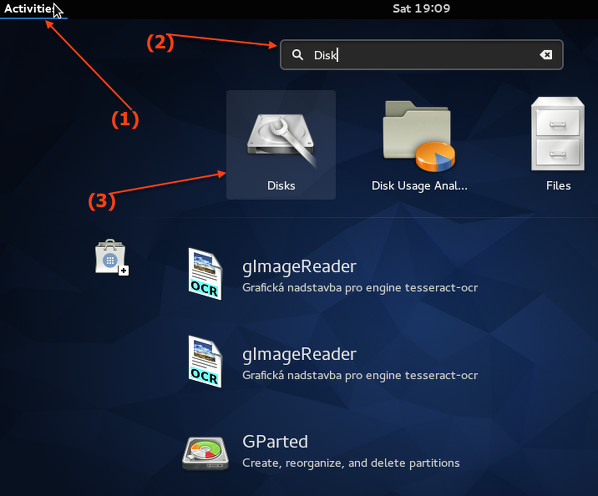
You can use disk utility (gnome-disk-utility) on a Linux or Unix based system to get the same information. The following screenshot is taken from my Fedora Linux v22 VM.
Graphical method
Click on the « Activities » or press the « Super » key to switch between the Activities overview and desktop. Type « Disks »
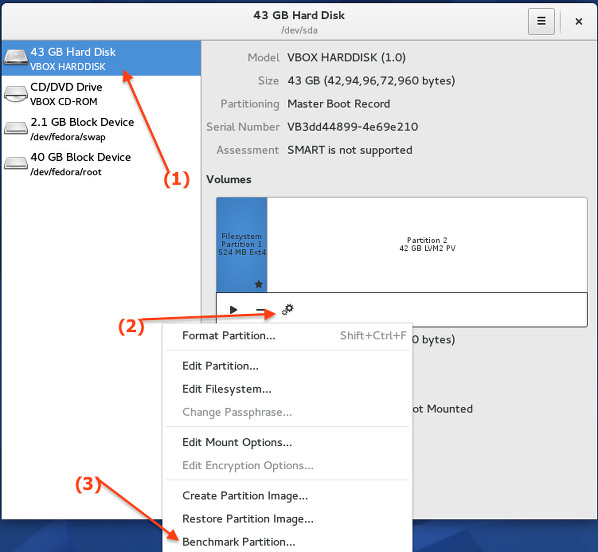
Select your hard disk at left pane and click on configure button and click on « Benchmark partition »:
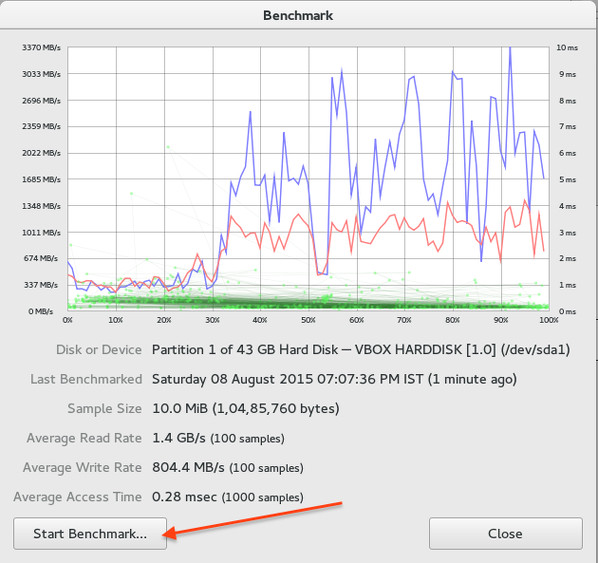
Finally, click on the « Start Benchmark… » button (you may be promoted for the admin username and password):
Which method and command do you recommend to use?
- I recommend dd command on all Unix-like systems (time sh -c "dd if=/dev/zero of=/tmp/testfile bs=100k count=1k && sync"
- If you are using GNU/Linux use the dd command (dd if=/dev/zero of=/tmp/testALT.img bs=1G count=1 conv=fdatasync)
- Make sure you adjust count and bs arguments as per your setup to get a good set of result.
- The GUI method is recommended only for Linux/Unix laptop users running Gnome2 or 3 desktop.