MySQL Circular Replication

Source: icicimov
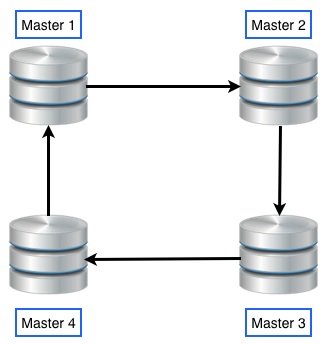 Setting the MySQL in Master-Master mode means in case of an instance failure the other one will transparently take over the client connections avoiding the need of any manual intervention. In Master-Slave mode we would need to manually promote the Slave to Master which will cause service interruption. MySQL circular replication can be used to scale out write nodes but there are certain considerations to be taken into account. The data will only be as complete as the speed of the replication. If data is inserted faster than the MySQL slave thread can run then each node can be missing data from the other node. This can be acceptable or not depending on the application and data requirements. For example if we use foreign keys in our database, inserts will fail if the data which the foreign key references has not yet been replicated. These issues need to be considered before we decide to employ Master-Master circular replication.
Setup
The hosts have been setup with two network interfaces, one on a public 192.168.100.0/24 network that will be used for incoming client connections and cluster communication and one on the private 10.10.1.0/24 network that will be used for the replication traffic only. We will start by setting the MySQL service on the nodes first.
Mysql
Installation
I will install the latest MySQL 5.6.x from the MySQL APT repository that have packages for Ubuntu/Debian. The official MySQL APT repository:
http://dev.mysql.com/get/mysql-apt-config_0.3.1-1ubuntu14.04_all.deb
http://dev.mysql.com/get/mysql-apt-config_0.3.1-1ubuntu12.04_all.deb
http://dev.mysql.com/get/mysql-apt-config_0.2.1-1debian7_all.deb
On both hosts we download and install the repository which will create the necessary apt links for us:
$ sudo wget http://dev.mysql.com/get/mysql-apt-config_0.3.1-1ubuntu12.04_all.deb
$ sudo dpkg -i mysql-apt-config_0.3.1-1ubuntu12.04_all.deb
Then we need to purge any installed MySQL packages (if any). In my case:
$ sudo dpkg -P mysql-client-5.5 mysql-client-core-5.5 mysql-common mysql-server mysql-server-5.5 mysql-server-core-5.5 libmysqlclient18 libmailutils2 mailutils libdbd-mysql-perl
$ sudo rm -rf /etc/mysql /var/lib/mysql /var/log/mysql
Then we can install the new MySQL server which is at version 5.6.21 atm, install the initial database, secure the installation and create password for the MySQL root user:
$ sudo aptitude update
$ sudo aptitude install mysql-server-5.6 mysql-server-core-5.6
$ sudo service mysql stop
$ sudo mysql_install_db
$ sudo mysql_secure_installation
$ sudo sevice mysql start
$ sudo mysqladmin -u root --password <set_new_password_here>
Replication
We can configure the Master-Master mode in the MySQL server config file by adding the following configuration file.
On host01 create new file /etc/mysql/conf.d/mysqld.cnf:
[mysqld]
# apply utf8
character-set-server = utf8
collation-server = utf8_unicode_ci

key_buffer=16M
bind_address=10.10.1.10

#
# SSL
#
ssl=1
ssl-ca=/etc/mysql/ssl/CA.pem
ssl-cert=/etc/mysql/ssl/mysql.pem
ssl-key=/etc/mysql/ssl/mysql.key
ssl-cipher=ECDHE-RSA-AES256-GCM-SHA384:DHE-RSA-AES256-SHA

#
# MySQL circular replication
#
server-id = 1
log-bin = /var/log/mysql/bin.log
binlog-format = row
log-slave-updates
log-bin-index = /var/log/mysql/log-bin.index
relay-log = /var/log/mysql/relay.log
relay-log-info-file = /var/log/mysql/relay-log.info
relay-log-index = /var/log/mysql/relay-log.index
replicate-same-server-id = 0
auto_increment_increment = 2
auto_increment_offset = 1
slave_exec_mode = IDEMPOTENT

# Recommended for InnoDB
innodb_flush_log_at_trx_commit = 1
innodb_flush_method = O_DIRECT
sync_binlog = 1
# this helps fight fragmentation
# but not recommended for huge
# number of tables (default is ON in 5.6)
innodb_file_per_table = 1

# consider these too
#sync_master_info = 1
#sync_relay_log = 1
#sync_relay_log_info = 1

#
# Optimization
#
# Increase max allowed packet size
max_allowed_packet = 52M

# Increase memory tmp space
tmp_table_size = 32M
max_heap_table_size = 32M

# Setup query cache
query_cache_type = 1
query_cache_limit = 512K
query_cache_min_res_unit = 2k
query_cache_size = 80M

# InnoDB buffer pool warm-up (new in 5.6)
innodb_buffer_pool_size = 128M
innodb_buffer_pool_dump_at_shutdown = 1
innodb_buffer_pool_load_at_startup = 1
On host02 create new file /etc/mysql/conf.d/mysqld.cnf:
[mysqld]
# apply utf8
character-set-server = utf8
collation-server = utf8_unicode_ci

key_buffer=16M
bind_address=10.10.1.11

#
# SSL
#
ssl=1
ssl-ca=/etc/mysql/ssl/CA.pem
ssl-cert=/etc/mysql/ssl/mysql.pem
ssl-key=/etc/mysql/ssl/mysql.key
ssl-cipher=ECDHE-RSA-AES256-GCM-SHA384:DHE-RSA-AES256-SHA

#
# MySQL circular replication
#
server-id = 2
log-bin = /var/log/mysql/bin.log
binlog-format = row
log-slave-updates
log-bin-index = /var/log/mysql/log-bin.index
relay-log = /var/log/mysql/relay.log
relay-log-info-file = /var/log/mysql/relay-log.info
relay-log-index = /var/log/mysql/relay-log.index
replicate-same-server-id = 0
auto_increment_increment = 2
auto_increment_offset = 2
slave_exec_mode = IDEMPOTENT

# Recommended for InnoDB
innodb_flush_log_at_trx_commit = 1
innodb_flush_method = O_DIRECT
sync_binlog = 1
# this helps fight fragmentation
# but not recommended for huge
# number of tables (default is ON in 5.6)
innodb_file_per_table = 1

# Consider these too
#sync_master_info = 1
#sync_relay_log = 1
#sync_relay_log_info = 1

#
# Optimization
#
# Increase max allowed packet size
max_allowed_packet = 52M

# Increase memory tmp space
tmp_table_size = 32M
max_heap_table_size = 32M

# Setup query cache
query_cache_type = 1
query_cache_limit = 512K
query_cache_min_res_unit = 2k
query_cache_size = 80M

# InnoDB buffer pool warm-up (new in 5.6)
innodb_buffer_pool_size = 128M
innodb_buffer_pool_dump_at_shutdown = 1
innodb_buffer_pool_load_at_startup = 1
The most important thing to note here is the different server-id for each instance and auto_increment_increment and the auto_increment_offset which prevents the auto-increment index clash in this mode of operation. We also log as much as possible so we can find any issues and recover easily in case of issues.
After restarting the service we login to the database on both nodes as root in order to find the master’s binlog file and position and grant replication privileges to the other node:
On host01:
mysql> stop slave;
Query OK, 0 rows affected, 1 warning (0.00 sec)

mysql> grant replication slave on *.* to repuser@'localhost' identified by 'cGFzc3dvcmQK';
Query OK, 0 rows affected (0.00 sec)

mysql> grant replication slave on *.* to repuser@'10.10.1.11' identified by 'cGFzc3dvcmQK';
Query OK, 0 rows affected (0.00 sec)

mysql> flush privileges;
Query OK, 0 rows affected (0.00 sec)

mysql> reset master;
Query OK, 0 rows affected (0.01 sec)

mysql> show master status;
+------------+----------+--------------+------------------+-------------------+
| File       | Position | Binlog_Do_DB | Binlog_Ignore_DB | Executed_Gtid_Set |
+------------+----------+--------------+------------------+-------------------+
| bin.000001 |      120 |              |                  |                   |
+------------+----------+--------------+------------------+-------------------+
1 row in set (0.00 sec)

mysql> CHANGE MASTER TO MASTER_HOST='10.10.1.11', MASTER_USER='repuser', MASTER_PASSWORD='cGFzc3dvcmQK', MASTER_LOG_FILE='bin.000001', MASTER_LOG_POS=120;
Query OK, 0 rows affected, 2 warnings (0.01 sec)

mysql> start slave;
Query OK, 0 rows affected (0.00 sec)

mysql> show slave status\G;
*************************** 1. row ***************************
               Slave_IO_State: Waiting for master to send event
                  Master_Host: 10.10.1.11
                  Master_User: repuser
                  Master_Port: 3306
                Connect_Retry: 60
              Master_Log_File: bin.000001
          Read_Master_Log_Pos: 120
               Relay_Log_File: relay.000002
                Relay_Log_Pos: 277
        Relay_Master_Log_File: bin.000001
             Slave_IO_Running: Yes
            Slave_SQL_Running: Yes
              Replicate_Do_DB:
          Replicate_Ignore_DB:
           Replicate_Do_Table:
       Replicate_Ignore_Table:
      Replicate_Wild_Do_Table:
  Replicate_Wild_Ignore_Table:
                   Last_Errno: 0
                   Last_Error:
                 Skip_Counter: 0
          Exec_Master_Log_Pos: 120
              Relay_Log_Space: 440
              Until_Condition: None
               Until_Log_File:
                Until_Log_Pos: 0
           Master_SSL_Allowed: No
           Master_SSL_CA_File:
           Master_SSL_CA_Path:
              Master_SSL_Cert:
            Master_SSL_Cipher:
               Master_SSL_Key:
        Seconds_Behind_Master: 0
Master_SSL_Verify_Server_Cert: No
                Last_IO_Errno: 0
                Last_IO_Error:
               Last_SQL_Errno: 0
               Last_SQL_Error:
  Replicate_Ignore_Server_Ids:
             Master_Server_Id: 2
                  Master_UUID: 8437c6a7-2183-11e6-ad65-0cc47aa38b7c
             Master_Info_File: /var/lib/mysql/master.info
                    SQL_Delay: 0
          SQL_Remaining_Delay: NULL
      Slave_SQL_Running_State: Slave has read all relay log; waiting for the slave I/O thread to update it
           Master_Retry_Count: 86400
                  Master_Bind:
      Last_IO_Error_Timestamp:
     Last_SQL_Error_Timestamp:
               Master_SSL_Crl:
           Master_SSL_Crlpath:
           Retrieved_Gtid_Set:
            Executed_Gtid_Set:
                Auto_Position: 0
1 row in set (0.00 sec)

ERROR:
No query specified

mysql>
On host2:
mysql> stop slave;
Query OK, 0 rows affected, 1 warning (0.00 sec)

mysql> grant replication slave on *.* to repuser@'localhost' identified by 'cGFzc3dvcmQK';
Query OK, 0 rows affected (0.00 sec)

mysql> grant replication slave on *.* to repuser@'10.10.1.10' identified by 'cGFzc3dvcmQK';
Query OK, 0 rows affected (0.00 sec)

mysql> flush privileges;
Query OK, 0 rows affected (0.00 sec)

mysql> reset master;
Query OK, 0 rows affected (0.00 sec)

mysql> show master status;
+------------+----------+--------------+------------------+-------------------+
| File       | Position | Binlog_Do_DB | Binlog_Ignore_DB | Executed_Gtid_Set |
+------------+----------+--------------+------------------+-------------------+
| bin.000001 |      120 |              |                  |                   |
+------------+----------+--------------+------------------+-------------------+
1 row in set (0.00 sec)

mysql> CHANGE MASTER TO MASTER_HOST='10.10.1.10', MASTER_USER='repuser', MASTER_PASSWORD='cGFzc3dvcmQK', MASTER_LOG_FILE='bin.000001', MASTER_LOG_POS=120;
Query OK, 0 rows affected, 2 warnings (0.00 sec)

mysql> start slave;
Query OK, 0 rows affected (0.00 sec)

mysql> show slave status\G;
*************************** 1. row ***************************
               Slave_IO_State: Waiting for master to send event
                  Master_Host: 10.10.1.10
                  Master_User: repuser
                  Master_Port: 3306
                Connect_Retry: 60
              Master_Log_File: bin.000001
          Read_Master_Log_Pos: 120
               Relay_Log_File: relay.000002
                Relay_Log_Pos: 277
        Relay_Master_Log_File: bin.000001
             Slave_IO_Running: Yes
            Slave_SQL_Running: Yes
              Replicate_Do_DB:
          Replicate_Ignore_DB:
           Replicate_Do_Table:
       Replicate_Ignore_Table:
      Replicate_Wild_Do_Table:
  Replicate_Wild_Ignore_Table:
                   Last_Errno: 0
                   Last_Error:
                 Skip_Counter: 0
          Exec_Master_Log_Pos: 120
              Relay_Log_Space: 440
              Until_Condition: None
               Until_Log_File:
                Until_Log_Pos: 0
           Master_SSL_Allowed: No
           Master_SSL_CA_File:
           Master_SSL_CA_Path:
              Master_SSL_Cert:
            Master_SSL_Cipher:
               Master_SSL_Key:
        Seconds_Behind_Master: 0
Master_SSL_Verify_Server_Cert: No
                Last_IO_Errno: 0
                Last_IO_Error:
               Last_SQL_Errno: 0
               Last_SQL_Error:
  Replicate_Ignore_Server_Ids:
             Master_Server_Id: 1
                  Master_UUID: 8449dbce-2183-11e6-ad65-0cc47a66896c
             Master_Info_File: /var/lib/mysql/master.info
                    SQL_Delay: 0
          SQL_Remaining_Delay: NULL
      Slave_SQL_Running_State: Slave has read all relay log; waiting for the slave I/O thread to update it
           Master_Retry_Count: 86400
                  Master_Bind:
      Last_IO_Error_Timestamp:
     Last_SQL_Error_Timestamp:
               Master_SSL_Crl:
           Master_SSL_Crlpath:
           Retrieved_Gtid_Set:
            Executed_Gtid_Set:
                Auto_Position: 0
1 row in set (0.00 sec)

ERROR:
No query specified

mysql>
If both:
Slave_IO_Running: Yes
Slave_SQL_Running: Yes
are YES then the replication is OK and both servers are synchronized with their master (each other). If not, the replication needs resetting.
Resetting Replication
It doesn’t take much for replication to go out of sync. A simple network interruption to one server can effectively halt two-way replication if data gets written during the interruption. It makes sense to learn how to reset replication before something goes wrong. A network outage can be simulated by unplugging one of the MySQL servers from the network or simply blocking the traffic on the firewall. While one server is unplugged, we try inserting rows to both. This will generally disrupt replication even though, after restoring network connectivity, the slave status of each server may look normal.
To reset replication, shut down both servers, delete their relay logs, and synchronize the servers (as outlined in the previous section). Deleting the relay logs will cause each server to re-read from their master.
Maintaining the binlogs
In case of ROW binary log based replication the logs can grow several GB’s in size so we need to perform periodic maintaniance.
First we need to find the binlog file from the master each of the slaves is up to.
On host01 we have:
mysql> SHOW SLAVE STATUS\G;
*************************** 1. row ***************************
               Slave_IO_State: Waiting for master to send event
                  Master_Host: 10.10.1.11
                  Master_User: repuser
                  Master_Port: 3306
                Connect_Retry: 60
              Master_Log_File: bin.000021
          Read_Master_Log_Pos: 545105731
               Relay_Log_File: relay.000063
                Relay_Log_Pos: 284681781
        Relay_Master_Log_File: bin.000021
             Slave_IO_Running: Yes
            Slave_SQL_Running: Yes
.
.
.
so this slave is reading the bin.000021 on the master.
On host02 we have:
mysql> SHOW SLAVE STATUS\G;
*************************** 1. row ***************************
               Slave_IO_State: Waiting for master to send event
                  Master_Host: 10.10.1.10
                  Master_User: repuser
                  Master_Port: 3306
                Connect_Retry: 60
              Master_Log_File: bin.000022
          Read_Master_Log_Pos: 545315564
               Relay_Log_File: relay.000061
                Relay_Log_Pos: 262532666
        Relay_Master_Log_File: bin.000022
             Slave_IO_Running: Yes
            Slave_SQL_Running: Yes
.
.
.
and this one is up to bin.000022.
Since we have daily backups of the MySQL logs to S3 it is dafe to purge all previous binlogs on each of the masters. This is the proper way of doing, deleting the logs from the file system is not recommended and may lead to corruption.
This is critical. When we run SHOW SLAVE STATUS\G, we will see two binary logs from the Master:
    Master_Log_File
    Relay_Master_Log_File
When replication has little or no lag these are usually the same value. When there is a lot of replication lag, these values are different. Just to make it simple, choose whatever Relay_Master_Log_File is, and go back to the Master and run:
PURGE BINARY LOGS TO 'Whatever Relay_Master_Log_File Is';
So on host01, which slave is up to bin.000022:
mysql> PURGE BINARY LOGS TO 'bin.000022';
Query OK, 0 rows affected (0.10 sec)
The result is, previously on host01 we had:
root@host01:~# ls -latrh /var/log/mysql/bin*
-rw-rw---- 1 mysql mysql 176M Jun 23 02:12 /var/log/mysql/bin.000020
-rw-rw---- 1 mysql mysql 1.1G Aug  8 07:30 /var/log/mysql/bin.000021
-rw-rw---- 1 mysql mysql 520M Aug 26 02:03 /var/log/mysql/bin.000022
and after:
root@host01:~# ls -latrh /var/log/mysql/bin*
-rw-rw---- 1 mysql mysql 521M Aug 26 02:21 /var/log/mysql/bin.000022
we can see the files have been removed.
On host02 we had:
root@host02:~# ls -latrh /var/log/mysql/bin*
-rw-rw---- 1 mysql mysql 175M Jun 23 02:11 /var/log/mysql/bin.000019
-rw-rw---- 1 mysql mysql 1.1G Aug  8 07:38 /var/log/mysql/bin.000020
-rw-rw---- 1 mysql mysql 520M Aug 26 02:04 /var/log/mysql/bin.000021
and after:
mysql> PURGE BINARY LOGS TO 'bin.000021';
Query OK, 0 rows affected (0.11 sec)
we have:
root@host02:~# ls -latrh /var/log/mysql/bin*
-rw-rw---- 1 mysql mysql 521M Aug 26 02:24 /var/log/mysql/bin.000021
Optimization
Using mysqltuner script:
$ wget http://mysqltuner.pl/ -O mysqltuner.pl
$ perl mysqltuner.pl

 >>  MySQLTuner 1.4.0 - Major Hayden <major@mhtx.net>
 >>  Bug reports, feature requests, and downloads at http://mysqltuner.com/
 >>  Run with '--help' for additional options and output filtering
Please enter your MySQL administrative login: root
Please enter your MySQL administrative password:
[OK] Currently running supported MySQL version 5.6.23-log
[OK] Operating on 64-bit architecture

-------- Storage Engine Statistics -------------------------------------------
[--] Status: Warning: Using a password on the command line interface can be insecure.
+ARCHIVE +BLACKHOLE +CSV -FEDERATED +InnoDB +MRG_MYISAM
[--] Data in PERFORMANCE_SCHEMA tables: 0B (Tables: 52)
[--] Data in MEMORY tables: 0B (Tables: 2)
[--] Data in MyISAM tables: 36M (Tables: 49)
[--] Data in InnoDB tables: 20M (Tables: 70)
[!!] Total fragmented tables: 1

-------- Security Recommendations  -------------------------------------------
[OK] All database users have passwords assigned

-------- Performance Metrics -------------------------------------------------
[--] Up for: 4h 43m 5s (56K q [3.309 qps], 17K conn, TX: 19M, RX: 5M)
[--] Reads / Writes: 86% / 14%
[--] Total buffers: 248.0M global + 1.1M per thread (151 max threads)
[OK] Maximum possible memory usage: 417.9M (11% of installed RAM)
[OK] Slow queries: 0% (0/56K)
[OK] Highest usage of available connections: 3% (5/151)
[OK] Key buffer size / total MyISAM indexes: 8.0M/3.5M
[OK] Key buffer hit rate: 98.8% (21K cached / 260 reads)
[!!] Query cache efficiency: 8.5% (3K cached / 38K selects)
[OK] Query cache prunes per day: 0
[OK] Sorts requiring temporary tables: 0% (0 temp sorts / 174 sorts)
[!!] Temporary tables created on disk: 78% (199 on disk / 254 total)
[OK] Thread cache hit rate: 99% (5 created / 17K connections)
[OK] Table cache hit rate: 92% (206 open / 222 opened)
[OK] Open file limit used: 15% (154/1K)
[OK] Table locks acquired immediately: 100% (7K immediate / 7K locks)
[OK] InnoDB buffer pool / data size: 128.0M/20.8M
[OK] InnoDB log waits: 0
-------- Recommendations -----------------------------------------------------
General recommendations:
    Run OPTIMIZE TABLE to defragment tables for better performance
    MySQL started within last 24 hours - recommendations may be inaccurate
    When making adjustments, make tmp_table_size/max_heap_table_size equal
    Reduce your SELECT DISTINCT queries without LIMIT clauses
Variables to adjust:
    query_cache_limit (> 256K, or use smaller result sets)
    tmp_table_size (> 16M)
    max_heap_table_size (> 16M)
I have adjusted the above 3 variables as per recommendation:
tmp_table_size = 32M
max_heap_table_size = 32M
query_cache_limit = 512K
Also since we have used ‘innodb_file_per_table = 1’ option for the database we can auto maintain it with a cron-job like this:
*/5 * * * * root mysqlcheck --auto-repair -e -o -uDBUSERNAME -pDBPASSWORD -hDBHOST DBNAME TABLE_NAME
Backup and archiving
We will install s3cmd and backup the binlogs and the db dump in S3 bucket in our AWS account. The root user cronjob:
# Archive mysql binlogs to S3
59 23 * * * [ -d /var/log/mysql ] && /usr/local/bin/s3cmd -m text/plain sync /var/log/mysql/ s3://<s3-bucket-name>/mysql/$(hostname)/$(date '+\%F')/ > /dev/null 2>&1
# Archive mysql backup
59 23 * * * /usr/bin/mysqldump --opt --single-transaction -u root -p<root-password> <db-name> | /bin/gzip -c > /tmp/db-dump.sql.gz && /usr/local/bin/s3cmd put /tmp/db-dump.sql.gz s3://<s3-bucket-name>/mysql/bkp/$(hostname)/$(date '+\%F')/db-dump.sql.gz
For this to work, there has been appropriate IAM role created with write access policy to the S3 bucket attached to it. Then the EC2 instances get this role attached during launch time.