Source: munin-monitoring.org There are a number of situations where you’d like to run munin-node on hosts not directly available to the Munin server. This article describes a few scenarios and different alternatives to set up monitoring. Monitoring hosts behind a non-routing server.
In this scenario, a *nix server sits between the Munin server and one or more Munin nodes. The server in-between reaches both the Munin server and the Munin node, but the Munin server does not reach the Munin node or vice versa.
To enable for Munin monitoring, there are several approaches, but mainly either using SSH tunneling or “bouncing” via the in-between server.
SSH tunneling
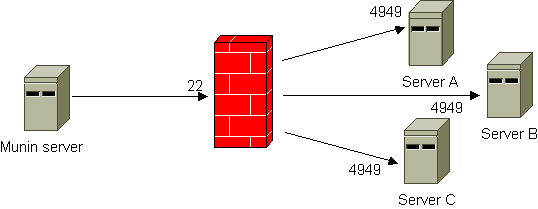
The illustration below shows the principle. By using SSH tunneling only one SSH connection is required, even if you need to reach several hosts on “the other side”. The Munin server listens to different ports on the localhost interface. A configuration example is included. Note that there is also a FAQ entry on using SSH that contains very useful information.
Bouncing
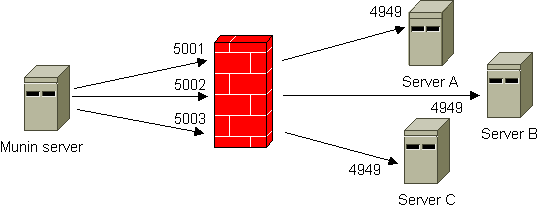
This workaround uses netcat and inetd/xinetd to forward the queries from the Munin server. All incoming connections to defined ports are automatically forwarded to the Munin node using netcat.
It doesn’t happen a lot but it does sometimes when the Gnome Panel freeze. If you are a former windows user you might be used to restart the computer when something in you desktop stuck. This is not the way with Linux. We can fix the problem by restarting the desktop session (restarting the X server) pressing the Ctrl+Alt+BackSpace but this will destroy everything we worked on so far. A more elegant way will be to restart only the Gnome Panel.
Getting access to the Linux command line shell
In order to restart the Gnome Panel we will need to execute the Linux kill command. Once the Gnome Panel process is killed Gnome will restart it automatically so the only thing left for us is to kill the Gnome Panel process. In order to execute the Linux kill command we will need to get access to the Linux shell. This can be done by one of the following:
Pressing Alt+F2
Using an opened console window using the Alt+Tab buttons to navigate to it.
Using a console session by pressing Ctrl+Alt+F1
Killing the Gnome Panel
In each of these options we will need to execute the Linux kill command in order to kill the Gnome Panel process. There are two ways to use the kill command:
Using the application name will kill all the applications with the same name
Using the process id (pid) will kill only the process with the specified id.
Back to our case with the Gnome Panel, we can use both of the options.
I am a new Debian Linux v.7.x / Ubuntu Linux LTS user. How do I reinstall a package using apt-get command line?
The Advanced Packaging Tool (APT) works on both Debian / Ubuntu and it can handle the installation and removal of software. You need use apt-get command as follows to forcefully reinstall package. The syntax is:
apt-get --reinstall install PackageNameHere
OR
apt-get --reinstall install Package1 Package2
The --reinstall option re-install packages that are already installed and at the newest version.
Pro tip: Backup configuration files before you reinstall packages. For example, if you are reinstalling nginx web server package, backup /etc/nginx/ with cp command i.e. mkdir /root/nginx.mmddyyyy/; cp -avr /etc/nginx/* /root/nginx.mmddyyy/
Examples
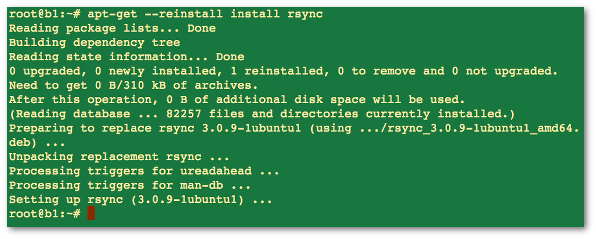
The following command will reinstall rsync package. Open a terminal and then type: $ sudo apt-get --reinstall install rsync OR # apt-get --reinstall install rsync Sample outputs:
Fig.01: Debian / Ubuntu Linux reinstall a package using apt-get command
If above method failed for you, try the following syntax. Make sure you backup config file before typing the following commands. Please note that the --purge option is identical to remove except that packages are removed and purged including any configuration files are deleted too.
Comment rendre la commande ssh-copy-id disponible sur Mac OS X
Si vous avez tenté d’utiliser la commande ssh-copy-id sur Mac OS X, vous avez dû vous rendre compte que, même si openssh est installé nativement, cette commande n’est pas disponible.
Heureusement, cette commande est un simple script qu’il suffit de copier au bon endroit, de lui donner les bons droits et SURPRISE la commande est disponible.
Et comme je suis sympa, eh bien je vous donne tout ça. 😉 Pour commencer le script ssh-copy-id
Ensuite, la méthodologie à suivre pour le mettre en place:
Télécharger le fichier
Déplacer le fichier dans le répertoire /usr/bin
Lui donner les droits nécessaires
$ chmod 755 /usr/bin/ssh-copy-id
Edit
Si vous utilisez homebrew, il existe un package pour faire la même chose : brew install ssh-copy-id