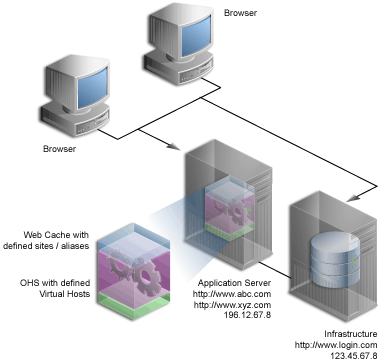
Quand votre nom de domaine pointe vers un hébergement mutualisé, vous n’avez, la plupart du temps, pas le droit de modifier les VirtualHost du serveur Apache.
Virtual Hosts
Pour pallier ce manque, une redirection s’impose mais par un autre biais: l’utilisation de l’URL Rewrting. Lire la suite…
In this tutorial, we will go over how to use Apache JMeter to perform basic load and stress testing on your web application environment. We will show you how to use the graphical user interface to build a test plan and to run tests against a web server.
JMeter is an open source desktop Java application that is designed to load test and measure performance. It can be used to simulate loads of various scenarios and output performance data in several ways, including CSV and XML files, and graphs. Because it is 100% Java, it is available on every OS that supports Java 6 or later.
Prerequisites
In order to follow this tutorial, you will need to have a computer that you can run JMeter on, and a web server to load test against. Do not run these tests against your production servers unless you know they can handle the load, or you may negatively impact your server’s performance.
You may adapt the tests in this tutorial to any of your own web applications. The web server that we are testing against as an example is a 1 CPU / 512 MB VPS running WordPress on a LEMP Stack, in the NYC2 DigitalOcean Datacenter. The JMeter computer is running in the DigitalOcean office in NYC (which is related to the latency of our tests).
Please note that the JMeter test results can be skewed by a variety of factors, including the system resources (CPU and RAM) available to JMeter and the network between JMeter and the web server being tested. The size of the load that JMeter can generate without skewing the results can be increased by running the tests in the non-graphical mode or by distributing the load generation to multiple JMeter servers. Lire la suite…
Suppose you want to sniff live HTTP web traffic (i.e., HTTP requests and responses) on the wire for some reason. For example, you may be testing experimental features of a web server. Or you may be debugging a web application or a RESTful service. Or you may be trying to troubleshoot PAC (proxy auto config) or check for any malware files surreptitiously downloaded from a website. Whatever the reason is, there are cases where HTTP traffic sniffing is helpful, for system admins, developers, or even end users.
While packet sniffing tools such as tcpdump are popularly used for live packet dump, you need to set up proper filtering to capture only HTTP traffic, and even then, their raw output typically cannot be interpreted at the HTTP protocol level so easily. Real-time web server log parsers such as ngxtopprovide human-readable real-time web traffic traces, but only applicable with a full access to live web server logs.
What will be nice is to have tcpdump-like sniffing tool, but targeting HTTP traffic only. In fact, httpryis extactly that: HTTP packet sniffing tool. httpry captures live HTTP packets on the wire, and displays their content at the HTTP protocol level in a human-readable format. In this tutorial, let’s see how we can sniff HTTP traffic with httpry.
Install httpry on Linux
On Debian-based systems (Ubuntu or Linux Mint), httpry is not available in base repositories. So build it from the source:
$ sudo apt-get install gcc make git libpcap0.8-dev
$ git clone https://github.com/jbittel/httpry.git
$ cd httpry
$ make
$ sudo make install
On Fedora, CentOS or RHEL, you can install httpry with yum as follows. On CentOS/RHEL, enableEPEL repo before running yum.
$ sudo yum install httpry
If you still want to build httpry from the source on RPM-based systems, you can easily do that by:
$ sudo yum install gcc make git libpcap-devel
$ git clone https://github.com/jbittel/httpry.git
$ cd httpry
$ make
$ sudo make install
Basic Usage of httpry
The basic use case of httpry is as follows.
$ sudo httpry -i <network-interface>
httpry then listens on a specified network interface, and displays captured HTTP requests/responses in real time.
In most cases, however, you will be swamped with the fast scrolling output as packets are coming in and out. So you want to save captured HTTP packets for offline analysis. For that, use either ‘-b’ or ‘-o’ options. The ‘-b’ option allows you to save raw HTTP packets into a binary file as is, which then can be replayed with httpry later. On the other hand, ‘-o’ option saves human-readable output ofhttpry into a text file.
To save raw HTTP packets into a binary file:
$ sudo httpry -i eth0 -b output.dump
To replay saved HTTP packets:
$ httpry -r output.dump
Note that when you read a dump file with ‘-r’ option, you don’t need root privilege.
To save httpry‘s output to a text file:
$ sudo httpry -i eth0 -o output.txt
Advanced Usage of httpry
If you want to monitor only specific HTTP methods (e.g., GET, POST, PUT, HEAD, CONNECT, etc), use ‘-m’ option:
$ sudo httpry -i eth0 -m get,head
If you downloaded httpry‘s source code, you will notice that the source code comes with a collection of Perl scripts which aid in analyzing httpry‘s output. These scripts are found in httpry/scripts/plugins directory. If you want to write a custom parser for httpry‘s output, these scripts can be good examples to start from. Some of their capabilities are:
hostnames: Display a list of unique host names with counts.
find_proxies: Detect web proxies.
search_terms: Find and count search terms entered in search services.
content_analysis: Find URIs which contain specific keywords.
xml_output: Convert output into XML format.
log_summary: Generate a summary of log.
db_dump: Dump log file data into a MySQL database.
Before using these scripts, first run httpry with ‘-o’ option for some time. Once you obtained the output file, run the scripts on it at once by using this command:
$ cd httpry/scripts
$ perl parse_log.pl -d ./plugins <httpry-output-file>
You may encounter warnings with several plugins. For example, db_dump plugin may fail if you haven’t set up a MySQL database with DBI interface. If a plugin fails to initialize, it will automatically be disabled. So you can ignore those warnings.
After parse_log.pl is completed, you will see a number of analysis results (*.txt/xml) in httpry/scripts directory. For example, log_summary.txt looks like the following.
To conclude, httpry can be a life saver if you are in a situation where you need to interpret live HTTP packets. That might not be so common for average Linux users, but it never hurts to be prepared. What do you think of this tool?
Pour empêcher les attaques par hameçonnage lancées en se servant du window.opener
En HTML, l’attribut “rel” peut être utilisé sur les balises <a> (qui permet de créer un lien hypertexte pointant vers un document en spécifiant l’URL de celui-ci au niveau de l’attribut « href” et qui permet également de définir des ancres au sein d’un document et les liens pour y accéder), <area> (qui permet de définir une zone particulière d’une image et peut lui associer un lien hypertexte) et <link> (qui permet de définir l’emplacement d’un fichier qui sera accessible au sein de la page où elle est déclarée couramment utilisée pour mettre en relation d’autres documents comme les feuilles de style).
Dans ces différentes balises, il est utilisé pour détailler la relation existante entre le document courant et le document qui sera ouvert par le lien et il prend pour valeur des éléments d’une liste de différentes relations dont les valeurs sont séparées par des virgules (par exemple “alternate”, “author”, “bookmark”, “help”, “license”, “next”, “nofollow”, “noreferrer”, “prefetch”, “prev”, “search”, “tag”).
Mathias Bynens, un développeur web front-end dans la ville de Termonde en Belgique, a voulu partager avec la communauté des développeurs web les bienfaits de l’une des valeurs de l’attribut “rel”, notamment “noreferrer” qui permet entre autres de résoudre un problème, mais lequel ?
En guise de démonstration, dans un billet blog il a proposé une petite expérience. Bynens propose les URL index.html et index/malicious.html. En définissant un lien vers la seconde URL avec l’attribut “target” qui avec la valeur “_blank”, cela va déclencher l’ouverture de la page cible dans une nouvelle fenêtre (dans ce cas la page malicious.html). Pour rappel, lorsqu’une fenêtre est ouverte depuis une autre fenêtre, elle conserve une référence à cette première fenêtre dans window.opener. Si la fenêtre courante n’a pas été ouverte par une autre fenêtre, la méthode renvoie null.
Bynens note que « le document malicious.html dans cette nouvelle page a l’élément windows.opener qui pointe vers l’élément window du document que vous regardez actuellement, c’est-à-dire index.html. Ce qui signifie que lorsque l’utilisateur clique sur le lien, malicious.html a un contrôle total sur l’objet window du document ». Dans le cas d’espèce, malicious.html vient remplacer l’onglet contenant index.html par index.html#hax, qui affiche un message caché.
« Ceci est un exemple relativement inoffensif, mais le lien aurait pu rediriger vers une page d’hameçonnage conçue pour ressembler à la vraie page index.html, demandant des informations de connexion. L’utilisateur ne l’aurait probablement pas remarqué, parce que l’accent est mis sur la page malveillante dans la nouvelle fenêtre tandis que la redirection se passe en arrière-plan. Cette attaque pourrait être encore plus subtile en ajoutant un retard avant de rediriger vers la page de phishing en arrière-plan », a-t-il avancé.
Dans cet exemple, index.html et index/malicious.html ont la même origine. Mais Bynens a indiqué qu’il est possible d’effectuer la même attaque avec des origines différentes.
Que faire pour empêcher que les pages n’abusent de window.opener ? Bynens recommande simplement de se servir de “rel=noopener”, « cela va permettre de vous assurer que window.opener a la valeur “null” sur Chrome 49 et Opera 36. Pour les navigateurs plus anciens, vous pouvez vous servir de “rel=noopener” qui va également désactiver l’en-tête HTTP “Refer”, ou alors vous servir de ce script JavaScript qui va potentiellement activer le bloqueur de popup.
var otherWindow = window.open();
otherWindow.opener = null;
otherWindow.location = URL;
Ne vous servez pas de “target=_blank” (ou tout autre “target” qui ouvre un nouveau contexte de navigation) en particulier pour les liens dans le contenu généré par l’utilisateur, à moins que vous n’ayez une bonne raison ».
Il a déjà averti les éditeurs de navigateurs dans des rapports de bogues. Le problème semble corrigé du côté de Chrome et Opera, mais pas encore chez Firefox, Safari et Edge.