Archive

Articles taggués ‘netfilter’

Voyage au centre du noyau: Traffic Control, la QoS

18/11/2023 Comments off

Gérer la QoS.

On peut aujourd’hui largement envisager d’héberger un ou plusieurs services sur son serveur à domicile, et des mouvements comme auto-hebergement.fr l’on bien illustré. Reste le problème de la bande passante en upload, qui bien que largement suffisante pour héberger des serveurs web, email, jabber ou autre, reste à utiliser intelligemment.

Linux fournit cette intelligence, sous forme d’un scheduler de paquets nommé Traffic Control (TC, pour les intimes), et l’objectif de cet article est de présenter cette technologie et sa mise en place dans un cas d’étude d’hébergement Web, DNS et même BitTorrent. Notons au passage que bon nombre de scripts et programmes existent pour simplifier la mise en place de la QoS (Quality of Service). Citons Wondershaper, Shorewall, ADSL-Optimizer par exemple. Cet article n’en parlera pas, car l’objectif est ici de faire mais aussi de comprendre comment ça marche sous le capot, et pour ça, il faut démonter le moteur et mettre les mains dans le cambouis.

1. Traffic Control, la QoS, les bases

Traffic Control travaille sur les paquets sortant du noyau. Il n’a pas, initialement, pour objectif de contrôler le trafic des paquets entrants. Cette portion de code du noyau se situe entre la couche IP et le pilote du matériel qui transmet sur le réseau. On est donc très bas dans les couches. En réalité, c’est Traffic Control qui est constamment en charge de transmettre au driver de la carte réseau le paquet à envoyer.

figure1-tcgeneral

Cela signifie, en fait, que le module TC – le scheduler de paquet – est en permanence activé dans le noyau, même quand vous ne pensez pas l’utiliser. Par défaut, ce scheduler maintient une queue (prononcer kiou, une file d’attente) similaire à FIFO dans laquelle le premier paquet entré est donc le premier sortit.

La base de TC est la Queuing Discipline (qdisc) qui représente la politique de scheduling appliquée à une queue. Il existe différentes qdisc. Comme pour le scheduling processeur, on retrouve les méthodes FIFO, FIFO à plusieurs files, FIFO avec hash et round robin (SFQ). On a également un système Token Bucket Filter (TBF) qui attribue des jetons (tokens) à une qdisc pour en limiter le débit (pas de token = pas de transmission = on attend d’avoir un jeton disponible). Cette dernière politique a ensuite été étendue à un TBF hiérarchique, le HTB (Hierarchical Token Bucket). Les politiques que nous allons étudier ici sont TBF, qui pose les fondamentaux, SFQ et HTB. Nous allons également jeter un coup d’oeil à la politique par défaut, que, tout Monsieur Jourdain que nous sommes, nous utilisons sans le savoir: pfifo_fast.

1.1 Premier contact

Jean-Kevin est pressé, il n’a pas de temps à perdre, et tout de suite maintenant, il doit limiter la bande passante sortante de son serveur web à 200kbits par secondes (25ko/s). Au diable la théorie, on y reviendra plus tard, mettons tout de suite les mains dans le cambouis. La mécanique que nous allons mettre en place est simple. Nous allons utiliser une règle Netfilter pour marquer les paquets qui nous intéressent. Ensuite, nous allons fournir à TC une politique qui s’appliquera sur les paquets contenant la marque définie. C’est parti.

1.2 Netfilter MARK

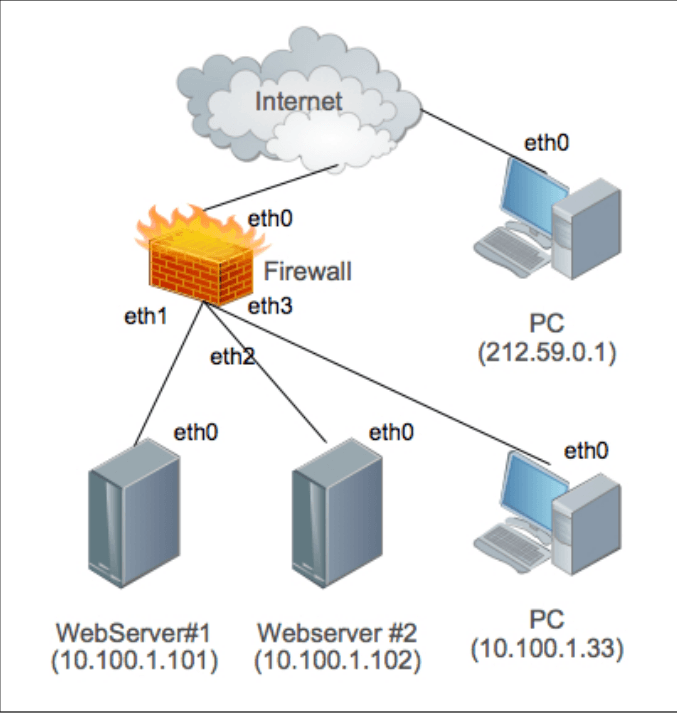
Netfilter permet d’interagir directement avec la structure représentant un paquet dans le noyau. Cette structure, le sk_buff, possède un champ « __u32 nfmark » que l’on va renseigner et qui sera lu par le filtre de TC pour sélectionner la classe de destination du paquet. La règle iptables suivante va appliquer la marque ’80’ sur les paquets sortant (chaine OUTPUT) ayant pour port source le port 80:

# iptables -t mangle -A OUTPUT -o eth0 -p tcp --sport 80 -j MARK --set-mark 80

On peut vérifier que cette règle est bien appliquée aux paquets sortants en visualisant les statistiques de Netfilter.

# iptables -L OUTPUT -t mangle -v
Chain OUTPUT (policy ACCEPT 74107 packets, 109M bytes)
 pkts bytes target prot opt in  out  source   destination
73896  109M MARK   tcp  --  any eth0 anywhere anywhere    tcp spt:www MARK xset 0x50/0xffffffff

1.3 Deux classes dans un arbre

Le binaire /sbin/tc est compris dans le package iproute (sous Debian). Un simple aptitude suffit à l’installer, s’il ne l’est pas déjà. Nous allons créer un arbre dont la racine appliquera la politique HTB. Cet arbre va contenir deux classes: une pour notre trafic marqué, l’autre pour tout le reste et qui sera donc considérée par défaut.

# tc qdisc add dev eth0 root handle 1: htb default 20
# tc class add dev eth0 parent 1:0 classid 1:10 htb rate 200kbit ceil 200kbit prio 1 mtu 1500
# tc class add dev eth0 parent 1:0 classid 1:20 htb rate 1024kbit ceil 1024kbit prio 2 mtu 1500

Les deux classes filles sont raccrochés à la racine. Ces classes possèdent un débit garantie (rate) et un débit maximal opportuniste (ceil). Si la bande passante n’est pas utilisée, alors une classe pourra monter son débit jusqu’à la valeur de ceil. Sinon c’est la valeur de rate qui s’applique. Cela veut dire que la somme des valeurs de rate doit correspondre à la bande passante disponible. Dans le cas d’un upload ADSL classique chez un fournisseur correct, cela sera d’environ 1024kbits (dans le meilleur des cas, éloignement du DSLAM, etc…).

Nous avons maintenant d’un côté un arbre de contrôle de trafic, et d’un autre côté du marquage de paquets. Il reste donc à relier les deux. Cela est fait avec les règles de filtrage de TC. Ces règles sont très simples. On dit à TC de prendre en charge (handle) les paquets portant la marque 80 et de les envoyer (fw flowid) à la classe correspondante. Un point important toutefois, un filtre doit être rattaché à la racine « root » de l’arbre. Sinon, il n’est pas pris en compte.

# tc filter add dev eth0 parent 1:0 protocol ip prio 1 handle 80 fw flowid 1:10

Faisons maintenant le test avec NetCat, on ouvre un port en écoute qui renvoi des zéro. C’est basique et parfait pour tester notre politique. On lance donc :

# nc -l -p 80 < /dev/zero

Et sur une autre machine, on lance un telnet vers le port 80 de la machine en écoute. L’outil iptraf permet de visualiser la connexion en cours et, surtout, son débit (voir figure 2).

figure2-debitqos

Comme on le voit dans l’encadré rouge, en bas à droite, le débit de la connexion est de 199,20kbps. On s’approche de beaucoup des 200kbps, la précision dépendant quelques paramètres que nous allons étudier. Si l’on teste une connexion du même type sur un autre port, on verra un débit limité à 1024kbps, ce qui correspond au débit de la classe par défaut qui s’applique à tous les paquets non marqués.

Lire la suite…

iptables revisited: a not so ordinary ‘firewall’

10/11/2023 Comments off

iptables revisited

Source: Per Linde, Martynas Pumputis and Guillermo Rodr ́ıguez iptables revisited: a not so ordinary ‘firewall’

iptables revisited: Abstract

At the present time, security on the internet, and networks in general have evolved, and become an issue that should not be disregarded. It is well known that many experts recommend Linux as the main operating system for the machines that have to be in charge of security (also for a desktop computer). Linux included a basic firewall tool called ipchains in the series of its kernel until 2.4 version, though after that version it switched to iptables. iptables is known for its efficiency and functionality, but the enormous functionality means a more complex tool to be configured. This paper will overview some mechanisms to do advanced configuration of iptables based on two main scenarios. The different configurations presented will try to prove the remarkable power of iptables as an independent firewall and also as a tool that can work in conjuntion with other tools usually incorporated when included this one.

Introduction

iptables is a firewall developed by the Netfilter Project 1 . Presently, this firewall is becoming more and more popular (both among end users and network administrators). The popularity of this firewall it closely related to Linux operating system, because iptables works with Linux kernels 2.4 and 2.6 and almost every major Linux distribution comes with pre-installed iptables firewall. This firewall is also known as a stateful packet filter. It is a main difference between iptables and ipchains (an ancestor of iptables that was used with Linux kernel versions up to 2.4). The firewall supports not only a packet filtering, but it is also able to log, forward packets and it could be used together with such tools as psad, snort, etc. In this paper we will look a bit deeper into more advance iptables configurations, but first of all, we would like to introduce a reader to a basic usage of iptables. The core of the firewall consists of four parts [7]: tables, chains, matches and targets. A system administrator is able to define an iptables policy, i.e. tables of chains, which describe how a kernel should react against different groups of packets. Rules are used to create a chain – collection of rules that is applied to every packet. There are five predefined chains:

  • INPUT: used for incoming packets before routing.
  • OUTPUT: used for packets coming into the box itself.
  • FORWARD: used for packets being routed through the box.
  • PREROUTING: used for locally-generated packets before routing.
  • POSTROUTING: used for packets as they about to leave iptables.

Every rule should have a set of matches, that helps to filter packets (e.g. -d 10.100.1.1 matches a destination IP 10.100.1.1), and it also has to have a target – an action which should be performed when a rule matches on a packet (e.g. ACCEPT, DROP, LOG…). All the examples presented in this paper (excluding the one used at section 6) will be based on the scenario presented in the figure 1. In the following scenario, WebServer#1 (10.100.1.101 assigned to its ‘eth0’ interface), WebServer#2 (10.100.1.102 assigned to its ‘eth0’ interface) and PC (10.100.1.33 assigned to its ‘eth0’ interface) belong to a local network and every packet that comes from the Internet/LAN is filtered by the firewall (‘eth1’ interface for LAN’s traffic, ‘eth0’ for Internet’s traffic). PC (212.59.0.1 assigned to ‘eth0’ interface) is reachable directly through the Internet. Capture du 2016-04-19 17:53:32 The listing 1 shows a couple of rules, the first one appends a rule to the end of the INPUT chain and it specifies that every packet from the source with IP address 212.59.0.1 will beDROPed and the second rule logs all outgoing connections from eth1 interface.

iptables -A INPUT -s 212.59.0.1 -j DROP
iptables -A OUTPUT -o eth1 -j LOG

Lire la suite…

Preventing brute force attacks using iptables recent matching

08/11/2023 Comments off

General idea

brute force attacksIn recent times our network has seen a lot of attempts to brute-force ssh passwords. A method to hamper such attacks by blocking attacker’s IP addresses using iptables ‘recent’ matching is presented in this text:

When the amount of connection attempts from a certain IP address exceeds a defined threshold, this remote host is blacklisted and further incoming connection attempts are ignored. The host is only removed from the blacklist after it has been stopped connecting for a certain time.

Edit: The fail2ban scripts offer a more sophisticated (but also more heavy-weighted) solution for this problem.

Software requirements

Linux kernel and iptables with ‘recent’ patch. (It seems that this patch has entered the mainline some time ago. ‘Recent’ matching e.g. is known to be included with kernels 2.4.31 and 2.6.8 of Debian Sarge 4.0.)

Implementation

We begin with empty tables…

iptables -F

and add all the chains that we will use:

iptables -N ssh
iptables -N blacklist

Setup blacklist chain

One chain to add the remote host to the blacklist, dropping the connection attempt:

iptables -A blacklist -m recent --name blacklist --set
iptables -A blacklist -j DROP

The duration that the host is blacklisted is controlled by the match in the ssh chain.

Setup ssh chain

In the ssh chain, incoming connections from blacklisted hosts are dropped. The use of --update implies that the timer for the duration of blacklisting (600 seconds) is restarted every time an offending packet is registered. (If this behaviour is not desired, --rcheckmay be used instead.)

iptables -A ssh -m recent --update --name blacklist --seconds 600 --hitcount 1 -j DROP

These rules are just for counting of incoming connections.

iptables -A ssh -m recent --set --name counting1
iptables -A ssh -m recent --set --name counting2
iptables -A ssh -m recent --set --name counting3
iptables -A ssh -m recent --set --name counting4

With the following rules, blacklisting is controlled using several rate limits. In this example, a host is blacklisted if it exceeds 2 connection attempts in 20 seconds, 14 in 200 seconds, 79 in 2000 seconds or 399 attempts in 20000 seconds.

iptables -A ssh -m recent --update --name counting1 --seconds 20 --hitcount 3 -j blacklist
iptables -A ssh -m recent --update --name counting2 --seconds 200 --hitcount 15 -j blacklist
iptables -A ssh -m recent --update --name counting3 --seconds 2000 --hitcount 80 -j blacklist
iptables -A ssh -m recent --update --name counting4 --seconds 20000 --hitcount 400 -j blacklist

The connection attempts that have survived this scrutiny are accepted:

iptables -A ssh -j ACCEPT

Lire la suite…

Mass-blocking IP addresses with ipset

30/10/2023 Comments off

Using ipset to block many IP addresses

I was sponsoring an upload of ipset to Debian the other day. This reminded me of ipset, a very cool program as I am going to show. It makes administering related netfilter (that is: firewall) rules easy along with a good performance. This is achieved by changing how rules match in iptables. Traditionally, an iptables rule matches a single network identity, for example a single IP address or a single network only. With ipsets you can operate on a bunch of (otherwise unrelated) addresses at once easily. If you happen to need bulk actions in your firewall, for example you want to blacklist a long list of IP addresses at once, you will love IP sets. I promise.

Drawbacks of netfilter

IP sets do exist for a longer time, however they made it into the upstream Linux kernel as of version 2.6.39. That means Debian Wheezy will support it as is; for Debian Squeeze you can either use a backported kernel or compile yourself the module shipped in the ipset-source package. In any case you additionally need the command line utilities named ipset. Thus, install that package before you can start. Having that said, Squeeze users should note the ipset syntax I am demonstrating below slightly differs from the syntax supported by the Squeeze utilities. The big picture remains the same, though.

IP utils do not conflict with iptables, but extend it in a useful way. You can combine both as you like. In fact, you still need iptables to turn IP sets into something really useful. Nonetheless you will be hitting iptables‘ limitation soon if you exceed a certain number of rules. You can combine as many conditions within a filter rule as you like, however you can only specify a single pattern for each condition. You figure, this does not scale very well if a pattern to match against does not follow a very tight definition such as a CIDR pattern.

This means you can happily filter whole network blocks such as 192.168.0.0/24 (which translates to 255 hosts) in iptables, but there is no way to specify a particular not specially connected set of IP addresses within this range if it cannot be expressed with a CIDR prefix. For example, there is no way to block, say, 192.168.0.5, 192.168.0.100 and 192.168.0.220 in a single statement only. You really need to declare three rules which only differ by the IP address. Pretend, you want to prevent these three addresses from accessing your host. You would probably do something like this:

iptables -A INPUT -s 192.168.0.5 -p TCP -j REJECT
iptables -A INPUT -s 192.168.0.100 -p TCP -j REJECT
iptables -A INPUT -s 192.168.0.220 -p TCP -j REJECT

Alternatively you could do

iptables -A INPUT -s 192.168.0.0/24 -p TCP -j REJECT

but this would block 251 unrelated hosts, too. Not a good deal I’d say. Now, while the former alternative is annoying, what’s the problem with it? The problem is: It does not scale. Netfilter rules work like a fall-through trapdoor. This means whenever a packet enters the system, it passes through several chains and in each of these chains, netfilter checks all rules until either one rule matches or there are no rules left. In the latter case the default action applies. In netfilter terminology a chain determines when an interception to the regular packet flow occurs. In the example above the specified chain is INPUT, which applies to any incoming packet.

In the end this means every single packet which is sent to your host needs to be checked whether it matches the patterns specified in every rule of yours. And believe me, in a server setup, there are lots of packets flowing to your machine. Consider for example a single HTTP requests, which requires at very least four packets sent from a client machine to your web server. Thus, each of these packets is passing through your rules in your INPUT chain as a bare minimum, before it is eventually accepted or discarded.

This requires a substantial computing overhead for every rule you are adding to your system. This isn’t so much of a problem if you haven’t many rules (for some values of “many” as I am going to show). However, you may end up in a situation where you end up with a large rule set. For example, if you suffer from a DDoS attack, you may be tempted to block drone clients in your firewall (German; Apache2. Likewise: for Lighttpd). In such a situation you will need to add thousands of rules easily.

Being under attack, the performance of your server is poor already. However, by adding many rules to your firewall you are actually further increasing computing overhead for every request significantly. To illustrate my point, I’ve made some benchmarks. Below you find the response times of a HTTP web server while doing sequential requests for a single file of 10 KiB in size. I am explaining my measurement method in detail further below. For now, look the graph. It shows the average response time of an Apache 2 web server, divided into four parts:

  • connect time: this is the time passed by until the server completed the initial TCP handshake
  • send time: this is the time passed by which I needed to reliably send a HTTP request over the established TCP connection reliably (that means: one packet sent and waiting for acknowledged by the server)
  • first byte: this is time passed by until the server sent the first byte from the corresponding HTTP response
  • response complete: this is time passed by until the server sent all of the remaining bytes of the corresponding HTTP response (remaining HTTP header + 10 KiB of payload)

ipset2

Lire la suite…

Collect & visualize your logs with Logstash, Elasticsearch & Redis

28/10/2023 Comments off

Source: michael.bouvy.net

Update of December 6th : although Logstash does the job as a log shipper, you might consider replacing it with Lumberjack / Logstash Forwarder, which needs way less resources, and keep Logstash on your indexer to collect, transform and index your logs data (into ElasticSearch) : check out my latest blog post on the topic.

Kibana_medium

Kibana Dashboard


Even if you manage a single Linux server, you probably already know how hard it is to keep an eye on what’s going on with your server, and especially tracking logs data. And this becomes even worse when you have several (physical or virtual) servers to administrate.


Although Munin is very helpful monitoring various informations from my servers / VMs, I felt the need of something more, and bit less static / more interactive.

There are 3 kind of logs I especially wanted to track :

  • Apache 2 access logs
  • iptables logs
  • Syslogs

After searching arround on the internet for a great tool that would help me, I read about the open source log management tool Logstash which seems to perfectly suit a (major) part of my needs : logs collecting / processing.

For the purpose of this post, I will take the following network architecture and assume and I want to collect my Apache, iptables, system logs from servers 1/2/3 (“shippers”) on server 4 (“indexer”) and visualize them :

logstach-archi1

As you can see, I am using 4 complementary applications, the role of each one being :

  • Logstash : logs collector, processor and shipper (to Redis) on log “shippers” 1-3 ; logs indexer on server 4 (reads from Redis, writes to Elasticsearch)
  • Redis : logs data broker, receiving data from log “shippers” 1-3
  • Elasticsearch : logs data persistent storage
  • Kibana : (time-based) logs data visualization (graphs, tables, etc.)

Lire la suite…

Categories: Système Tags: , , ,