How To Secure Nginx with Let’s Encrypt on Ubuntu 14.04
Introduction
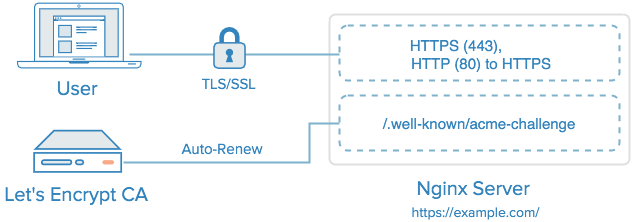
.png?1452541820 "nginx lets encrypt ubuntu") Let’s Encrypt is a new Certificate Authority (CA) that provides an easy way to obtain and install free TLS/SSL certificates, thereby enabling encrypted HTTPS on web servers. It simplifies the process by providing a software client,
Let’s Encrypt is a new Certificate Authority (CA) that provides an easy way to obtain and install free TLS/SSL certificates, thereby enabling encrypted HTTPS on web servers. It simplifies the process by providing a software client, letsencrypt, that attempts to automate most (if not all) of the required steps. Currently, as Let’s Encrypt is still in open beta, the entire process of obtaining and installing a certificate is fully automated only on Apache web servers. However, Let’s Encrypt can be used to easily obtain a free SSL certificate, which can be installed manually, regardless of your choice of web server software.
In this tutorial, we will show you how to use Let’s Encrypt to obtain a free SSL certificate and use it with Nginx on Ubuntu 14.04. We will also show you how to automatically renew your SSL certificate. If you’re running a different web server, simply follow your web server’s documentation to learn how to use the certificate with your setup.
Prerequisites
Before following this tutorial, you’ll need a few things.
You should have an Ubuntu 14.04 server with a non-root user who has sudo privileges. You can learn how to set up such a user account by following steps 1-3 in our initial server setup for Ubuntu 14.04 tutorial.
You must own or control the registered domain name that you wish to use the certificate with. If you do not already have a registered domain name, you may register one with one of the many domain name registrars out there (e.g. Namecheap, GoDaddy, etc.).
If you haven’t already, be sure to create an A Record that points your domain to the public IP address of your server. This is required because of how Let’s Encrypt validates that you own the domain it is issuing a certificate for. For example, if you want to obtain a certificate for example.com, that domain must resolve to your server for the validation process to work. Our setup will use example.com and www.example.com as the domain names, so both DNS records are required.
Once you have all of the prerequisites out of the way, let’s move on to installing the Let’s Encrypt client software.
Step 1 — Install Let’s Encrypt Client
The first step to using Let’s Encrypt to obtain an SSL certificate is to install the letsencrypt software on your server. Currently, the best way to install Let’s Encrypt is to simply clone it from the official GitHub repository. In the future, it will likely be available via a package manager.
Install Git and bc
Let’s install Git and bc now, so we can clone the Let’s Encrypt repository.
Update your server’s package manager with this command:
sudo apt-get update
Then install the git and bc packages with apt-get:
sudo apt-get -y install git bc
With git and bc installed, we can easily download letsencrypt by cloning the repository from GitHub.
Clone Let’s Encrypt
We can now clone the Let’s Encrypt repository in /opt with this command:
sudo git clone https://github.com/letsencrypt/letsencrypt /opt/letsencrypt
You should now have a copy of the letsencrypt repository in the /opt/letsencrypt directory.
Lire la suite…


