Que ce soit lors de la première installation ou après la perte du mot de passe principal de MySQL, il est nécessaire de pouvoir modifier le mot de passe administrateur (root) de MySQL.
Pour pouvoir modifier le mot de passe root de MySQL, il faut pouvoir s’y connecter, Or, si vous n’avez pas le mot de passe root actuel, vous vous retrouvez alors dans une situation kafkaïenne. Si vous connaissez le mot de passe actuel de MySQL et que vous souhaitez juste changer le mot de passe root, vous pouvez sauter cette étape ! Lire la suite…
If you lost your ISPConfig 3 administrator password, you can reset it with the following SQL query.
UPDATE sys_user SET passwort = md5(‘admin’) WHERE username = ‘admin’;
The SQL query sets the password to “admin” for the user “admin”, it has to be executed in the ISPConfig mysql database, e.g. with phpmyadmin. If you dont have phpmyadmin installed, then the query can be executed with the mysql commandline utility as well:
Login to the mysql database.
mysql -u root -p
and enter the password of the mysql root user. To switch to the ISPConfig database, run this command:
use dbispconfig;
Now execute the SQL command:
UPDATE sys_user SET passwort = md5(‘admin’) WHERE username = ‘admin’;
The OTPW package consists of the one-time-password generator otpw-gen plus two verification routinesotpw_prepare() and otpw_verify() that can easily be added to programs such as login or ftpd on POSIX systems. For platforms that support the Pluggable Authentication Method (PAM) interface, a suitable wrapper is included as well. Login software extended this way will allow reasonably secure user authentication over insecure network lines. The user carries a password list on paper. The scheme is designed to be robust against theft of the paper list and race-for-the-last-letter attacks. Cryptographic hash values of the one-time passwords are stored for verification, either in the user’s home directory or in a dedicated system directory.
Introduction
A well-known classic vulnerability of the Internet application protocol suite is the frequent cleartext transfer of passwords in the telnet, rsh, and ftp protocols. Modern replacements for these protocols such as Tatu Ylönen’sSecure Shell allow comfortable and secure remote sessions and file transfers over network connection that are not trusted to provide confidentiality.
However, traveling computer users often want to connect to their home system via untrusted terminals at conference hotels, other universities, and airports, where trusted encryption software is not available. Even Secure Shell does not protect against keyboard eavesdropping software on the untrusted terminal. A loss of confidentiality is often acceptable in these situations for the session content, but not for reusable login passwords. One-time-password schemes avoid the transmission of authentication secrets that are of any value after they have been used. This provides a reasonable level of protection against the widely encountered password sniffing attacks. The goal of a one-time-password login scheme is merely to provide a significant increase of security over the classic telnet/rlogin login procedure. It does not aim to protect from sophisticated active attacks such as session hijacking, host emulation, man-in-the-middle, etc. against which ssh and SSL based protocols should be used if this level of protection is required.
A widely known one-time-password scheme is S/KEY [Hal94, HM96]. OTPW is not compatible with and is not derived from either S/KEY or OPIE. It is a completely independent and different design, which I believe fulfils my functional and security requirements better.
How it works
One-time password authentication with the OTPW package is accomplished via a file containing hash values of passwords. Depending on the installation option chosen, this can either be a file ~john/.otpw located in the user’s home directory, or it can be a file ~otpw/john in the home directory of a dedicated pseudo user “otpw”. In the latter case, the otpw-gen tool for generating new passwords must be owned by pseudo user “otpw” and have the SETUID bit set. As long as users do not have such a hash file, the one-time-password facility is not active for them.
A user who wants to setup the one-time-password capability just executes the otpw-gen program. The program will ask for a prefix password that the user has to select and memorize and it will then write to standard output a password list such as:
Normally the output of otpw-gen should be sent directly to the printer as in
otpw-gen | lpr
or should be first formatted with an ASCII to PostScript converter where necessary.
Fetch the printed list immediately from the printer, fold it, and keep it with you. The list shows the machine name and the creation time to allow users to find the latest list for the right machine. It does not show the user’s name, because nobody is supposed to have the list of anyone else, but printer drivers such as a2ps might add it. Only a single list is required for a set of networked machines on which the user has a common home directory.
By default, otpw-gen generates 60 lines of output. Use the command line options -hlines, -wcolumns, and -spages to specify the length of the output. No more than 1000 passwords will be generated at a time.
Where one-time-password authentication is used, the password prompt will be followed by a 3-digit password number. Enter first the prefix password that was given to otpw-gen, followed directly (without hitting return between) by the password with the requested number from the printed password list:
  login: kuhn
  Password 019: geHeimOdAkH62c
In this example, geHeim was the prefix password. The spaces in the password list are just there to increase readability and can be dropped.
A clever attacker might observe the password being entered and might try to use the fact that computers can send data much faster than users can finish entering passwords. In the several hundred milliseconds that the user needs to press the return key after the last character, an attacker could on a parallel connection to the same machine send the code of the return key faster than the user.
To prevent such a race-for-the-last-key attack, any login attempt that is taking place concurrently with another attempt will require three one-time passwords to be entered:
This might look inconvenient at first, but remember that three passwords will only be requested when someone tries to login simultaneously, which in itself should already cause suspicion. The three requested passwords are randomly selected but they will never include the single password that was requested in the first of the concurrent login attempts. Only the first requested single password will be locked, not any of the requested triples. This way, the three-password method ensures that an attacker cannot disable the OTPW mechanism by locking all passwords. The triple challenge ensures that many ten thousand network connections would be necessary to perform a race attack on the same password triple, which is not practical. The OTPW package creates a symbolic link .otpw.lock in the user’s home directory to lock the first requested password while its input is pending. If a system crash created a stale lock, it will be removed after 24 hours.
As someone says, security is a not a product, but a process. While SSH protocol itself is cryptographically secure by design, someone can wreak havoc on your SSH service if it is not administered properly, be it weak passwords, compromised keys or outdated SSH client.
As far as SSH authentication is concerned, public key authentication is in general considered more secure than password authentication. However, key authentication is actually not desirable or even less secure if you are logging in from a public or shared computer, where things like stealth keylogger or memory scraper can always a possibility. If you cannot trust the local computer, it is better to use something else. This is when « one-time passwords » come in handy. As the name implies, each one-time password is for single-use only. Such disposable passwords can be safely used in untrusted environments as they cannot be re-used even when they are stolen.
One way to generate disposable passwords is via Google Authenticator. In this tutorial, I am going to demonstrate another way to create one-time passwords for SSH login: OTPW, a one-time password login package. Unlike Google Authenticator, you do not rely on any third party for one-time password generation and verification.
What is OTPW?
OTPW consists of one-time password generator and PAM-integrated verification routines. In OTPW, one-time passwords are generated apriori with the generator, and carried by a user securely (e.g., printed in a paper sheet). Cryptographic hash of the generated passwords are then stored in the SSH server host. When a user logs in with a one-time password, OTPW’s PAM module verifies the password, and invalidates it to prevent re-use.
Step One: Install and Configure OTPW on Linux
Debian, Ubuntu or Linux Mint:
Install OTPW packages with apt–get.
$ sudo apt-get install libpam-otpw otpw-bin
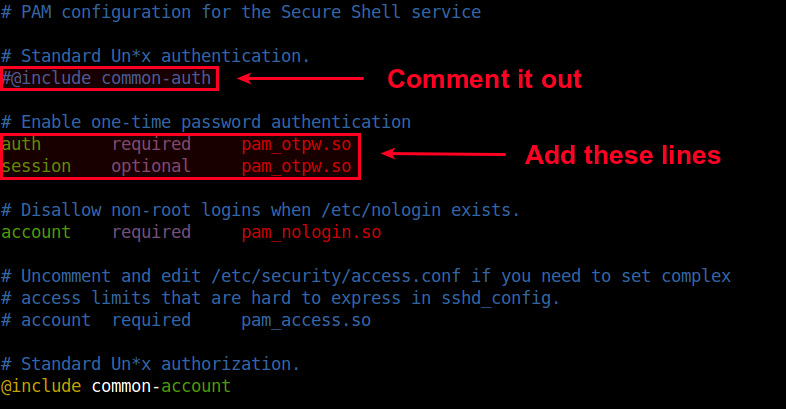
Open a PAM configuration file for SSH (/etc/pam.d/sshd) with a text editor, and comment out the following line (to disable password authentication).
#@include common-auth
and add the following two lines (to enable one-time password authentication):
Open Makefile with a text editor, and edit a line that starts with « PAMLIB= » as follows.
On 64-bit system:
PAMLIB=/usr/lib64/security
On 32-bit system:
PAMLIB=/usr/lib/security
Compile and install it. Note that installation will automatically restart an SSH server. So be ready to be disconnected if you are on an SSH connection.
$ make
$ sudo make install
Now you need to update SELinux policy since /usr/sbin/sshd tries to write to user’s home directory, which is not allowed by default SELinux policy. The following commands will do. If you are not using SELinux, skip this step.
Next, open a PAM configuration file for SSH (/etc/pam.d/sshd) with a text editor, and comment out the following line (to disable password authentication).
#auth substack password-auth
and add the following two lines (to enable one-time password authentication):
Before we proceed, it would be best to cover some basic user administration topics that will be very useful in later chapters. Adding Users
One of the most important activities in administering a Linux box is the addition of users. Here you’ll find some simple examples to provide a foundation for future chapters. It is not intended to be comprehensive, but is a good memory refresher. You can use the command man useradd to get the help pages on adding users with the useradd command or the man usermod to become more familiar with modifying users with the usermod command.
Who Is the Super User?
The super user with unrestricted access to all system resources and files in Linux is the user named root. This user has a user ID, of 0 which is universally identified by Linux applications as belonging to a user with supreme privileges. You will need to log in as user root to add new users to your Linux server.
Debian Note: When installing Ubuntu Linux systems, you are prompted to create a primary user that is not root. A root user is created but no password is set, so you initially cannot log in as this user. The primary user can become the root user using the sudo su - command that will be discussed later.
How To Add Users
Adding users takes some planning; read through these steps below before starting:
1) Arrange your list of users into groups by function. In this example there are three groups « parents« , « children » and « soho« .
Parents    Children     Soho
Paul       Alice        Accounts
Jane       Derek        Sales
3) Add the Linux users and assign them to their respective groups
[root@bigboy tmp]# useradd -g parents paul
[root@bigboy tmp]# useradd -g parents jane
[root@bigboy tmp]# useradd -g children derek
[root@bigboy tmp]# useradd -g children alice
[root@bigboy tmp]# useradd -g soho accounts
[root@bigboy tmp]# useradd -g soho sales
If you don’t specify the group with the -g, RedHat/Fedora Linux creates a group with the same name as the user you just created; this is also known as the User Private Group Scheme. When each new user first logs in, they are prompted for their new permanent password.
4) Each user’s personal directory is placed in the /home directory. The directory name will be the same as their user name.
[root@bigboy tmp]# ll /home
drwxr-xr-x 2 root root 12288 Jul 24 20:04 lost found
drwx------ 2 accounts soho 1024 Jul 24 20:33 accounts
drwx------ 2 alice children 1024 Jul 24 20:33 alice
drwx------ 2 derek children 1024 Jul 24 20:33 derek
drwx------ 2 jane parents 1024 Jul 24 20:33 jane
drwx------ 2 paul parents 1024 Jul 24 20:33 paul
drwx------ 2 sales soho 1024 Jul 24 20:33 sales
[root@bigboy tmp]#