Archive

Archives pour la catégorie ‘Constructeur’

If your iPhone, iPad, or iPod touch won‘t turn on or is frozen

30/10/2017 Comments off

If your device has a frozen screen or doesn’t respond when you touch it, or becomes stuck when you turn it on, learn what to do.

If your screen is black or frozen

If your screen is black or frozen, you might need to force restart your device. A force restart won’t erase the content on your device. You can force restart your device even if the screen is black or the buttons aren’t responding. Follow these steps:

  • On an iPhone 8 or iPhone 8 Plus: Press and quickly release the Volume Up button. Then press and quickly release the Volume Down button. Finally, press and hold the Side button until you see the Apple logo.
  • On an iPhone 7 or iPhone 7 Plus: Press and hold both the Side and Volume Down buttons for at least 10 seconds, until you see the Apple logo.
  • On an iPhone 6s and earlier, iPad, or iPod touch: Press and hold both the Home and the Top (or Side) buttons for at least 10 seconds, until you see the Apple logo.

If your device still won’t turn on or start up

Plug in your device and let it charge for up to one hour.

After a few minutes, you should see the charging screen. 


If you don’t see the charging screen within an hour, or you see the connect to power screen, check the jack, USB cable, and power adapter. Make sure that everything is plugged in firmly, free of debris, and not damaged. You might want to try a different USB cable or power adapter.

If your device still doesn’t turn on, see what to do next.

If your device turns on but gets stuck during start up

If you see the Apple logo or a red or blue screen during startup, try these steps:

  1. Connect your device to a computer and open iTunes. If you don’t have a computer, try to borrow one, or go to an Apple Store or Apple Authorized Service Provider for help. 
  2. While your device is connected, force it to restart. 
    • On an iPhone 8 or iPhone 8 Plus: Press and quickly release the Volume Up button. Then press and quickly release the Volume Down button. Finally, press and hold the Side button until you see the recovery-mode screen.
    • On an iPhone 7 or iPhone 7 Plus: Press and hold the Side and Volume Down buttons at the same time. Keep holding them until you see the recovery-mode screen.
    • On an iPhone 6s and earlier, iPad, or iPod touch: Press and hold both the Home and the Top (or Side) buttons at the same time. Keep holding them until you see the recovery-mode screen.
  3. Don’t release the buttons when you see the Apple logo. Keep holding until you see the recovery mode screen.


  1. When you get the option to restore or update, choose Update. iTunes will try to reinstall iOS without erasing your data.

iTunes will download the software for your device. If it takes more than 15 minutes, your device will exit recovery mode and you’ll need to repeat steps 2 and 3.
 
Categories: Constructeur, Matériel Tags: ,

macOS Boot Option Cheatsheet

16/10/2017 Comments off

To access some specialized Mac features you’ll need to hold down one or more keys during startup. If you’re having trouble with your Mac, this can be a great way to troubleshoot and analyze your options.

To use any of these boot keys, hold down the listed key combo as soon as you press your Mac’s power button. If you’re restarting your Mac, press and hold the keys immediately after your Mac begins to restart. Don’t release the keys until you see the described behavior.

Shift: Start your Mac in Safe Mode. Since safe mode only loads essential software, you can determine whether a system process or a user-installed application is causing your problem.

Option: Boot into Startup Manager. From here you can select different startup disks if any bootable partitions are available.

Command + R: Boot into Recovery Mode. Recovery Mode is macOS’s powerful recovery suite with a bunch of options for saving or wiping your Mac. You can use it to reinstall macOS, restore from a Time Machine backup or use Disk Utility to repair or format your hard drive.

Shift + Command + Option + R: Start in Internet Recovery Mode, skipping your system’s hard drive. This allows you to reinstall the build of macOS that came with your computer from the factory. macOS might do this one on its own if your installation is so messed up that you can’t boot into Recovery Mode.

Command + S: Start in single user, command-line-only mode. This is useful for running diagnostic Terminal commands or fsck, but it can’t do much beyond that.

Command + V: Boot in verbose mode. This mode displays logging and diagnostic messages as your Macboots. If your Mac is showing the Apple logo but failing to start completely, try this step to see where in the boot process the error occurs.

Lire la suite…

Categories: Constructeur, Système Tags: ,

macOS High Sierra Supplemental Update Released for Mac Users

06/10/2017 Comments off

Apple has released the first supplemental update to macOS High Sierra 10.13, complete with bug fixes, improvements, and security fixes.

General release notes accompanying the supplemental update suggests the release includes improvements to stability, reliability, and security. Specifically, the update is said to “improve installer robustness” (it is unclear if this addresses the issue where some users are unable to download a complete macOS High Sierra installer without third party utility assistance), includes a fix for cursor graphics bugs when using Adobe InDesign, and resolves and issue with Mail app was unable to delete email from Yahoo accounts. Additionally, the update includes a security fix to address a problem where Disk Utility could be used to reveal the password of an encrypted AFPS volume, and the update also resolves a security bug relating to Keychain passwords. Complete security update release notes are below for those interested. The supplemental update is recommended for all macOS High Sierra users to install.

Mac users running macOS 10.13 High Sierra can find the update available to download and install now in the Mac App Store Updates section. The update is labeled as “macOS High Sierra 10.13 Supplemental Update”.

Note the supplemental update is separate from the beta versions of 10.13.1 currently under the beta testing programs.

Always back up a Mac before installing any system software update, including smaller bug fix updates like this macOS High Sierra Supplemental Update.

The complete security related supplemental update release notes are as follows:

macOS High Sierra 10.13 Supplemental Update
Released October 5, 2017
StorageKit
Available for: macOS High Sierra 10.13
Impact: A local attacker may gain access to an encrypted APFS volume
Description: If a hint was set in Disk Utility when creating an APFS encrypted volume, the password was stored as the hint. This was addressed by clearing hint storage if the hint was the password, and by improving the logic for storing hints.
CVE-2017-7149: Matheus Mariano of Leet Tech
Security
Available for: macOS High Sierra 10.13
Impact: A malicious application can extract keychain passwords
Description: A method existed for applications to bypass the keychain access prompt with a synthetic click. This was addressed by requiring the user password when prompting for keychain access.
CVE-2017-7150: Patrick Wardle of Synack
New downloads of macOS High Sierra 10.13 include the security content of the macOS High Sierra 10.13 Supplemental Update.

Separately, iPhone and iPad users can find iOS 11.0.2 available as an update, which also includes various bug fixes for that system software release, and watchOS 4.0.1 for Apple Watch is out as well.

Categories: Constructeur, Logiciel Tags: ,

How to Downgrade iOS 11 to iOS 10.3.3 on iPhone and iPad

06/10/2017 Comments off

Don’t like iOS 11 on your iPhone or iPad? You can downgrade to iOS 10.3.3 if you act quickly. Maybe you don’t like the update, maybe you find iOS 11 battery life to be poor, or app compatibility to be a problem, or perhaps you think the performance is subpar. Whatever the reason, you can easily downgrade iOS 11 if you need to, but the ability to downgrade is only available for a limited time while Apple continues to sign the prior operating system release of iOS 10.3.3.

We’ll walk through how you can downgrade iOS 11 back to iOS 10 on an iPhone or iPad.

This guide requires iTunes and a computer, internet access, an iOS 10.3.3 ISPW file, and a USB cable. There is no way to downgrade iOS 11 without iTunes and a computer.

Important note: downgrading iOS 11 to iOS 10.3.3 can cause data loss, including the removal of important data or everything on your iPhone or iPad. Thus it is critical to have a backup that is compatible with iOS 10 available before downgrading (one should have been made prior to updating to iOS 11 in the first place), this is because iOS 11 backups are not compatible with iOS 10 or other prior releases. If you only have a backup for iOS 11, then downgrading to iOS 10 may require you to update again to iOS 11 in order to restore from that iOS 11 backup. If you don’t know what you are doing and do not have adequate backups, do not attempt to downgrade or you may experience permanent data loss on the iPhone or iPad.

We’ll cover two ways to downgrade, a simple way that should work for most users, and an approach that requires Recovery Mode if the first downgrade method fails.

Lire la suite…

Categories: Constructeur, Logiciel Tags: ,

How to Download a Full macOS High Sierra Installer App

04/10/2017 Comments off

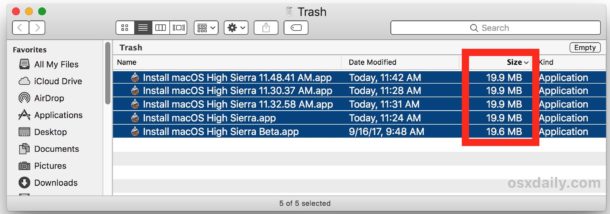
Many Mac users who are attempting to download macOS High Sierra from the Mac App Store will find that a small 19 MB version of “Install macOS High Sierra.app” downloads to the /Applications folder of the target Mac, rather than the complete 5.2 GB Installer application for macOS High Sierra. This is annoying because it prevents a single download from being used on multiple computers, plus the small installer requires an internet connection during usage to download the rest of the High Sierra update files. Additionally, the tiny 19 MB incomplete installer prevents users from being able to create a macOS High Sierra USB installer drive or other custom update options available through the command line, like skipping the APFS update.

This tutorial will show you a workaround trick that allows Mac users to download the full macOS High Sierra “Install macOS High Sierra.app” file at 5.2 GB with the complete installer tool set and all dmg files and associated Install macOS High Sierra.app/Contents/Resources/ tools, rather than the tiny incomplete truncated installer at 19 MB.

How to Download the Full “Install macOS High Sierra.app” Application

Warning: this method relies on a third party tool from an unverified third party source, if you are not comfortable with using unvetted and unverified software, and if you do not understand the risks associated with using potentially dubious software, do not follow this process. This is for advanced users only.

    1. Go to dosdude1.com here and download the High Sierra patcher application*
    2. Launch “MacOS High Sierra Patcher” and ignore everything about patching, instead pull down the “Tools” menu and choose “Download MacOS High Sierra”

    1. Confirm that you want to download the complete macOS High Sierra install application, and then point it to a location to save on the local hard drive

    1. The patcher app will notify you when the download is complete, when it is done downloading quit out of the patcher app

    1. Locate the “Install macOS High Sierra.app” file you downloaded, it will be the complete installer application with the full Contents/Resources/ toolkit available

* The “macOS High Sierra Patcher” application is intended for those with unsupported Macs and Hackintosh users, but any Mac user can use the app to be able to download the complete installer file from Apple servers. The source of this patcher application is a MacRumors Forums

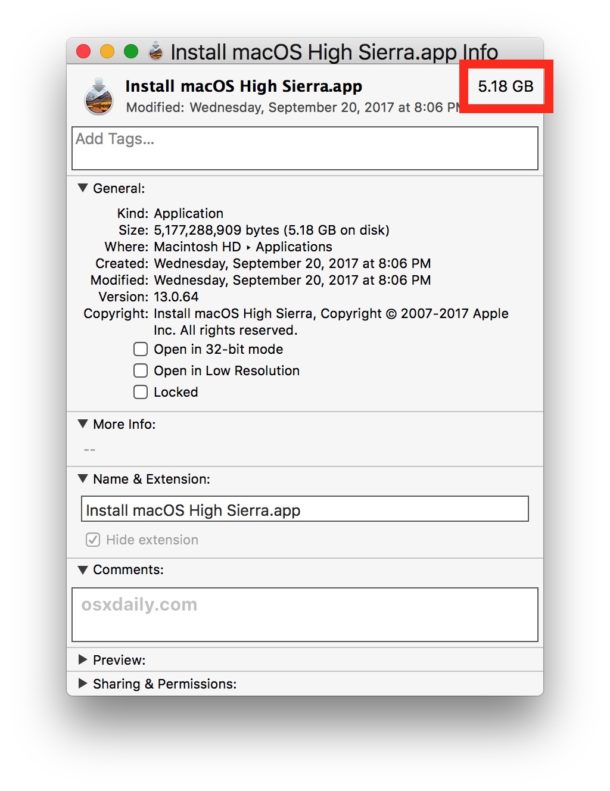
You can confirm that you have the complete Install macOS High Sierra.app application by getting info on the file, the complete installer should be around 5.2 GB rather than the tiny 19 MB incomplete installer that requires additional downloads.

The complete macOS High Sierra installer downloaded

Why do some users get a small incomplete version of macOS High Sierra installer from the App Store?

This is not yet known, but it happens with the final version of macOS High Sierra installer as well as with some of the beta versions.

It is unclear why some users will get a 19MB version of “Install macOS High Sierra.app” when downloaded from the App Store, while others users will get the complete 5.2GB version of “Install macOS High Sierra.app” when downloading from the App Store. Interestingly, once a user ends up with the 19 MB version of the incomplete installer, that seems to be the only thing that will download for that user regardless of how many times the incomplete installer app is deleted and re downloaded.

Incomplete macOS High Sierra installer

The installer size and completeness inconsistency appears random, and has no relation to disk space, beta enrollment, software catalog, and other theories seem to be incorrect as well.