The setup described here is compatible with any Ubuntu LAMP server, so you can use this one as the basis setup too.
This tutorial will show you how to setup Let’s Encrypt on Servers without ISPConfig 3 as there will be a direct implementation of the Let’s Encrypt service in the next ISPConfig 3 release (version 3.1) soon. So if you plan to use ISPConfig, wait for the 3.1 release and also a new tutorial.
Creating the website
The 1st step is to create the website configuration and directory and enable SSL (Apache mod_ssl) for it. It’s up to you if you use the default configuration for one website on a server or you plan to use multiple vhosts to host more than one domain. For more reliable and scalable usage, I’ll create a vhost configuration for my “lab” domain isp1.cloudapp.net from Azure.
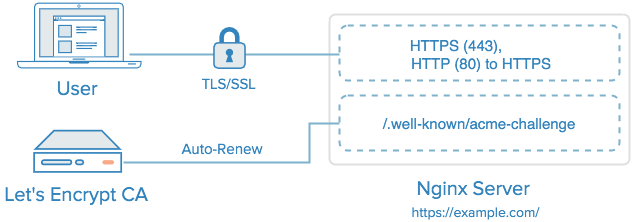
Let’s Encrypt is a new Certificate Authority (CA) that provides an easy way to obtain and install free TLS/SSL certificates, thereby enabling encrypted HTTPS on web servers. It simplifies the process by providing a software client, letsencrypt, that attempts to automate most (if not all) of the required steps. Currently, as Let’s Encrypt is still in open beta, the entire process of obtaining and installing a certificate is fully automated only on Apache web servers. However, Let’s Encrypt can be used to easily obtain a free SSL certificate, which can be installed manually, regardless of your choice of web server software.
In this tutorial, we will show you how to use Let’s Encrypt to obtain a free SSL certificate and use it with Nginx on Ubuntu 14.04. We will also show you how to automatically renew your SSL certificate. If you’re running a different web server, simply follow your web server’s documentation to learn how to use the certificate with your setup.
Prerequisites
Before following this tutorial, you’ll need a few things.
You should have an Ubuntu 14.04 server with a non-root user who has sudo privileges. You can learn how to set up such a user account by following steps 1-3 in our initial server setup for Ubuntu 14.04 tutorial.
You must own or control the registered domain name that you wish to use the certificate with. If you do not already have a registered domain name, you may register one with one of the many domain name registrars out there (e.g. Namecheap, GoDaddy, etc.).
If you haven’t already, be sure to create an A Record that points your domain to the public IP address of your server. This is required because of how Let’s Encrypt validates that you own the domain it is issuing a certificate for. For example, if you want to obtain a certificate for example.com, that domain must resolve to your server for the validation process to work. Our setup will use example.com and www.example.com as the domain names, so both DNS records are required.
Once you have all of the prerequisites out of the way, let’s move on to installing the Let’s Encrypt client software.
Step 1 — Install Let’s Encrypt Client
The first step to using Let’s Encrypt to obtain an SSL certificate is to install the letsencrypt software on your server. Currently, the best way to install Let’s Encrypt is to simply clone it from the official GitHub repository. In the future, it will likely be available via a package manager.
Install Git and bc
Let’s install Git and bc now, so we can clone the Let’s Encrypt repository.
Update your server’s package manager with this command:
sudo apt-get update
Then install the git and bc packages with apt-get:
sudo apt-get -y install git bc
With git and bc installed, we can easily download letsencrypt by cloning the repository from GitHub.
Clone Let’s Encrypt
We can now clone the Let’s Encrypt repository in /opt with this command:
Anyone who has gone through the trouble of setting up a secure website knows what a hassle getting and maintaining a certificate can be. Let’s Encrypt automates away the pain and lets site operators turn on and manage HTTPS with simple commands.
No validation emails, no complicated configuration editing, no expired certificates breaking your website. And of course, because Let’s Encrypt provides certificates for free, no need to arrange payment.
This page describes how to carry out the most common certificate management functions using the Let’s Encrypt client. You’re welcome to use any compatible client, but we only provide instructions for using the client that we provide.
If you’d like to know more about how this works behind the scenes, check out our technical overview.
Installing Let’s Encrypt
Note: Let’s Encrypt is in beta. Please don’t use it unless you’re comfortable with beta software that may contain bugs.
If your operating system includes a packaged copy of letsencrypt, install it from there and use the letsencrypt command. Otherwise, you can use our letsencrypt-auto wrapper script to get a copy quickly:
$ git clone https://github.com/letsencrypt/letsencrypt
$ cd letsencrypt
$ ./letsencrypt-auto --help
letsencrypt-auto accepts the same flags as letsencrypt; it installs all of its own dependencies and updates the client code automatically (but it’s comparatively slow and large in order to achieve that).
How To Use The Client
The Let’s Encrypt client supports a number of different “plugins” that can be used to obtain and/or install certificates. A few examples of the options are included below:
If you’re running Apache on a recent Debian-based OS, you can try the Apache plugin, which automates both obtaining and installing certs:
./letsencrypt-auto --apache
On other platforms automatic installation is not yet available, so you will have to use the certonly command. Here are some examples:
To obtain a cert using a “standalone” webserver (you may need to temporarily stop your exising webserver) for example.com and www.example.com:
The this will obtain a single cert for example.com, www.example.com, thing.is, and m.thing.is; it will place files below /var/www/example to prove control of the first two domains, and under /var/www/thing for the second pair.
In a post on Wednesday, researchers Alex Halderman and Nadia Heninger presented compelling research suggesting that the NSA has developed the capability to decrypt a large number of HTTPS, SSH, and VPN connections using an attack on common implementations of the Diffie-Hellman key exchange algorithm with 1024-bit primes. Earlier in the year, they were part of a research group that published a study of the Logjam attack, which leveraged overlooked and outdated code to enforce « export-grade » (downgraded, 512-bit) parameters for Diffie-Hellman. By performing a cost analysis of the algorithm with stronger 1024-bit parameters and comparing that with what we know of the NSA « black budget » (and reading between the lines of several leaked documents about NSA interception capabilities) they concluded that it’s likely NSA has been breaking 1024-bit Diffie-Hellman for some time now.
The good news is, in the time since this research was originally published, the major browser vendors (IE, Chrome, and Firefox) have removed support for 512-bit Diffie-Hellman, addressing the biggest vulnerability. However, 1024-bit Diffie-Hellman remains supported for the forseeable future despite its vulnerability to NSA surveillance. In this post, we present some practical tips to protect yourself from the surveillance machine, whether you’re using a web browser, an SSH client, or VPN software.
Disclaimer: This is not a complete guide, and not all software is covered.
Web Browser
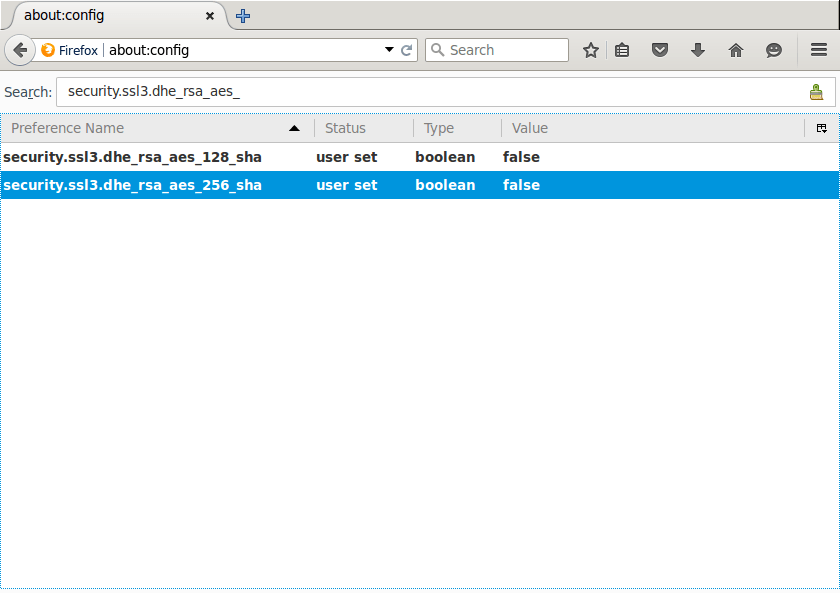
To make sure you’re using the strongest crypto, you have to look at the encryption algorithms (or cipher suites) that your browser supports. There’s an excellent tool, How’s My SSL?, that will test your browser’s cipher suite support. The relevant area of the page is the bottom, Given Cipher Suites. You want to make sure that you don’t see the text « _DHE_ » in the list of ciphersuites – although the Elliptic Curve variant of Diffie-Hellman, represented by suites with « _ECDHE_ » is okay. It is important to note that there is a trade-off here: removing your clients support for « _DHE_ » ciphers will eliminate the risk of this attack, but it may also remove Forward Secrecy support altogether for some sites. Here’s how to remove those « _DHE_ » cipher suites if you still have them:
Firefox
(tested with 40.0.3)
Open a new tab, enter « about:config » into the location bar and hit the « Enter » key. If you get a warning page, click « I’ll be careful, I promise! » This will bring you to the Firefox configuration settings. In the search bar up top, type « .dhe_ » and hit the « Enter » key. This should result in two settings being displayed: « security.ssl3.dhe_rsa_aes_128_sha » and « security.ssl3.dhe_rsa_aes_256_sha ». Double-click both of them to change the value from « true » to « false ».
Now, if you refresh the How’s My SSL page, the « _DHE_ » ciphersuites should be gone!
.png?1452541820 "nginx lets encrypt ubuntu")