I‘m a new Linux / Unix system user. How can I set encrypted tunnel between my desktop/laptop computer and server in a remote data center to bypass the limits in a network? How do I create a reverse SSH tunnel on Unix-like systems?
SSH tunnelling can be thought as a poor-man’s-VPN. It is handy in situations where you would like to hide your traffic from any body who might be listening on the wire or eavsdropping.
You can use such tunnel between your computer and your Unix/BSD/Linux server to bypass limits placed by a network or to bypass NAT, and more. Lire la suite…
Many times it can be convenient to tunnel your web traffic through a proxy, particularly an encrypted one. This web page shows how to easily tunnel your traffic through an ssh-encrypted proxy on Mac OS X. This allows your traffic to traverse your local network without being visible to snoopers, even when visiting unencrypted sites.
It also allows you to appear to come from a different IP address, allowing you to defeat geolocation schemes. In particular, some credit card processors try to make sure that your credit card billing address is correlated with your IP address, which can be hard on us expatriates. Another example is the free credit report web site which doesn’t seem to work from outside the United States. There are undoubtedly many other practical, legitimate uses for this sort of redirection. Lire la suite…
You are running a Linux server at home, which is behind a NAT router or restrictive firewall. Now you want to SSH to the home server while you are away from home. How would you set that up? SSH port forwarding will certainly be an option. However, port forwarding can become tricky if you are dealing with multiple nested NAT environment. Besides, it can be interfered with under various ISP-specific conditions, such as restrictive ISP firewalls which block forwarded ports, or carrier-grade NAT which shares IPv4 addresses among users.
What is Reverse SSH Tunneling?
One alternative to SSH port forwarding is reverse SSH tunneling. The concept of reverse SSH tunneling is simple. For this, you will need another host (so-called « relay host ») outside your restrictive home network, which you can connect to via SSH from where you are. You could set up a relay host using a VPS instance with a public IP address. What you do then is to set up a persistent SSH tunnel from the server in your home network to the public relay host. With that, you can connect « back » to the home server from the relay host (which is why it’s called a « reverse » tunnel). As long as the relay host is reachable to you, you can connect to your home server wherever you are, or however restrictive your NAT or firewall is in your home network.
Set up a Reverse SSH Tunnel on Linux
Let’s see how we can create and use a reverse SSH tunnel. We assume the following. We will be setting up a reverse SSH tunnel from homeserver to relayserver, so that we can SSH to homeserver via relayserver from another computer called clientcomputer. The public IP address of relayserver is 1.1.1.1.
On homeserver, open an SSH connection to relayserver as follows.
Here the port 10022 is any arbitrary port number you can choose. Just make sure that this port is not used by other programs on relayserver.
The « -R 10022:localhost:22 » option defines a reverse tunnel. It forwards traffic on port 10022 of relayserver to port 22 of homeserver.
With « -fN » option, SSH will go right into the background once you successfully authenticate with an SSH server. This option is useful when you do not want to execute any command on a remote SSH server, and just want to forward ports, like in our case.
After running the above command, you will be right back to the command prompt of homeserver.
Log in to relayserver, and verify that 127.0.0.1:10022 is bound to sshd. If so, that means a reverse tunnel is set up correctly.
One thing to take note is that the SSH login/password you type for localhost should be for homeserver, not for relayserver, since you are logging in to homeserver via the tunnel’s local endpoint. So do not type login/password for relayserver. After successful login, you will be on homeserver.
As someone says, security is a not a product, but a process. While SSH protocol itself is cryptographically secure by design, someone can wreak havoc on your SSH service if it is not administered properly, be it weak passwords, compromised keys or outdated SSH client.
As far as SSH authentication is concerned, public key authentication is in general considered more secure than password authentication. However, key authentication is actually not desirable or even less secure if you are logging in from a public or shared computer, where things like stealth keylogger or memory scraper can always a possibility. If you cannot trust the local computer, it is better to use something else. This is when « one-time passwords » come in handy. As the name implies, each one-time password is for single-use only. Such disposable passwords can be safely used in untrusted environments as they cannot be re-used even when they are stolen.
One way to generate disposable passwords is via Google Authenticator. In this tutorial, I am going to demonstrate another way to create one-time passwords for SSH login: OTPW, a one-time password login package. Unlike Google Authenticator, you do not rely on any third party for one-time password generation and verification.
What is OTPW?
OTPW consists of one-time password generator and PAM-integrated verification routines. In OTPW, one-time passwords are generated apriori with the generator, and carried by a user securely (e.g., printed in a paper sheet). Cryptographic hash of the generated passwords are then stored in the SSH server host. When a user logs in with a one-time password, OTPW’s PAM module verifies the password, and invalidates it to prevent re-use.
Step One: Install and Configure OTPW on Linux
Debian, Ubuntu or Linux Mint:
Install OTPW packages with apt–get.
$ sudo apt-get install libpam-otpw otpw-bin
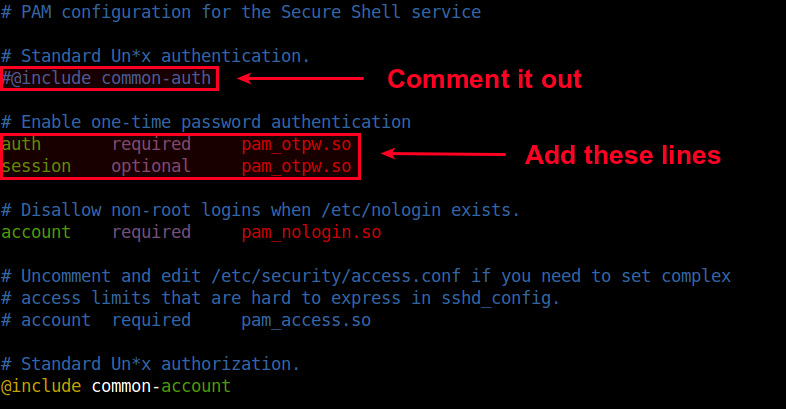
Open a PAM configuration file for SSH (/etc/pam.d/sshd) with a text editor, and comment out the following line (to disable password authentication).
#@include common-auth
and add the following two lines (to enable one-time password authentication):
Open Makefile with a text editor, and edit a line that starts with « PAMLIB= » as follows.
On 64-bit system:
PAMLIB=/usr/lib64/security
On 32-bit system:
PAMLIB=/usr/lib/security
Compile and install it. Note that installation will automatically restart an SSH server. So be ready to be disconnected if you are on an SSH connection.
$ make
$ sudo make install
Now you need to update SELinux policy since /usr/sbin/sshd tries to write to user’s home directory, which is not allowed by default SELinux policy. The following commands will do. If you are not using SELinux, skip this step.
Next, open a PAM configuration file for SSH (/etc/pam.d/sshd) with a text editor, and comment out the following line (to disable password authentication).
#auth substack password-auth
and add the following two lines (to enable one-time password authentication):
SSH Tunneling – Get Through Your Firewall to Other Ports
Typical Scenario is that only the ssh port (tcp/22) and http (tcp/80) are allowed into a machine. All other traffic is blocked.
Do you have a server on the other side of a firewall that you can ssh to, but to which you cannot reach on other ports. Let’s imagine, for example, that your server has ports 80/tcp and 22/tcp open, but you want to be able to get to your database port (3306/tcp) or your vnc port (5901/tcp) which are blocked by the firewall. Grr. What can you do? Use ssh tunneling, of course.
SSH Tunneling is Similar to VPN
Ssh allows you to tunnel traffic to other ports through the firewall using your ssh Connection
Ssh allows you to tunnel your communication to other ports and services on your server through your ssh connection to the server. This means that traffic that would normally be blocked by your firewall or iptables can now reach its destination. This of course, all assumes that you have a login to the server and are able to ssh to it from your network or internet location.
SSH Tunneling Uses a Local Port
The idea behind ssh tunneling is that you know which port(s) you want to access on the server and that you also setup a local port on your workstation for you to connect to on your side of the tunnel. When using SSH Tunneling, you will direct your client applications, in this example case MySQL Workbench and VNC Viewer, to the local ports on your workstation which you configured in your ssh client. SSH will then transport the traffic to the local port through its tunnel to the server port you are hoping to reach.
Ssh Command Line (CLI) Port Configuration
When using ssh from the command line in a linux, unix, OSX or other command line environment, you will use the -L option to map local ports to remote ports on the server. In the example below, Mary is logging in to server1.uptimemadeeasy.com with ssh and is mapping local port 8675 on her workstation to the MySQL port (tcp/3306) on the server. Note that the name localhost is in reference to server1.uptimemadeeasy.com.
ssh -l mary server1.uptimemadeeasy.com -L 8675:localhost:3306
Mary will then supply the password when requested and she will notice with netstat -an that port 8675 on her local workstation is now being used. She can then point her MySQL Workbench client at her local machine (localhost) port 8675. Her traffic to her local port 8675 will then be transported through her ssh tunnel to the server port 3306. Mary can now verify that her local port (8675) is listening locally using netstat: