How do I use mysqldump command with Unix shell pipes?
The mysqldump client is a backup program which is used to dump a database or a collection of databases for backup or transfer to another SQL server (not necessarily a MySQL server). The dump typically contains SQL statements to create the table, populate it, or both. However, mysqldump can also be used to generate files in CSV, other delimited text, or XML format. The syntax is as follows to dump a database called foo to the remote server called server1.cyberciti.biz:
mysqldump db-name | mysql -h server1.dbsysnet.com db-name
mysqldump foo | mysql -h server1.dbsysnet.com foo
However, I recommend using VPN or ssh client to secure data transfer using the shell pipes as follows:
mysqldump db-name | ssh user@server1.dbsysnet.com mysql db-name
mysqldump -u vivek -p'myPassWord' foo | ssh vivek@server1.dbsysnet.com mysql -u backup -p'myPassword' bar
You have configured your MySql replication, next step is to perform maintenance and monitor your replication. Percona Toolkit for MySQL is a collection of advanced command-line tools to perform a variety of MySQL server and system tasks.
The Percona Toolkit allows you to amongst many tasks to verify MySQL replication integrity, efficiently archive rows, find duplicate indexes, summarize MySQL servers, analyze queries from logs and tcpdump, collect vital system information when problems occur.
To get started you need to install Percona Toolkit, I’m using Ubuntu as an OS on my servers, installing the percona toolkit was straight forward
apt-get install percona-toolkit
To get a summary of your databases use the command – pt-mysql-summary
pt-mysql-summary --u=username --p=password
Next you would want to setup a heartbeat table in your database so you can Monitor MySQL replication delay – for that you will use the pt-heartbeat command.
pt-heartbeat measures replication lag on a MySQL or PostgreSQL server. You can use it to update a master or monitor a replica. mk-heartbeat depends only on the heartbeat record being replicated to the slave, so it works regardless of the replication mechanism. It works at any depth in the replication hierarchy; for example, it will reliably report how far a slave lags its master’s master’s master.
Start daemonized process to update test.heartbeat table on master:
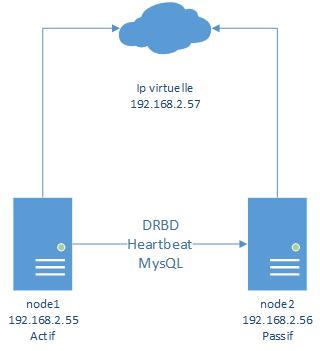
Nous avons vu précédement comment mettre un place un Cluster Apache actif/passif avec DRBD et HeartBeat. Dans ce tutoriel nous allons voir comment faire la même chose mais avec MySQL.
La configuration de DRBD et de Heartbeat est la même que pour le tutoriel précédent.
Voilà ce que nous allons mettre en place
Donc pour faire ce tutoriel suivez le tutoriel suivant jusqu’a « Installation d’apache« :
on injecte la base: [maitre]# mysql -u root -pMDP votre_bdd.sql > votre_bdd.sql
Maintenant, on va activer la réplication de la base MySql du serveur maître sur l’esclave: sur le serveur maître: tout d’abord on va se connecter sur la base
[maitre]# mysql -u root -pMDP
Puis on bloque la base en lecture seule mysql>: FLUSH TABLES WITH READ LOCK;
On repère la position de la base:
mysql > SHOW MASTER STATUS;
  ------------------ ---------- -------------- --------------------------
 | File             | Position | Binlog_Do_DB | Binlog_Ignore_DB         |
  ------------------ ---------- -------------- --------------------------
 | mysql-bin.000003 | 73       | test,bar     | foo,manual,mysql         |
  ------------------ ---------- -------------- --------------------------
 1 row in set (0.06 sec)
et on note: mysql-bin.000003 ← le log bin à utiliser 73 ← la position du log évidemment à adapter suivant le cas.
sur le serveur esclave: on se connecte aussi à la base mysql [esclave]# mysql -u root -pMDP
on stoppe la réplication en cours mysql>stop slave;
on fait une RAZ de la réplication mysql>reset slave;
On va positionner le serveur esclave comme le maître: mysql> CHANGE MASTER TO MASTER_HOST = 'IP', MASTER_USER = 'repli', MASTER_PASSWORD = 'repli', MASTER_LOG_FILE = 'mysql-bin.000003', MASTER_LOG_POS = 73;
on démarre la réplication mysql> start slave;
on vérifie qu’on n’a pas d’erreur
mysql> show slave statusG*************************** 1. row ***************************
Slave_IO_State: Waiting for master to send event
Master_Host: 10.94.8.58
Master_User: repli
Master_Port: 3306
Connect_Retry: 60
Master_Log_File: mysql-bin.000003
Read_Master_Log_Pos: 73
Relay_Log_File: GLPI_esclave-relay-bin.000024
Relay_Log_Pos: 660186
Relay_Master_Log_File: mysql-bin.000003
Slave_IO_Running: Yes
Slave_SQL_Running: Yes
******
Last_Errno: 0
Last_Error:
******
Seconds_Behind_Master: 0
1 row in set (0.00 sec)
on se déconnecte de mysql mysql>exit;
sur le serveur maitre on déverrouille l’écriture sur la base mysql> UNLOCK TABLES;
on se déconnecte de mysql mysql>exit;
et pour finir on lance le script de lancement automatique des services heartbeat/mon/http/myslq:
[maitre]#./startHA
sur le serveur maitre c’est le même script sauf le service Mon en moins: [esclave]#./startHA
on vérifie que l’IP virtuel est actif sur le serveur maitre:
[maitre]#ifconfig
eth0:0 Link encap:Ethernet HWaddr 00:22:19:D7:73:48
 inet adr:10.94.8.56 Bcast:10.94.15.255 Masque:255.255.248.0
 UP BROADCAST RUNNING MULTICAST MTU:1492 Metric:1
 Interruption:16
et dans le navigateur firefox, on fait un test de connection:
http://appliweb.com
SI TABLE CRASHED :
d’après le log, on repère la table dite crashed
connexion à mysql : #mysql -u root -pMDP ;
on sélectionne la base mysql>use votre_bdd ;
on répare la table mysql>repair table nomdelatable ;