Archive

Articles taggués ‘video’

How to convert .rmvb to .avi (on PowerPC and Intel Macs)?

06/02/2024 Comments off

The good news is it’s very easy. The bad news is you’ll need a PowerPC Mac.A big thank you to Bluemint for pointing out an Universal Binaries version of the Real Codec is actually available, making the conversion possible on both PowerPC and Intel Mac. The instructions below are herewith updated.

What you’ll need:

  1. ffmpegX – It’s a Mac OS X graphic user interface designed to easily operate more than 20 powerful Unix open-source video and audio processing tools
  2. mpeg2enc – Download to your Downloads folder.
  3. mencoder & mplayer – Download and decompress the zip file.

Setup:

The first time you launch ffmpegX it’ll ask you to locate three components (items 2 & 3 above). Click on the respective “Locate” buttons to tell ffmpegX where they are. After that, enter your Mac OS X login password (ffmpegX won’t work if your login password is empty) and click the “Install” button.

Download and Install the Real Codec (Universal Binaries)

  1. Download the “Mac OS X x86″ binary codec package from one of these links on this page.
  2. Unzip the downloaded zip file and install the codec package.
  3. Select “Go to folder …” from Finder’s “Go” menu.
  4. Type “/usr/local/lib/” in the input text field and click “Go”
  5. You should see a “codecs” folder in the new window.
  6. Drag the “codecs” folder to your Desktop, and rename it to “reallib”.
  7. Move the “reallib” folder to “/Library/Applications Support/ffmpegx/”.

Performing the conversion to .avi

UB Rockz on any valid unicode Path/Filename.

ffmpegx-rmvb
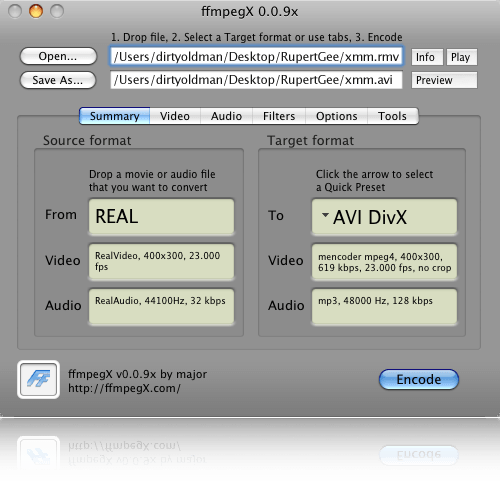
Drag and drop your rmvb file into the “From” well and just click the “Encode” button to start encoding. Unless you’re an expert user, do not be tempted to change any settings when converting a .rmvb file.

In other words, for a successful run, just drag, drop, and click Encode. What more can you ask for?

Footnotes:

  • Re-launch ffmpegX if you messed up the default settings.
  • You can close ffmpegX’s main window after clicking Encode; a new stand-alone Progress window shows you the progress.
  • Repeat the process to convert more files.
  • The “Play” button plays the .rmvb.
  • The “Preview” button plays the (partially) converted .avi file.
  • Press the Return key to stop playback.
  • You can download and install MPlayer to play your .rmvb files. However, it has a bug whereby it only plays video and totally ignores embedded links and other wonderful added features Real is famous for.
Categories: Logiciel, Système Tags: , ,

How to live stream video from webcam on Linux

26/10/2023 Comments off

Source: Xmodulo

Have you ever wanted to live stream a video feed from your webcam for someone else? You could use any existing video chat software such as Skype, Google+ Hangouts. However, if you do not want to rely on any third-party streaming infrastructure, you can set up your own webcam streaming server in house.

In this tutorial, I will describe how to live stream video from webcam by using VLC. VLC is an open-source, cross platform media player which can handle virtually all video and audio formats. VLC can also run as a streaming server supporting various streaming protocol such as RTP, HTTP, RTSP, etc.

Before attempting to set up webcam streaming on your own, you need to understand the huge potential security risk of streaming a webcam over the Internet. Anyone can tap into your streaming feed unless you properly access control the streaming server, and encrypt the streaming traffic. I’ll briefly mention several security protections against threats towards the end of the tutorial.

Install VLC on Linux

Before setting up a streaming server with VLC, install VLC first.

To install VLC on Debian, Ubuntu or Linux Mint:

$ sudo apt-get install vlc

To install VLC on Fedora, first enable RPM Fusion’s free repository, and then run:

$ sudo yum install vlc

To install VLC on CentOS or RHEL 6, first set up EPEL repository, and then use the following commands:

$ cd /etc/yum.repos.d/
$ sudo wget http://pkgrepo.linuxtech.net/el6/release/linuxtech.repo
$ sudo yum install vlc

Verify Webcam Device on VLC

Next, verify whether a webcam device is successfully detected on your Linux system and VLC.

To do so, first find out the device name of your webcam with the following command. In this example, the device name of the webcam is /dev/video0.

$ ls /dev/video*
/dev/video0

Now use the following command to test video from your webcam. Replace « video0 » with your own device name.

$ vlc v4l2:///dev/video0

If your webcam is successfully detected by VLC, you should see a video stream of yourself.

Configure Webcam Streaming on VLC

Assuming that your webcam is successfully recognized by VLC, I am going to show how to configure webcam streaming. In this setup, webcam is streamed over HTTP in WMV format.

To configure VLC for webcam streaming, first launch VLC.

$ vlc

Choose « Streaming » from VLC menu.

9652347212_67126e2037

On the screen, choose webcam/audio device name (e.g., /dev/video0 for webcam, and hw:0,0 for audio). Click on the checkbox of « Show more options ». Make a note of value strings in « MRL » and « Edit Options » fields. We will use these strings later in the tutorial. Click on « Stream » button at the bottom.

Lire la suite…

Categories: Logiciel Tags:

Installation de Plexmediaserver

17/05/2021 Comments off

Installation de Plexmediaserver

L’installation de Plexmediaserver se fera en deux parties (console et sur Plexmediaserver).

1er Partie :

sudo apt-get install curl
echo "deb http://shell.ninthgate.se/packages/debian squeeze main" | sudo tee -a /etc/apt/sources.list.d/plexmediaserver.list
sudo curl http://shell.ninthgate.se/packages/shell-ninthgate-se-keyring.key | sudo apt-key add -
sudo apt-get update
sudo apt-get install plexmediaserver

Plexmediaserver est installé normalement .

Code Init qui peuvent être utile :

Start

service plexmediaserver start

Stop

service plexmediaserver stop

Restart

service plexmediaserver restart

Status

service plexmediaserver status

Résumons un peu la situation
Nous avons maintenant accès à http:// IPSERVEUR:32400/web/ et nous pouvons nous connecter mais le serveur ne dis que nous n’avons pas les permissions !

Remarque : Pour se connecter , il faut un compte Plex (aller sur plex.tv et inscrivez vous c’est gratuit)

2e Partie :

Pour pouvoir activer Plexmediaserver, nous devons nous connecter à l’URL (http:// IPSERVEUR:32400/web/) local comme si nous étions le serveur. Et pour ça , rien de plus facile , nous allons créer un tunnel SSH.

ssh -L 32400:127.0.0.1:32400 root@IPSERVEUR

De là, aller sur votre navigateur web (chrome, firefox,…) à l’adresse suivante :

127.0.0.1:32400/web/

Vous accéderez en local et pourrez activer Plexmediaserver.

140125062519321314

Une fois installé , vous arrêtons le Tunnel SSH avec cette ligne code suivante :

quit

Vous pouvez accéder maintenant à cette URL :

http://IPSERVEUR:32400/web/
Categories: Logiciel, Tutoriel Tags:

A Raspberry Pi dashcam with two cameras and a GPS

28/09/2015 Comments off
 

Information on how to set up a Raspberry Pi as a two cameras dashcam with GPS.

General information about the Raspberry Pi dashcam

  What was used and how it’s connected up.

  Installing Arch Linux or Raspbian, resize the SD card, camera configurations etc.

How to wire up the button, LEDs and GPS using the Pi’s GPIO pins
A simple button for shutdown / reboots, status LEDs and an easy to connect GPS.


The built-in version

  I decided to try and hide things away and make it automated.
  Current status. What next?

Here are a couple of videos of the dashcam in action…


Connecting to your Hikvision IP camera

26/05/2015 Comments off

Try the following connection options in iSpy to connect to your Hikvision IP camera. If VLC or FFMPEG options are available we recommend you try those first as they will often be faster and include audio support. If you don’t have VLC installed (or are experiencing problems with the VLC plugin) you may be able to use the same URL under the FFMPEG source type (VLC is based on FFMPEG).

hikvision-domeThe settings for Hikvision cameras are built into our open source project ispy – click « Add » then « IP camera with wizard » to automatically setup your Hikvision cameras. If the camera is not listed in iSpy then click « Get Latest List » when on the add camera wizard. If you need to modify the URL then add or edit the Hikvision camera in iSpy and you can modify the connection type and URL in the video source dialog (button is top of the first tab). Lire la suite…