How do I use mysqldump command with Unix shell pipes?
The mysqldump client is a backup program which is used to dump a database or a collection of databases for backup or transfer to another SQL server (not necessarily a MySQL server). The dump typically contains SQL statements to create the table, populate it, or both. However, mysqldump can also be used to generate files in CSV, other delimited text, or XML format. The syntax is as follows to dump a database called foo to the remote server called server1.cyberciti.biz:
mysqldump db-name | mysql -h server1.dbsysnet.com db-name
mysqldump foo | mysql -h server1.dbsysnet.com foo
However, I recommend using VPN or ssh client to secure data transfer using the shell pipes as follows:
mysqldump db-name | ssh user@server1.dbsysnet.com mysql db-name
mysqldump -u vivek -p'myPassWord' foo | ssh vivek@server1.dbsysnet.com mysql -u backup -p'myPassword' bar
One of the most daunting prospects of administering your own server on a public network is dealing with your server’s security. While security threats in a networked world are real and it is always important to be mindful of security issues, protecting against possible attacks is often a matter of exercising basic common sense and adhering to some general best practices.
This guide takes a broad overview of common security concerns and provides a number of possible solutions to common security problems. You are encouraged to consider deploying some of these measures to “harden” your server against possible attacks.
It’s important to remember that all of the solutions we present in this document are targeted at specific kinds of attacks, which themselves may be relevant only in specific configurations. Security solutions need to be tailored to the kind of services that you’re providing and the software you’re running, and the decision whether or not to deploy a specific security solution is often a matter of personal discretion and cost-benefit analysis.
Perhaps most importantly, it should be understood that security is a process, not a product (credit to Bruce Schneier.) There is no “magic bullet” set of guidelines that can be followed to ensure the security of any system. Threats are constantly evolving, so vigilance is required on the part of network administrators to prevent unauthorized access to systems.
Keep Systems and Software Up To Date
One of the most significant sources of security vulnerabilities are systems running out of date software with known security holes. Make a point of using your system’s package management tools to keep your software up to date; this will greatly assist in avoiding easily preventable security intrusions.
Running system updates with the package management tool, using apt-get update && apt-get upgrade (for Debian and Ubuntu Systems) or yum update (for CentOS and Fedora systems) is simple and straightforward. This practice ensures that if your distribution maintains active security updates, your system will be guarded against many security holes in commonly used software packages.
System update tools will, however, not keep software up to date that you’ve installed outside of package management. This includes software that you’ve compiled and installed “by hand” (e.g. with ./configure && make && make install) and web-based applications that you’ve installed from a software developer’s site, as is often the case with applications like WordPress and Drupal. Also excluded from protection will be libraries and packages you’ve installed with supplementary package management tools like Ruby’s Gems, Perl’s CPAN tool, Python easy_install, and Haskell Cabal. You will have to manage the process of keeping these files up to date yourself.
The method you use to make sure that your entire system is kept up to date is a matter of personal preference, and depends on the nature of your workflow. We would recommend trying very hard to use the versions of software provided by your operating system or other programming platform-specific package management tools. If you must install from “source,” we would recommend that you save the tarballs and source files for all such software in /src/ or ~/src/ so that you can keep track of what software you’ve installed in this manner. Often, you can remove a manually compiled application by issuing make uninstall in the source repository (directory). Additionally, it may be helpful to maintain a list of manually installed software, with version numbers and download locations. You may also want to investigate packaging your own software so that you can install it with apt, yum or pacman.
Because of the complexity of maintaining software outside of the system’s package management tools we strongly recommend avoiding manually installing software unless absolutely necessary. Your choice in a Linux distribution should be heavily biased by the availability of software in that distro’s repositories for the systems you need to run on your server.
You have configured your MySql replication, next step is to perform maintenance and monitor your replication. Percona Toolkit for MySQL is a collection of advanced command-line tools to perform a variety of MySQL server and system tasks.
The Percona Toolkit allows you to amongst many tasks to verify MySQL replication integrity, efficiently archive rows, find duplicate indexes, summarize MySQL servers, analyze queries from logs and tcpdump, collect vital system information when problems occur.
To get started you need to install Percona Toolkit, I’m using Ubuntu as an OS on my servers, installing the percona toolkit was straight forward
apt-get install percona-toolkit
To get a summary of your databases use the command – pt-mysql-summary
pt-mysql-summary --u=username --p=password
Next you would want to setup a heartbeat table in your database so you can Monitor MySQL replication delay – for that you will use the pt-heartbeat command.
pt-heartbeat measures replication lag on a MySQL or PostgreSQL server. You can use it to update a master or monitor a replica. mk-heartbeat depends only on the heartbeat record being replicated to the slave, so it works regardless of the replication mechanism. It works at any depth in the replication hierarchy; for example, it will reliably report how far a slave lags its master’s master’s master.
Start daemonized process to update test.heartbeat table on master:
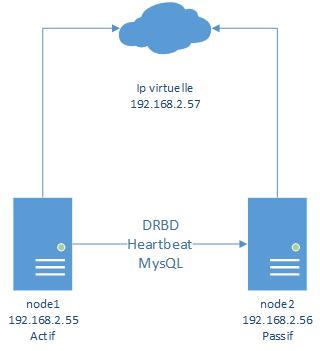
Nous avons vu précédement comment mettre un place un Cluster Apache actif/passif avec DRBD et HeartBeat. Dans ce tutoriel nous allons voir comment faire la même chose mais avec MySQL.
La configuration de DRBD et de Heartbeat est la même que pour le tutoriel précédent.
Voilà ce que nous allons mettre en place
Donc pour faire ce tutoriel suivez le tutoriel suivant jusqu’a « Installation d’apache« :