Archive

Articles taggués ‘installation’

Clone Your Ubuntu installation

09/03/2024 Comments off

If you want to create a system that is similar to a different system you have already set up, it can be difficult to remember each and every package you had installed.This method works best when you are exporting to and importing from the same distribution and, specifically, the same releasefor example, exporting from Ubuntu Dapper to Ubuntu Dapper or ubuntu edgy to ubuntu edgy.

Ubuntu uses the APT package management system which handles installed packages and their dependencies. If we can get a list of currently installed packages you can very easily duplicate exactly what you have installed now on your new machine. Below is a command you can use to export a list of your installed packages.

sudo dpkg --get-selections | grep '[[:space:]]install$='| awk '{print $1}' > installedpackages
Now you should end up with a file called “installedpackages” which consists of a long list of every package your currently have installed.

The next step would be to tell the clone machine to install each of those packages. You’ll have to copy that file to the clone machine (via network, usb drive, email, etc) and also make sure to duplicate the /etc/apt/sources.list file. Without the same access to repositories it may not be able to find the packages.

To tell your system to use the previously exported package list use the following command (after making sure to also clone your /etc/apt/sources.list file).

Update the source list using the following command

sudo aptitude update

Import the package list using the following command

cat installedpackages | xargs sudo aptitude install
 

Best way to backup all settings, list of installed packages, tweaks, etc?

02/02/2024 Comments off

Programs


A quick way of backing up a list of programs is to run this:

dpkg --get-selections > ~/Package.list
sudo cp /etc/apt/sources.list ~/sources.list
sudo apt-key exportall > ~/Repo.keys


It will back them up in a format that dpkg can read for after your reinstall, like this:

sudo apt-key add ~/Repo.keys
sudo cp ~/sources.list /etc/apt/sources.list 
sudo apt-get update
sudo apt-get install dselect
sudo dpkg --set-selections < ~/Package.list
sudo apt-get dselect-upgrade -y


Settings and Personal Data


Before you reinstall, you should probably back up the settings from some of your programs, this can easily be done by grabbing folders from /etc and all the content from your user directory (not just the stuff you can see in nautilus!):

rsync --progress /home/`whoami` /path/to/user/profile/backup/here


After you reinstall, you can restore it with:

rsync --progress /path/to/user/profile/backup/here /home/`whoami`


So all together as a pseudo-bash script.


This assumes there is only one user on the machine (remove /'whoami' otherwise) and that you used the same username on both installs (modify dest. of rsync otherwise).

dpkg --get-selections > ~/Package.list
sudo cp /etc/apt/sources.list ~/sources.list
sudo apt-key exportall > ~/Repo.keys
rsync --progress /home/`whoami` /path/to/user/profile/backup/here

##  Reinstall now

rsync --progress /path/to/user/profile/backup/here /home/`whoami`
sudo apt-key add ~/Repo.keys
sudo cp ~/sources.list /etc/apt/sources.list 
sudo apt-get update
sudo apt-get install dselect
sudo dpkg --set-selections < ~/Package.list
sudo dselect


Clé USB Bootable | Comment faire depuis un Mac ?

18/01/2024 Comments off

Pour créer une clé USB bootable depuis un Mac, ce n’est pas spécialement difficile. Par contre, il est vrai que la méthode n’est pas hyper intuitive à première vue. Pour les fans de la ligne de commande, c’est par ici que çà ce passe! Et pour les autres, ne vous inquiètez pas, c’est très facile, et très simple finalement.

Donc voici, l’opération est constitué de trois étapes principales :

  1. Télécharger une image disque (.iso par exemple) de l’OS de votre choix. Par exemple, pour bien débuter, une image d’une distribution Linux de type LiveCD.
  2. Insérer la clé USB, et s’assurer de démonter le volume : Sinon, nous ne pouvons pas écrire « bas niveau » avec la commande « dd » de unix.
  3. « Graver » l’image disque sur la clé.

Donc, une fois que vous avez télécharger l’image disque, insérer la clé USB dans la prise de votre mac, et ensuite, à partir d’une fenètre Terminal tapez :

diskutil list

En théorie vous devriez voir un affichage similaire à celui:

A partir de cette liste, identifiez votre clé USB. Dans mon cas c’est/dev/disk2. Une fois identifié, nous pouvons passer à l’étape deux, et nous allons tapez cette commande :

diskutil unmountDisk /dev/disk2

N’oubliez pas de remplacer disk2 par le n° de votre clé USB!

Nous sommes prêt à passer à la troisième, et dernière étape : La gravure! (ouais, je sais, une clé USB ne se grave pas…). Donc, pour se faire, notez bien le nom de votre fichier image, nous allons en avoir besoin pour taper cette commande :
sudo dd if=monImageBootable.iso of=/dev/disk2 bs=1m

N’oubliez pas de remplacer disk2 par le n° de votre clé USB!

Le mot de passe root vous sera demandé, ensuite la copie va s’effectuer.

Une fois terminé, il suffit de redémarrer Macosx en appuyant sur la touche ALT pour avoir une sélection des disques bootable, et de choisir la clé USB.


Categories: Système Tags: , ,

How to make a bootable OS X 10.10 Yosemite install drive

28/04/2021 Comments off

Source: Macworld

Back in the day when we bought OS X on discs, as long as you kept that disc, you always had a bootable installer just in case. Modern, downloadable versions of OS X create a recovery partition on your drive, but it’s always a smart idea to make your own bootable installer drive too.

I recommend making one for Yosemite, on an external hard drive or USB thumb drive, for many of the same reasons I recommend making a bootable Mavericks installer drive: If you want to install Yosemite on multiple Macs, using a bootable installer drive can be more convenient than downloading or copying the entire installer to each computer. If you want to erase the drive on a Mac before installing Yosemite, or start over at any time, you can use a dedicated installer drive to boot that Mac, erase its drive, and then install the OS clean and restore whatever data you need from a backup. And if your Mac is experiencing problems, a bootable installer drive makes a handy emergency disk.

Macworld also has bootable-install-drive instructions for Mavericks (OS X 10.9), Mountain Lion (OS X 10.8), and Lion (OS X 10.7).

As with previous versions of OS X, it’s not difficult to create a bootable installer drive from the Yosemite installer, though the processes have changed slightly since Mavericks. I show you how, below. Lire la suite…

Categories: Système, Tutoriel Tags: ,

How to Download a Full macOS High Sierra Installer App

04/10/2017 Comments off

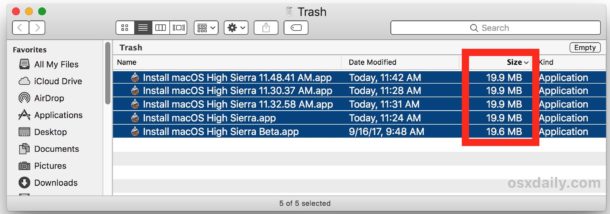
Many Mac users who are attempting to download macOS High Sierra from the Mac App Store will find that a small 19 MB version of “Install macOS High Sierra.app” downloads to the /Applications folder of the target Mac, rather than the complete 5.2 GB Installer application for macOS High Sierra. This is annoying because it prevents a single download from being used on multiple computers, plus the small installer requires an internet connection during usage to download the rest of the High Sierra update files. Additionally, the tiny 19 MB incomplete installer prevents users from being able to create a macOS High Sierra USB installer drive or other custom update options available through the command line, like skipping the APFS update.

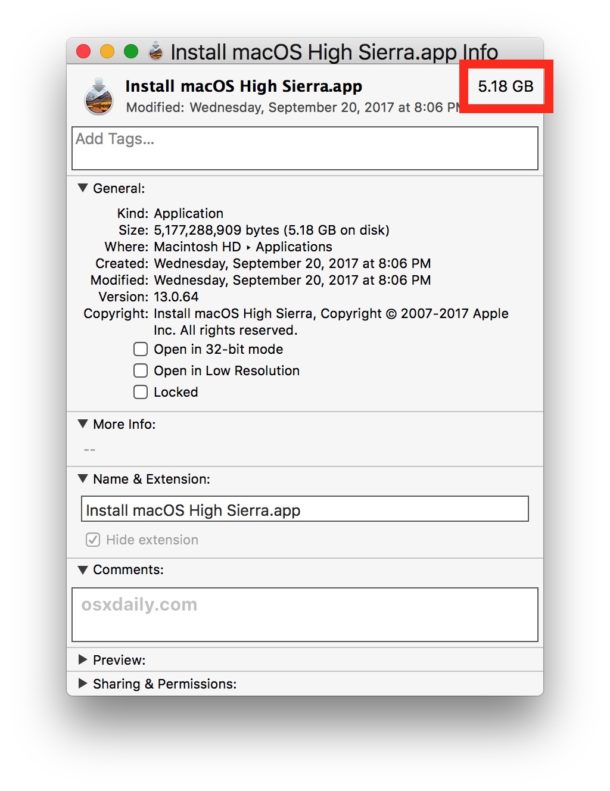
This tutorial will show you a workaround trick that allows Mac users to download the full macOS High Sierra “Install macOS High Sierra.app” file at 5.2 GB with the complete installer tool set and all dmg files and associated Install macOS High Sierra.app/Contents/Resources/ tools, rather than the tiny incomplete truncated installer at 19 MB.

How to Download the Full “Install macOS High Sierra.app” Application

Warning: this method relies on a third party tool from an unverified third party source, if you are not comfortable with using unvetted and unverified software, and if you do not understand the risks associated with using potentially dubious software, do not follow this process. This is for advanced users only.

    1. Go to dosdude1.com here and download the High Sierra patcher application*
    2. Launch “MacOS High Sierra Patcher” and ignore everything about patching, instead pull down the “Tools” menu and choose “Download MacOS High Sierra”

    1. Confirm that you want to download the complete macOS High Sierra install application, and then point it to a location to save on the local hard drive

    1. The patcher app will notify you when the download is complete, when it is done downloading quit out of the patcher app

    1. Locate the “Install macOS High Sierra.app” file you downloaded, it will be the complete installer application with the full Contents/Resources/ toolkit available

* The “macOS High Sierra Patcher” application is intended for those with unsupported Macs and Hackintosh users, but any Mac user can use the app to be able to download the complete installer file from Apple servers. The source of this patcher application is a MacRumors Forums

You can confirm that you have the complete Install macOS High Sierra.app application by getting info on the file, the complete installer should be around 5.2 GB rather than the tiny 19 MB incomplete installer that requires additional downloads.

The complete macOS High Sierra installer downloaded

Why do some users get a small incomplete version of macOS High Sierra installer from the App Store?

This is not yet known, but it happens with the final version of macOS High Sierra installer as well as with some of the beta versions.

It is unclear why some users will get a 19MB version of “Install macOS High Sierra.app” when downloaded from the App Store, while others users will get the complete 5.2GB version of “Install macOS High Sierra.app” when downloading from the App Store. Interestingly, once a user ends up with the 19 MB version of the incomplete installer, that seems to be the only thing that will download for that user regardless of how many times the incomplete installer app is deleted and re downloaded.

Incomplete macOS High Sierra installer

The installer size and completeness inconsistency appears random, and has no relation to disk space, beta enrollment, software catalog, and other theories seem to be incorrect as well.