1. Overview
Reading text files is a common operation when we work with the Linux command-line. Sometimes, we know the line X in a file contains interesting data, and we want to just read line X.
In this quick tutorial, we’ll have a look at different approaches to read a specific line from a file.
2. Introduction to the Problem
The problem is pretty straightforward. Let’s get a more clear picture through an example.
For instance, we have a file called input.txt:
$ nl input.txt
     1	I am line 1, I don't have any interesting data.
     2	I am line 2, I don't have any interesting data.
     3	I am line 3, I don't have any interesting data.
     4	I am line 4, I don't have any interesting data.
     5	I am line 5, interesting data: Linux is awesome!
     6	I am line 6, I don't have any interesting data.
     7	I am line 7, I don't have any interesting data.
As the output above shows, we’ve used the nl command to print the file’s content with line numbers.
We know that the input.txt file contains some interesting information in the fifth line. Therefore, we want to read line five only.
Lire la suite…
Dupliquer un système consiste à installer, sur une machine, exactement les mêmes paquets que sur une autre. La technique n’a rien de nouveau en soi, mais il est toujours bon de la rappeler. Sous les dérivés de Debian, “dpkg” permet d’effectuer cette opération rapidement.
Sur la machine à dupliquer, exporter la liste des paquets installés :
# dpkg --get-selections > lstpkg.dpkg
Sur la machine à installer, commencez par poser un système minimal (installation via le CD-Rom “businesscard” sans sélectionner aucun groupe de paquets). Copiez la liste des paquets exportée depuis la machine à dupliquer et importez la dans le gestionnaire de paquets local :
# dpkg --set-selections < lstpkg.dpkg
puis lancez l’installation des paquets ainsi sélectionnés :
# apt-get dselect-upgrade
Note 1 : si vous souhaitez des machines réellement identique, commencez par copier “/etc/passwd” et “/etc/group” de la machine à dupliquer sur la machine cible afin que les programmes installés utilisent les mêmes UIDs et GIDs (exemple : bind, apache, etc…).
Note 2 : Lors de la sauvegarde des configurations de serveurs, conserver un export de la liste des paquets installés sur chacun d’eux peut faire gagner beaucoup de temps en cas de problème…
Source: admin-linux.fr
It can be helpful to configure Mac OS X to automatically mount shared network drives, this is particularly true for those of us who regularly connect to a network drive for file sharing or backups.
Setting up automatic network drive connections in OS X is a two-step process, you must mount the drive, then you add it to your automatic login items. This should work flawlessly in most versions of OS X, but we’ll cover an alternative approach that uses Automator to mount a network drive automatically on login as well.
1) Mounting the Network Drive
If you’re already familiar with mapping a network drive in Mac OS X you can skip the first part of this and go straight to System Preferences in the second section.
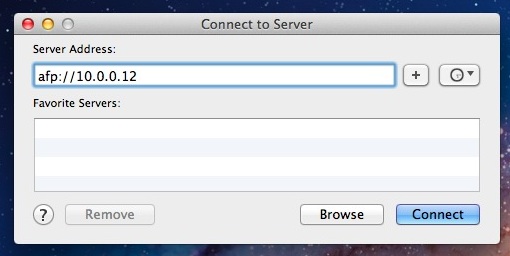
- From the OS X desktop, pull down the “Go” menu and select “Connect to Server”
- Connect to the server and mount the drive you want to automatically connect to on boot
- Choose Guest or for a specific user check the box next to “Remember this password in my keychain” – you must select to remember the password otherwise the automatic login event can not happen without logging into the network drive

Next, you add the network drive to automatically connect on OS X by bringing it into your Login Items list.
Lire la suite…
Click on the item in the Finder’s sidebar with the house icon and verify that you are able to write to this folder in the Ownership & Permissions section of the Get Info window, and that it isn’t locked; if it is already set this way and you get that error, open the Terminal in the /Applications/Utilities/ folder and run the following:
mkdir ~/.Trash
If you get a message stating that the folder exists, run the following:
sudo chown $UID ~/.Trash
chmod u+rwx ~/.Trash
The first command in the second set will prompt you for your administrator password; nothing will appear in the Terminal window while it is being typed. In either case, click on the Finder icon in the Dock with the Control and Option keys pressed, and relaunch it.
There are many reasons why you’d want to reset your MacBook Air to factory settings. Perhaps your Mac is showing just a too much little lag. Maybe you want to reset for better overall performance, are thinking of giving away or selling your MacBook after you purchase or receive the latest Mac model. For whatever reason, you need to set your Mac back to its factory defaults.
Since our Macs hold so much of our personal and private data, it’s imperative to clean out our machines when selling or giving away our favorite older Macs. And it’s particularly useful for the new user to have a nice clean machine that’s returned to its native factory state.
Lire la suite…