How To Isolate Servers Within A Private Network Using Iptables
Source: DigitalOcean – Mitchell Anicas
Introduction
In this tutorial, we will teach you how to use a Iptables with shared private networking to simulate the network traffic isolation that a true private network can provide. We will also cover why you would want to do this, and provide an example of how to implement this in your own environment. The example should explain the concept well enough that you should be able to adapt the configuration to your own needs.
DigitalOcean’s private networking option grants a second networking interface to a VPS, which is only accessible to other VPSs in the same datacenter–which includes the VPSs of other customers in the same datacenter. This is known as shared private networking. This means that data sent over a VPS’s private interface does not leave the datacenter at all, and no billable bandwidth usage will be incurred.
At the time of this writing, DigitalOcean offers the private networking option for VPSs in the following data centers:
- Amsterdam 2
- New York 2
- Singapore 1
Note: This tutorial covers IPv4 security. In Linux, IPv6 security is maintained separately from IPv4. For example, iptables only maintains firewall rules for IPv4 addresses but it has an IPv6 counterpart called ip6tables, which can be used to maintain firewall rules for IPv6 network addresses.
If your VPS is configured for IPv6, please remember to secure both your IPv4 and IPv6 network interfaces with the appropriate tools. For more information about IPv6 tools, refer to this guide: How To Configure Tools to Use IPv6 on a Linux VPS
Example Scenario
For our example, we will use the environment created by the following tutorial: How To Optimize WordPress Performance With MySQL Replication On Ubuntu 14.04.
Here is a diagram of what the environment looks like:
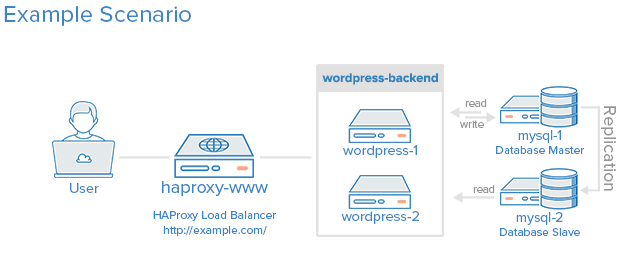
The example environment uses five VPSs (and iptables are not configured):
- haproxy-www: Reverse proxy load balancer
- wordpress-1: First application server
- wordpress-2: Second application server
- mysql-1: Master MySQL database server
- mysql-2: Slave MySQL database server
If your setup doesn’t look like this, you should still be able to follow along. Also, if you would like to read up on setting up a VPS with private networking or iptables basics, here are a few links that you might find to be useful (this tutorial assumes you know the basics of iptables):
- How To Set Up And Use DigitalOcean Private Networking
- How To Enable DigitalOcean Private Networking on Existing Droplets
- How the Iptables Firewall Works
- How To Set Up a Firewall Using Iptables on Ubuntu 14.04
If you are already familiar with the concepts, and would like to see the iptables setup, feel free to skip to the Overview of Iptables Configuration section.
Our Goal
When we are finished with this tutorial, we should have an environment that looks something like the following diagram:
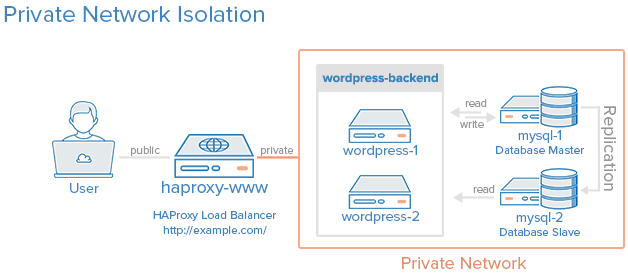
All of the servers in the private network area can only be communicated with by other servers within this private network (the orange box). The load balancer will be accessible via the Internet and also be linked to the private network. The enforcement of this policy will be implemented via iptables on each server.
Note: To block traffic to your public interface, you can either disable your public interface or set up firewall rules to achieve a similar effect with Iptables. We will go with the firewall option because we can configure it block unwanted network traffic, while allowing our server to access the Internet when it initiates the connection (this is useful for things like downloading updates on the server).