As a key enabler for software-defined networking (SDN), OpenFlow was initially introduced in the academia as a way to enable innovation on production networks which had traditionally been built with closed and proprietary networking hardware. OpenFlow offloads the high-level routing/forwarding decisions (control plane) from networking devices such as switches, and moves the control plane on to a separate controller. The networking devices then simply forward traffic, as programmed by the external OpenFlow controller. It is the OpenFlow protocol that is used by the OpenFlow controller to program the networking devices.
Suppose you have an OpenFlow testbed running, which consists of an OpenFlow controller and a set of OpenFlow-capable switches. For troubleshooting purposes, you want to capture and examine OpenFlow messages exchanged between the controller and the switches. For this you could monitor exchanged OpenFlow messages either at the controller or the switch side, but what if it is not convenient to do so? Another way is to « sniff » network packets on the OpenFlow control channel and interpret the packets.
In this tutorial, I am going to show how to sniff live OpenFlow control packets and decode OpenFlow messages contained in the packets.
Note that for such packet sniffing to work, SSL must be disabled in any existing OpenFlow control channels between the controller and switches. Let’s assume we are not talking about any production environment here, so the SSL is off for now.
Method One: Sniff OpenFlow Messages via Wireshark GUI
If you want to monitor OpenFlow messages using packet sniffing, the most user-friendly way is via Wireshark, a GUI-based packet sniffer. A nice thing about Wireshark is its extensive list of built-in and custom dissectors. Each dissector decodes some part of packet data based on a specific network protocol. For pretty much any existing network protocol, there is a corresponding Wireshark dissector (either built-in or contributed by a third-party). The OpenFlow protocol is not an exception.
While there is an official OpenFlow dissector, I am going to use a third-party OpenFlow dissector developed by Big Switch Networks, since the former seems to have patchy/incomplete support for different OpenFlow versions.
Here is how to install the OpenFlow dissector for Wireshark.
$ mkdir -p ~/.wireshark/plugins
$ cd ~/.wireshark/plugins
$ wget http://www.projectfloodlight.org/openflow.lua
Now go ahead and start Wireshark.
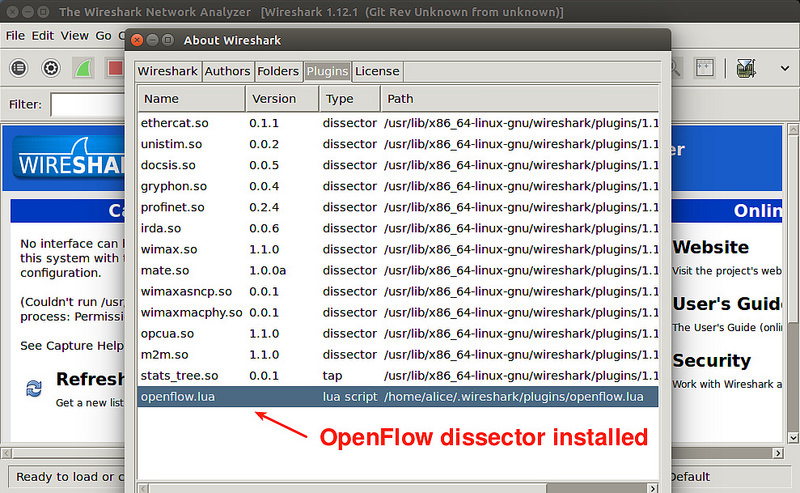
To verify that the OpenFlow dissector is successfully installed, go to « Help » -> »About Wireshark ».
Under the « Plugin » tab, if you see openflow.lua listed, it means the Openflow dissector is successfully loaded on Wireshark.
Suppose you as a software developer has set up daily builds of your software for testing purposes. Every day you make a new build, users have to re-download the updated build to evaluate it. In this case you may want to enable differential downloads, so that users can download only difference between two builds, thereby saving on the server’s bandwidth. Users will also be happy as they don’t have to wait to re-download the whole thing. Similar situations are encountered when you want to set up a download archive which allows incremental sync for users.
In these cases, how would you distribute incrementally updated files efficiently for multiple users? In fact, there are open-source storage solutions that come with « delta sync » capability built-in, such as ownCloud or Syncthing. These kinds of full-blown solutions with built-in GUI require users to install a dedicated client, and thus may be an overkill for simple file distribution that you are looking for.
Barring full-blown third-party software like these, perhaps rsync may come to mind, which can do bandwidth-efficient file sync. The problem with rsync, however, is that all the heavy duty computations is done at the server side. That is, when a client requests for a file sync, the server needs to perform block-by-block checksum computation and search for blocks not available on the client. Obviously this procedure can place a significant strain on the server’s resources if the server needs to handle many users, and thus is not scalable.
What is Zsync?
This is when a command-line tool called zsync comes in handy. While zsync uses the same delta-encoding based sync algorithm as rsync does, it moves the heavy duty computation away from the server and onto the clients. What do I mean by that?
Well, in zsync, the server maintains a separate .zsync metadata file for a file to distribute, which contains a list of « precomputed » checksums for individual blocks of the file. When zsync client requests for a file sync, the client downloads .zsync metadata file first, and performs block-by-block checksum calculation to find missing blocks on its own. The client then requests for missing blocks using HTTP range requests. As you can see, the server is totally out of the loop from the sync algorithm, and simply serves requested file blocks over HTTP, which makes it ideal when incremental file sync is needed for many users.
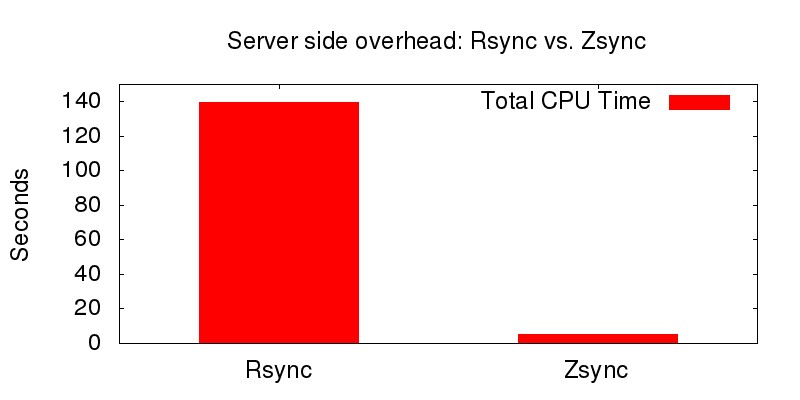
Here is a quick rundown on the server-side overhead difference between rsync and zsync. In the plot below, I compare rsync and zsync in terms of the server’s CPU usage when 200 users are downloading a tarball file with 2.5% discrepancy of a previous version. For fair comparison, SSH is not used for rsync.
With zsync, since all checksum computation overhead has shifted from the server to individual clients, the server overhead is reduced dramatically. A small neat idea makes zsync a real winner!
In the rest of the tutorial, I will show how to distribute a file incrementally using zsync under the Linux environment.
Zsync: Client Side Setup
On the client side, you need to install zsync to initiate file transfer from a remote web server. zsync is extremely lightweight, and is included in the most Linux distros. Here is how to install zsync on various distros.
When a group of employees collaborate on a project, there is need for handling all aspects and complexities of the project from start to finish, such as task assignment, scheduling, budget management, communication, documentation, and so on. Thus a good project management tool is a necessity for any kinds of businesses or organizations which are involved in a lot of collaborative projects.
Especially web-based online project management tools are the top choice for such environments as different project members can access and share the online tools wherever they are. If your organization requires good web-based project management software, you will find ONLYOFFICE a viable candidate.
ONLYOFFICE is a free and open source office suite that enables seamless project collaboration in the web-based environment. It offers different management tools for documents, emails, events, tasks and client relations. Using ONLYOFFICE, a project manager can schedule the workflow, lead discussions, monitor and coordinate the project progress using Gantt Chart and reports.
In this tutorial, I will describe the main project management features offered by ONLYOFFICE and give some tips to use them more efficiently.
Installing ONLYOFFICE using Docker on Linux
The easiest way to install ONLYOFFICE is by using Docker. The tutorial presented here covers the Docker-based installation instructions for the whole ONLYOFFICE system with online editors integrated for real-time document collaboration.
If you want to install ONLYOFFICE without editors (called « community server »), simply execute the following command:
The above command will download the official ONLYOFFICE Docker image with all dependencies needed for its correct work. For more installation and configuration tips, please refer to the ONLYOFFICE official documentation.
Running a Self-Hosted Web Office
To open your web office, enter in the address bar of your browser localhost (http://IP-Address/) on which the docker is running. The Welcome page will open:
Enter a password and specify the email address you will use to access your office the next time.
Getting Started with a New Project
First, click the Projects link to open the project management tool. To start a new project, click on the Create New…button in the upper left corner and select the Project option from the drop-down list. Fill out the form: specify your project Title and enter a short Description. If necessary, assign a Project Manager and create a project Team.
To restrict access to the newly created project, check the Save this project as private box. Review the project settings and click on the Save button.
Note: to create a new portal, the full privilege administrator or projects management administrator rights are required.
Setting up Your Project Hierarchy
Once the project is started, the next step is to create the project hierarchy which involves the following:
Set up project key points with milestones
Distribute the whole amount of work among the team members using tasks
Link tasks to determine the order in which they need to be performed
Divide a task into subtasks if it requires several persons to perform several steps
Organize Project Documentation
Keep all the documentation related to your project in one place to access it anytime anywhere. Switch to theDocuments tab on your project page to:
Upload documents from your hard disk drive
Download an existing document to your hard disk drive
Filter and sort documents to facilitate the search
Copy or move documents to another folder
Create a new document, spreadsheet or presentation, open and edit the existing ones if the online editorsare installed
Attach documents to the related tasks
Managing Access Rights
Being a project manager you can manage the project team, tasks, milestones, discussions, comments inside your project; change project status, edit its settings, and also set access rights to project team members for a private project.
By default, each member of your project team can add tasks, assign them to himself or other team members and manage them; start new discussions; add and remove documents; view all content inside your project: milestones, tasks, documents, discussions and contacts.
To restrict the access to an item, switch to the Team tab on your project page, select the team member you wish to set access rights for, and click on one of the links to the right: Discussions, Documents, All Tasks, Milestones,Contacts.
Note: you can set the access rights for each team member unless he/she does not have full privilege administrator or projects management administrator rights.
Monitoring Project using Gantt Chart
Making changes to your project once it is underway is both indispensable and inevitable part of its life cycle. The simplest way to do it with ONLYOFFICE, especially when you manage multiple related projects, is to use Gantt Chart, a bar chart used to illustrate a project schedule.
To open Gantt Chart, click on the Gantt Chart link on the left side panel, or click on the Gantt Chart button in the upper right corner of your project page.
Gantt Chart gives you a panoramic view of all your project activities and allows you to:
Select one or several projects you wish to coordinate
View and change the project activity status: open/closed, active/overdue
Manage the project milestones and tasks: create, edit, close, reopen, delete, etc.
Link the tasks within your project to show the task dependencies
Useful Tips
1. Leading discussions
To find a solution of problems occurred, you can start a project-related discussion and discuss the issue with your project team within the Discussion tab.
2. Using templates
To easily start a new project, you can use the previously created templates (click on the Create New… button and select the Project Template option to create one).
3. Reporting
To keep up with what each team member is doing, make use of the Reports system. Click on the corresponding link on the left-side panel and generate a report or set up needed parameters once and regularly receive automatic reports by email on certain date and time.
Comme un débutant tâchant d’effectuer une réparation automobile, je peux me battre pendant des heures en essayant d’utiliser convenablement mes rudimentaires outils (marteau, clefs, etc.) pour la tâche à laquelle je me suis attablé. Une fois que j’ai lamentablement échoué et que j’ai fait remorquer ma guimbarde par un vrai mécanicien, à chaque fois il farfouille dans sa grosse caisse à outils pour y trouver le parfait bidule qui, d’un coup de cuillère à pot, répare le truc. L’art du scan de port, c’est la même chose. Les experts connaissent des douzaines de techniques de scan et choisissent la bonne (ou une combinaison) pour une tâche donnée. D’un autre côté, les utilisateurs inexpérimentés et les script kiddies essaient de tout résoudre avec le scan SYN par défaut. Comme Nmap est gratuit, la seule barrière à franchir pour atteindre la maîtrise du scan est la connaissance. C’est bien mieux que l’automobile, où il faut une grande expérience pour déterminer que vous avez besoin d’une plieuse à tablier hydraulique, mais où quand bien même il faut encore payer des centaines d’euros pour en disposer.
Types de scans
La plupart des types de scans ne sont disponibles que pour les utilisateurs privilégiés. Ceci est dû au fait qu’ils émettent et reçoivent des paquets bruts (raw), qui nécessitent les droits root sur les systèmes UNIX. L’utilisation d’un compte administrateur est conseillé sous Windows, bien que Nmap puisse fonctionner avec des utilisateurs non-privilégiés si WinPcap est déjà chargé avec l’OS. Ce besoin des droits root était une sérieuse restriction quand Nmap a été diffusé en 1997, car beaucoup d’utilisateurs avaient seulement accès à des comptes Internet partagés. Maintenant, le monde est différent. Les ordinateurs sont moins chers, bien plus de gens disposent d’un accès 24/24 direct à Internet et les systèmes UNIX de bureau (comme Linux et Mac OS X) sont répandus. Une version Windows de Nmap est désormais disponible, permettant ainsi de le lancer sur encore plus de machines. Pour toutes ces raisons, les utilisateurs ont bien moins besoin de lancer Nmap depuis des comptes Internet limités. Ceci est heureux, car les options privilégiés rendent Nmap bien plus puissant et flexible.
Résultats
Si Nmap essaie de produire des résultats précis, il faut garder à l’esprit que toute sa perspicacité est basée sur les paquets renvoyés par les machines cibles (ou les pare-feux qui les protègent). De tels hôtes ne sont pas toujours dignes de confiance et peuvent répondre dans le but de d’induire Nmap en erreur. Les hôtes qui ne respectent pas les RFCs et ne répondent pas comme ils devraient sont encore plus courants. Les scans FIN, Null et Xmas sont les plus sensibles à ce problème. Ces points sont spécifiques à certains types de scan et sont donc abordés dans leur section propre de la documentation.
Cette section documente la douzaine de techniques de scan de ports gérées par Nmap. Les méthodes ne peuvent pas être utilisés simultanément, excepté le scan UDP (-sU) qui peut être combiné avec chacun des types de scan TCP. A titre d’aide mémoire, les options de type de scan sont de la forme -s<C>, où <C>est un caractère prépondérant dans le nom du scan, souvent le premier. La seule exception est le désuet scan par rebond FTP (-b). Par défaut, Nmap effectue un scan SYN, bien qu’il y substitue un scan connect() si l’utilisateur ne dispose pas des droits suffisants pour envoyer des paquets bruts (qui requièrent les droits root sous UNIX) ou si des cibles IPv6 sont spécifiées. Des scans listés dans cette section, les utilisateurs non-privilégiés peuvent seulement exécuter les scans connect() et le scan par rebond FTP.
Commandes et options
-sS
(Scan TCP SYN)
Le scan SYN est celui par défaut et le plus populaire pour de bonnes raisons. Il peut être exécuté rapidement et scanner des milliers de ports par seconde sur un réseau rapide lorsqu’il n’est pas entravé par des pare-feux. Le scan SYN est relativement discret et furtif, vu qu’il ne termine jamais les connexions TCP. Il marche également contre toute pile respectant TCP, au lieu de dépendre des particularités environnementales spécifiques comme les scans Fin/Null/Xmas, Maimon ou Idle le sont. Il permet de plus une différentiation fiable entre les états ouvert, fermé et filtré.
Cette technique est souvent appelée le scan demi-ouvert (half-open scanning), car il n’établi pas pleinement la connexion TCP. Il envoie un paquet SYN et attend sa réponse, comme s’il voulait vraiment ouvrir une connexion. Une réponse SYN/ACK indique que le port est en écoute (ouvert), tandis qu’une RST (reset) indique le contraire. Si aucune réponse n’est reçue après plusieurs essais, le port est considéré comme étant filtré. Le port l’est également si un message d’erreur « unreachable ICMP (type 3, code 1,2, 3, 9, 10 ou 13) » est reçu.
-sT
(Scan TCP connect())
Le scan TCP connect() est le type de scan par défaut quand le SYN n’est pas utilisable. Tel est le cas lorsque l’utilisateur n’a pas les privilèges pour les paquets bruts (raw packets) ou lors d’un scan de réseaux IPv6. Plutôt que d’écrire des paquets bruts comme le font la plupart des autres types de scan, Nmap demande au système d’exploitation qui l’exécute d’établir une connexion au port de la machine cible grâce à l’appel système connect(). C’est le même appel système haut-niveau qui est appelé par les navigateurs Web, les clients P2P et la plupart des applications réseaux qui veulent établir une connexion. Cet appel fait partie de l’interface d’application connue sous le nom de « Berkeley Sockets API ». Au lieu de lire les réponses brutes sur le support physique, Nmap utilise cette application API pour obtenir l’état de chaque tentative de connexion.
Si le scan SYN est disponible, il vaut mieux l’utiliser. Nmap a bien moins de contrôles sur l’appel système haut niveau connect() que sur les paquets bruts, ce qui le rend moins efficace. L’appel système complète les connexions ouvertes sur les ports cibles au lieu de les annuler lorsque la connexion est à demie ouverte, comme le fait le scan SYN. Non seulement c’est plus long et demande plus de paquets pour obtenir la même information, mais de plus la probabilité que les cibles activent la connexion est plus grande. Un IDS décent le fera, mais la plupart des machines ne disposent pas de ce système d’alarme. De nombreux services sur les systèmes UNIX standards noteront cette connexion dans le journal, accompagné d’un message d’erreur sibyllin si Nmap ouvre puis referme la connexion sans n’envoyer aucune donnée. Les services réseaux les plus piteux risquent même de tomber en panne, mais c’est assez rare. Un administrateur qui verrait un tas de tentatives de connexions dans ses journaux en provenance d’une seule machine devrait se rendre compte qu’il a été scanné.
-sU
(Scan UDP)
Même si les services les plus connus d’Internet son basés sur le protocole TCP, les services UDP sont aussi largement utilisés. DNS, SNMP ou DHCP (ports 53, 161/162 et 67/68) sont les trois exemples les plus courants. Comme le scan UDP est généralement plus lent et plus difficile que TCP, certains auditeurs de sécurité les ignorent. C’est une erreur, car les services UDP exploitables sont courants et les attaquants eux ne les ignoreront pas. Par chance, Nmap peut aider à répertorier les ports UDP.
Le scan UDP est activé avec l’option-sU. Il peut être combiné avec un scan TCP, comme le scan SYN ( -sS), pour vérifier les deux protocoles lors de la même exécution de Nmap.
Le scan UDP envoie un en-tête UDP (sans données) à chaque port visé. Si un message ICMP « port unreachable (type 3, code 3) » est renvoyé, le port est alors fermé. Les autres messages d’erreur « unreachable ICMP (type 3, codes 1, 2, 9, 10, or 13) » rendront le port filtré. À l’occasion, il arrive qu’un service répond par un paquet UDP, prouvant que le port est dans l’état ouvert. Si aucune réponse n’est renvoyée après plusieurs essais, le port est considéré comme étant ouvert|filtré. Cela signifie que le port peut être soit ouvert, soit qu’un dispositif de filtrage bloque les communications. Le scan de versions ( -sV) peut être utilisé pour différencier les ports ouverts de ceux filtrés.
Une des grandes difficultés avec le scan UDP est de l’exécuter rapidement. Les ports ouverts et filtrés ne renvoient que rarement des réponses, laissant Nmap expirer son délai de retransmission au cas où les paquets se soient perdus. Les ports fermés posent encore un plus grand problème: ils renvoient normalement une erreur ICMP « port unreachable ». Mais à la différence des paquets RST renvoyés par les ports TCP fermés en réponse à un scan SYN ou à un connect(), de nombreux hôtes limitent par défaut la cadence d’émission de ces messages. Linux et Solaris étant particulièrement stricts à ce sujet. Par exemple, le kernel 2.4.20 limite cette cadence des destinations inaccessibles (« destination unreachable ») à un par seconde (cf.net/ipv4/icmp.c).
Nmap détecte cette limitation de fréquence et s’y ralenti conformément afin d’éviter de saturer le réseau avec des paquets inutiles que la machine cible rejettera. Malheureusement, une limitation à la Linux d’un paquet par seconde fera qu’un scan des 65 536 ports prendra plus de 18 heures. Les idées pour accélérer les scans UDP incluent le scan des cibles en parallèle, ne scanner que les ports les plus courants en premier, scanner derrière le pare-feu et utiliser l’option --host-timeoutpour éviter les hôtes les plus lents.
When disaster strikes (and it will), you can put the pieces back together if you’ve got a solid backup solution in place.
If you have a Windows server and you’re not backing it up, you are tempting fate. It’s only a matter of time before something tragic will happen: a hardware failure, a hacker, or a corrupted Windows update. Something will bring that server down and do everything it can to take your data with it.
Luckily, several reliable backup solutions are available for the Windows Server environment. They aren’t perfect. But the five solutions discussed here have their strengths and can be depended upon to keep your data safe. Now, before I reveal the big five, I want to make sure you understand how critical it is to be backing up that data to an external drive and to rotate that drive offsite. If you’re backing up drives and leaving everything onsite, should a fire (or some other catastrophe) occur, that data will be lost.
Note: This list is also available as a photo gallery.
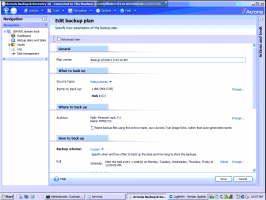
1: Acronis Backup and Restore (with Universal Restore)
Acronis Backup and Restore (Figure A) is the backup tool I use the most. It’s costly but well worth it. The newer version of Acronis does a great job of ensuring that there is room on your external drive for your latest backup. You can overwrite the old backup or go by the traditional cleanup rules established in Acronis Echo. But if you go the Acronis route, you should also purchase the Universal Restore feature. With this tool, you can take a full image of a backup and restore it to any hardware — so long as it meets the requirements of your platform. That way, you don’t need an exact duplicate of your server hardware sitting around waiting to have an image restored onto it. Acronis also has add-ons for Exchange and SQL Servers.
Figure A
Acronis Backup and Restore
2: Symantec Backup Exec
Symantec Backup Exec (Figure B) is a powerful backup solution that does a great job of « just working. » And with its at-a-glance calendar, it’s easy to know when your backup has succeeded and when it has worked. If you’re using Symantec Backup Exec across a network (to back up clients/hosts), you can feel safe because it uses SSL for all network backup connections. Like Acronis, Symantec offers solutions for Exchange and SQL. Also, the ability to manage Vaults (backup destinations) is superb with Symantec. Just make sure that if a Vault is physically (and permanently) removed, you remove it from within the backup software. Otherwise, it will cause problems.
Figure B
Symantec Backup Exec
3: Carbonite
Carbonite (Figure C) is primarily an online backup (although the Business and BusinessPremier plans allow you to back up to an external drive). It’s meant to back up data only. Carbonite is probably one of the most reliable online backup tools and can back up email, documents, POS files, financial data, pictures and other multimedia, and more. But to use Carbonite for Windows Server, you must use the BusinessPremier Plan ($229.00 per year), which will allow you to include as many servers running Window Server 2003/2008/2011 as you like. Unlike Acronis, you won’t be backing up an image of your server with Carbonite — it’s a data-only backup tool. But it’s an excellent addition to any onsite backup solution.
Figure C
Carbonite
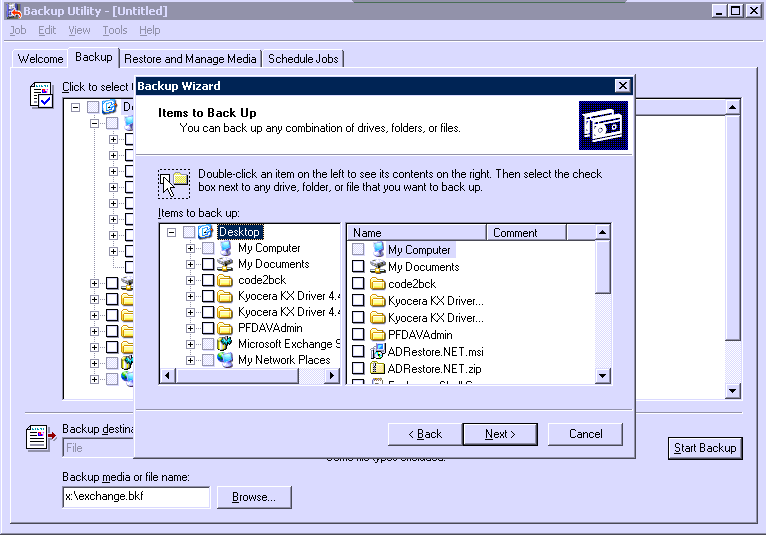
4: Windows NT Backup
Windows NT Backup (Figure D) is the free backup solution that comes with any Windows Server. Why do I include it here? Although it just does data backup and doesn’t offer many of the bells and whistles of the other tools, it is one of the only truly reliable backup solutions that will clear the Exchange logs for you. I always set up an NT Backup to run once a week (or month, depending upon the needs), just to have it clear the Exchange logs. Otherwise, you’ll be including a lot of unnecessary data in your backups, causing their size to get out of hand.
Figure D
Windows NT Backup
5: ShadowProtect 4 (Server)
ShadowProtect 4 (Figure E) is probably the least-known product in this list. But it falls into place next to Acronis as a feature-rich tool that can do everything — including recover to dissimilar hardware. ShadowProtect 4 also includes an easy-to-use tool that allows you to consolidate backup image files and convert the backups to either .VHD or .VMDK virtual machines. Another outstanding feature is its granular recovery, which allows for the quick recovery of individual files from within a backup. Unique to ShadowProtect is the Virtual Boot technology, which provides for automatic failover to a virtual server.
Figure E
ShadowProtect 4
Which backup?
Every company needs a backup plan. How far you go with your backup depends upon the size of the company, your needs, and your budget. But any of the above solutions will serve as a great place to start — or stop — for your Windows Server backup needs. Do you have a different backup solution to add to the list? Share your recommendations with fellow TechRepublic members.