Si vous souhaitez rendre vos règles de firewalling persistantes les développeurs de iptables ont prévu deux commandes : iptables-save et iptables-restore.
Ces commandes permettent de créer une copie de la configuration actuelle et de charger une de ces copies.
Il se trouve que nos amis de chez Debian ont prévu un petit script permettant d’automatiser le chargement des règles iptables au démarrage : iptables-persistent. Nous allons donc dans un premier temps installer ce paquet. Nous verrons ensuite comment sauvegarder notre configuration actuelle.
Installation de iptables-persistent
L’installation est très très très simple … voyez plutôt !
# aptitude install iptables-persistent
Et le tour est joué !
À l’installation il vous sera demandé si vous souhaitez sauvegarder les règles de firewalling actuellement en place. Vous pouvez répondre oui ou non.
Ce paquet vous a créé plusieurs fichiers dont
/etc/iptables/rules.v4 : Le fichier qui sera lu par le script de démarrage pour charger vos règles IPV4.
/etc/iptables/rules.v6 : Le fichier qui sera lu par le script de démarrage pour charger vos règles IPV6.
Sauvegarder nos règles
Comme je le disais plus haut, il existe la commande iptables-save qui nous permet d’exporter la configuration actuelle. Petit exemple
La seul chose que nous avons à faire est de rediriger la sortie de cette commande non plus dans le terminal mais dans le fichier rules.v4 ou rules.v6 utilisés par iptables-persistent.
The OTPW package consists of the one-time-password generator otpw-gen plus two verification routinesotpw_prepare() and otpw_verify() that can easily be added to programs such as login or ftpd on POSIX systems. For platforms that support the Pluggable Authentication Method (PAM) interface, a suitable wrapper is included as well. Login software extended this way will allow reasonably secure user authentication over insecure network lines. The user carries a password list on paper. The scheme is designed to be robust against theft of the paper list and race-for-the-last-letter attacks. Cryptographic hash values of the one-time passwords are stored for verification, either in the user’s home directory or in a dedicated system directory.
Introduction
A well-known classic vulnerability of the Internet application protocol suite is the frequent cleartext transfer of passwords in the telnet, rsh, and ftp protocols. Modern replacements for these protocols such as Tatu Ylönen’sSecure Shell allow comfortable and secure remote sessions and file transfers over network connection that are not trusted to provide confidentiality.
However, traveling computer users often want to connect to their home system via untrusted terminals at conference hotels, other universities, and airports, where trusted encryption software is not available. Even Secure Shell does not protect against keyboard eavesdropping software on the untrusted terminal. A loss of confidentiality is often acceptable in these situations for the session content, but not for reusable login passwords. One-time-password schemes avoid the transmission of authentication secrets that are of any value after they have been used. This provides a reasonable level of protection against the widely encountered password sniffing attacks. The goal of a one-time-password login scheme is merely to provide a significant increase of security over the classic telnet/rlogin login procedure. It does not aim to protect from sophisticated active attacks such as session hijacking, host emulation, man-in-the-middle, etc. against which ssh and SSL based protocols should be used if this level of protection is required.
A widely known one-time-password scheme is S/KEY [Hal94, HM96]. OTPW is not compatible with and is not derived from either S/KEY or OPIE. It is a completely independent and different design, which I believe fulfils my functional and security requirements better.
How it works
One-time password authentication with the OTPW package is accomplished via a file containing hash values of passwords. Depending on the installation option chosen, this can either be a file ~john/.otpw located in the user’s home directory, or it can be a file ~otpw/john in the home directory of a dedicated pseudo user “otpw”. In the latter case, the otpw-gen tool for generating new passwords must be owned by pseudo user “otpw” and have the SETUID bit set. As long as users do not have such a hash file, the one-time-password facility is not active for them.
A user who wants to setup the one-time-password capability just executes the otpw-gen program. The program will ask for a prefix password that the user has to select and memorize and it will then write to standard output a password list such as:
Normally the output of otpw-gen should be sent directly to the printer as in
otpw-gen | lpr
or should be first formatted with an ASCII to PostScript converter where necessary.
Fetch the printed list immediately from the printer, fold it, and keep it with you. The list shows the machine name and the creation time to allow users to find the latest list for the right machine. It does not show the user’s name, because nobody is supposed to have the list of anyone else, but printer drivers such as a2ps might add it. Only a single list is required for a set of networked machines on which the user has a common home directory.
By default, otpw-gen generates 60 lines of output. Use the command line options -hlines, -wcolumns, and -spages to specify the length of the output. No more than 1000 passwords will be generated at a time.
Where one-time-password authentication is used, the password prompt will be followed by a 3-digit password number. Enter first the prefix password that was given to otpw-gen, followed directly (without hitting return between) by the password with the requested number from the printed password list:
  login: kuhn
  Password 019: geHeimOdAkH62c
In this example, geHeim was the prefix password. The spaces in the password list are just there to increase readability and can be dropped.
A clever attacker might observe the password being entered and might try to use the fact that computers can send data much faster than users can finish entering passwords. In the several hundred milliseconds that the user needs to press the return key after the last character, an attacker could on a parallel connection to the same machine send the code of the return key faster than the user.
To prevent such a race-for-the-last-key attack, any login attempt that is taking place concurrently with another attempt will require three one-time passwords to be entered:
This might look inconvenient at first, but remember that three passwords will only be requested when someone tries to login simultaneously, which in itself should already cause suspicion. The three requested passwords are randomly selected but they will never include the single password that was requested in the first of the concurrent login attempts. Only the first requested single password will be locked, not any of the requested triples. This way, the three-password method ensures that an attacker cannot disable the OTPW mechanism by locking all passwords. The triple challenge ensures that many ten thousand network connections would be necessary to perform a race attack on the same password triple, which is not practical. The OTPW package creates a symbolic link .otpw.lock in the user’s home directory to lock the first requested password while its input is pending. If a system crash created a stale lock, it will be removed after 24 hours.
The '!' symbol or operator in Linux can be used as Logical Negation operator as well as to fetch commands from history with tweaks or to run previously run command with modification. All the commands below have been checked explicitly in bash Shell. Though I have not checked but a major of these won’t run in other shell. Here we go into the amazing and mysterious uses of '!' symbol or operator in Linux commands.
1. Run a command from history by command number.
You might not be aware of the fact that you can run a command from your history command (already/earlier executed commands). To get started first find the command number by running ‘history‘ command.
$ history
Now run a command from history just by the number at which it appears, in the output of history. Say run a command that appears at number 1551 in the output of ‘history‘ command.
$ !1551
And, it runs the command (top command in the above case), that was listed at number 1551. This way to retrieving already executed command is very helpful specially in case of those commands which are long. You just need to call it using ![Number at which it appears in the output of history command].
Firewalls are an important tool that can be configured to protect your servers and infrastructure. In the Linux ecosystem, iptables is a widely used firewall tool that interfaces with the kernel’s netfilter packet filtering framework. For users and administrators who don’t understand the architecture of these systems, creating reliable firewall policies can be daunting, not only due to challenging syntax, but also because of number of interrelated parts present in the framework.
In this guide, we will dive into the iptables architecture with the aim of making it more comprehensible for users who need to build their own firewall policies. We will discuss how iptables interacts with netfilter and how the various components fit together to provide a comprehensive filtering and mangling system.
What Are IPTables and Netfilter?
The basic firewall software most commonly used in Linux is called iptables. The iptables firewall works by interacting with the packet filtering hooks in the Linux kernel’s networking stack. These kernel hooks are known as the netfilter framework.
Every packet that enters networking system (incoming or outgoing) will trigger these hooks as it progresses through the stack, allowing programs that register with these hooks to interact with the traffic at key points. The kernel modules associated with iptables register at these hooks in order to ensure that the traffic conforms to the conditions laid out by the firewall rules.
Netfilter Hooks
There are five netfilter hooks that programs can register with. As packets progress through the stack, they will trigger the kernel modules that have registered with these hooks. The hooks that a packet will trigger depends on whether the packet is incoming or outgoing, the packet’s destination, and whether the packet was dropped or rejected at a previous point.
The following hooks represent various well-defined points in the networking stack:
NF_IP_PRE_ROUTING: This hook will be triggered by any incoming traffic very soon after entering the network stack. This hook is processed before any routing decisions have been made regarding where to send the packet.
NF_IP_LOCAL_IN: This hook is triggered after an incoming packet has been routed if the packet is destined for the local system.
NF_IP_FORWARD: This hook is triggered after an incoming packet has been routed if the packet is to be forwarded to another host.
NF_IP_LOCAL_OUT: This hook is triggered by any locally created outbound traffic as soon it hits the network stack.
NF_IP_POST_ROUTING: This hook is triggered by any outgoing or forwarded traffic after routing has taken place and just before being put out on the wire.
Kernel modules that wish to register at these hooks must provide a priority number to help determine the order in which they will be called when the hook is triggered. This provides the means for multiple modules (or multiple instances of the same module) to be connected to each of the hooks with deterministic ordering. Each module will be called in turn and will return a decision to the netfilter framework after processing that indicates what should be done with the packet.
IPTables Tables and Chains
The iptables firewall uses tables to organize its rules. These tables classify rules according to the type of decisions they are used to make. For instance, if a rule deals with network address translation, it will be put into the nat table. If the rule is used to decide whether to allow the packet to continue to its destination, it would probably be added to the filter table.
Within each iptables table, rules are further organized within separate « chains ». While tables are defined by the general aim of the rules they hold, the built-in chains represent the netfilter hooks which trigger them. Chains basically determine when rules will be evaluated.
As you can see, the names of the built-in chains mirror the names of the netfilter hooks they are associated with:
PREROUTING: Triggered by the NF_IP_PRE_ROUTING hook.
INPUT: Triggered by the NF_IP_LOCAL_IN hook.
FORWARD: Triggered by the NF_IP_FORWARD hook.
OUTPUT: Triggered by the NF_IP_LOCAL_OUT hook.
POSTROUTING: Triggered by the NF_IP_POST_ROUTING hook.
Chains allow the administrator to control where in a packet’s delivery path a rule will be evaluated. Since each table has multiple chains, a table’s influence can be exerted at multiple points in processing. Because certain types of decisions only make sense at certain points in the network stack, every table will not have a chain registered with each kernel hook.
There are only five netfilter kernel hooks, so chains from multiple tables are registered at each of the hooks. For instance, three tables have PREROUTING chains. When these chains register at the associated NF_IP_PRE_ROUTING hook, they specify a priority that dictates what order each table’s PREROUTING chain is called. Each of the rules inside the highest priority PREROUTING chain is evaluated sequentially before moving onto the next PREROUTING chain. We will take a look at the specific order of each chain in a moment. Lire la suite…
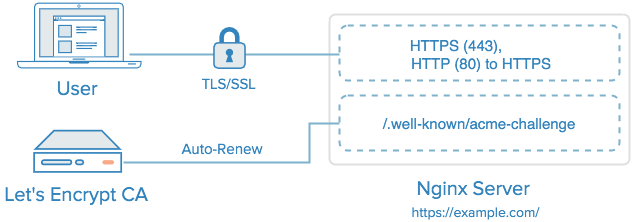
Let’s Encrypt is a new Certificate Authority (CA) that provides an easy way to obtain and install free TLS/SSL certificates, thereby enabling encrypted HTTPS on web servers. It simplifies the process by providing a software client, letsencrypt, that attempts to automate most (if not all) of the required steps. Currently, as Let’s Encrypt is still in open beta, the entire process of obtaining and installing a certificate is fully automated only on Apache web servers. However, Let’s Encrypt can be used to easily obtain a free SSL certificate, which can be installed manually, regardless of your choice of web server software.
In this tutorial, we will show you how to use Let’s Encrypt to obtain a free SSL certificate and use it with Nginx on Ubuntu 14.04. We will also show you how to automatically renew your SSL certificate. If you’re running a different web server, simply follow your web server’s documentation to learn how to use the certificate with your setup.
Prerequisites
Before following this tutorial, you’ll need a few things.
You should have an Ubuntu 14.04 server with a non-root user who has sudo privileges. You can learn how to set up such a user account by following steps 1-3 in our initial server setup for Ubuntu 14.04 tutorial.
You must own or control the registered domain name that you wish to use the certificate with. If you do not already have a registered domain name, you may register one with one of the many domain name registrars out there (e.g. Namecheap, GoDaddy, etc.).
If you haven’t already, be sure to create an A Record that points your domain to the public IP address of your server. This is required because of how Let’s Encrypt validates that you own the domain it is issuing a certificate for. For example, if you want to obtain a certificate for example.com, that domain must resolve to your server for the validation process to work. Our setup will use example.com and www.example.com as the domain names, so both DNS records are required.
Once you have all of the prerequisites out of the way, let’s move on to installing the Let’s Encrypt client software.
Step 1 — Install Let’s Encrypt Client
The first step to using Let’s Encrypt to obtain an SSL certificate is to install the letsencrypt software on your server. Currently, the best way to install Let’s Encrypt is to simply clone it from the official GitHub repository. In the future, it will likely be available via a package manager.
Install Git and bc
Let’s install Git and bc now, so we can clone the Let’s Encrypt repository.
Update your server’s package manager with this command:
sudo apt-get update
Then install the git and bc packages with apt-get:
sudo apt-get -y install git bc
With git and bc installed, we can easily download letsencrypt by cloning the repository from GitHub.
Clone Let’s Encrypt
We can now clone the Let’s Encrypt repository in /opt with this command:


.png?1452541820 "nginx lets encrypt ubuntu")