Nous avons installé fail2ban sur chacun de nos serveurs en utilisant ce tutoriel
Le script de monitoring que nous allons utiliser se trouve ici : http://blog.sinnwidrig.org/?p=50. C’est un script générique permettant de créer un graphique distinct par action de fail2ban.
On décide de placer les plugins supplémentaires pour munin dans le répertoire  /opt/share/munin/plugins
#Créer le répertoire des plugins dans le cas ou il n'existe pas déjà
sudo mkdir -p /opt/share/munin/plugins
cd /opt/share/munin/plugins
# Récupérer le script
sudo wget http://blog.sinnwidrig.org/files/fail2ban_-0.1
# Rendre exécutable le script
sudo chmod +x fail2ban_-0.1
Up until now i have been manually blocking ip’s that attack my server but by the time i see them the attacks have normally finished but after the last big attack on my email server (some 35,000 attempts) i decided to find a way to automate the blocking. After a bit of research i decided to setup Fail2ban and here’s how i did it.
As i use a 3rd party repostories – EPEL (how to add repositories) i can just use yum to install it
yum install fail2ban
once installed i just needed to change the configuration to my liking, the config files can be found at « /etc/fail2ban »
first i edit « /etc/fail2ban/fail2ban.conf » and ensure the « logtarget » is set correctly
logtarget = /var/log/fail2ban.log
The default behaviour of fail2ban is configured in the file « /etc/fail2ban/jail.conf ». There’s a [DEFAULT] section that applies to all other sections unless the default options are overridden in the other sections. Lire la suite…
Fail2ban: An Apache HTTP server in production environments can be under attack in various different ways. Attackers may attempt to gain access to unauthorized or forbidden directories by using brute-force attacks or executing evil scripts. Some malicious bots may scan your websites for any security vulnerability, or collect email addresses or web forms to send spams to.
Apache HTTP server comes with comprehensive logging capabilities capturing various abnormal events indicative of such attacks. However, it is still non-trivial to systematically parse detailed Apache logs and react to potential attacks quickly (e.g., ban/unban offending IP addresses) as they are perpetrated in the wild. That is when fail2ban comes to the rescue, making a sysadmin‘s life easier.
fail2ban is an open-source intrusion prevention tool which detects various attacks based on system logs and automatically initiates prevention actions e.g., banning IP addresses with iptables, blocking connections via /etc/hosts.deny, or notifying the events via emails. fail2ban comes with a set of predefined « jails » which use application-specific log filters to detect common attacks. You can also write custom jails to deter any specific attack on an arbitrary application.
In this tutorial, I am going to demonstrate how you can configure fail2ban to protect your Apache HTTP server. I assume that you have Apache HTTP server and fail2ban already installed. Refer to another tutorial for fail2ban installation.
What is a Fail2ban Jail
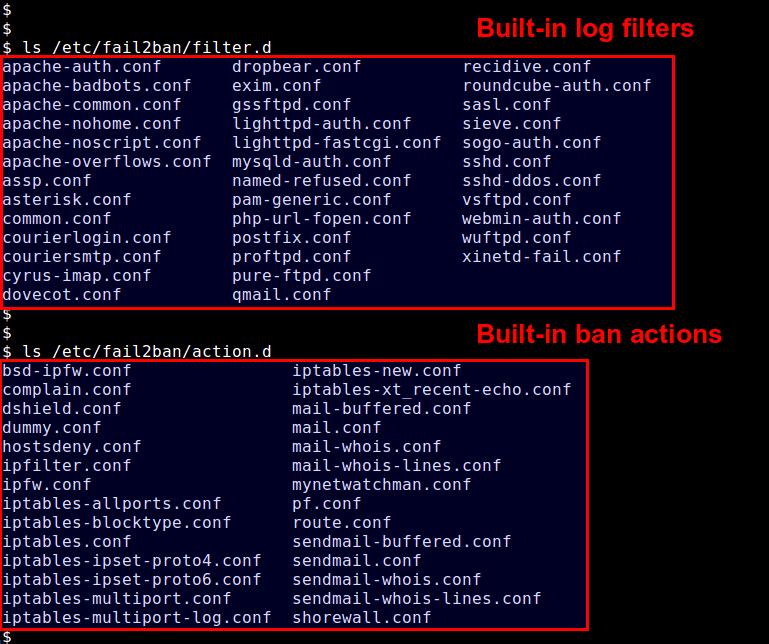
Let me go over more detail on fail2ban jails. A jail defines an application-specific policy under which fail2ban triggers an action to protect a given application. fail2ban comes with several jails pre-defined in /etc/fail2ban/jail.conf, for popular applications such as Apache, Dovecot, Lighttpd, MySQL, Postfix, SSH, etc. Each jail relies on application-specific log filters (found in /etc/fail2ban/fileter.d) to detect common attacks. Let’s check out one example jail: SSH jail.
This SSH jail configuration is defined with several parameters:
[ssh]: the name of a jail with square brackets.
enabled: whether the jail is activated or not.
port: a port number to protect (either numeric number of well-known name).
filter: a log parsing rule to detect attacks with.
logpath: a log file to examine.
maxretry: maximum number of failures before banning.
banaction: a banning action.
Any parameter defined in a jail configuration will override a corresponding fail2ban-wide default parameter. Conversely, any parameter missing will be assgined a default value defined in [DEFAULT] section.
Predefined log filters are found in /etc/fail2ban/filter.d, and available actions are in /etc/fail2ban/action.d.
If you want to overwrite fail2ban defaults or define any custom jail, you can do so by creating /etc/fail2ban/jail.local file. In this tutorial, I am going to use /etc/fail2ban/jail.local.
In an operating system, logs are all about keeping track of events, be it critical system errors, resource usage warnings, transaction history, application status, or user activities. These logs, which are stored as (text or binary) files in the system, are useful for system auditing, debugging and maintenance. However, with so many different system entities generating log files, and even at growing rate, the challenge as a system admin is to how to « consume » these log files effectively.
That’s when log monitoring tools come into the picture, which streamline the often laborious process of collecting, parsing and analyzing log files, as well as alerting system admins for any interesting events. These tools are designed from ground up focused on log monitoring, so they offer many attractive features, such as scalable log aggregation and filtering, human-readable display, event correlation, visual or email notification, flexible log retention policy, and so on.
In this post, I am going to introduce a list of popular open-source log monitoring software for Linux, ranging from simple log file viewers to full-blown log monitoring frameworks.
Log Aggregation and Filtering
Log monitoring would not be possible without efficient and scalable mechanisms to collect and pre-process log files. Tools in this category focus on shipping, collecting, filtering, indexing and storing log files, so that they can be further analyzed and visualized in subsequent monitoring pipelines.
1. rsyslog: an open-source log collector server which can filter and consolidate log data (based on syslog protocol) from different hosts and devices in the network. rsyslog can be configured as a server or a client, where the former plays the role of a log collector and the latter runs as a log sender.
2. syslog-ng: another open-source implementation of the syslog protocol with more advanced and user-friendly features such as content-based filtering, easier-to-understand config format, and real-time event correlation.
3. systemd journal: systemd journal can be configured for remote journal logging, where locally logged events are forwarded to a remote server over HTTP. In this setup, systemd-journal-upload on a client host serializes and forwards journal messages to systemd-journal-remote running on a remote collector server.
4. logstash: an open-source tool that collects, parses, and stores log files for offline search and analysis. logstash can run in various pipelines due to many plugins supporting different input/output interfaces, decoding/encoding, and filtering rules. Input plugins allows logstash to gather log files from different sources and protocols (e.g., files, S3, RabbitMQ, syslog, collectd, TCP/UDP sockets). Filter/codec plugins are used to parse, convert, modify and add metadata to log files. Output plugins pass processed log files to various target storages (e.g., file, Google cloud storage, Nagios, S3, Zabbix).
5. collectd: a daemon service which gathers various system-level statistics, and stores them for historical analysis or real-time graphing. Similar to logstash, collectd is an extensible architecture, where you can enable various input/output plugins to change its collection behaviors. For log collection, collectd can leverage LogFile and Network plugins to aggregate remote log files.
6. Logster: an open-source utility for parsing log files for any interesting data, and aggregating extracted data into metrics for subsequent reporting and graphing pipelines.
7. Fluentd: a unified log aggregation layer which allows in-stream processing for a variety of streaming data and log files. It comes with a huge plugin ecosystem with more than 300 plugins to support various input sources and output interfaces.
8. Nxlog: a unified log collector and forwarder which supports a variety of log sources, formats and protocols. Advanced features include multi-threaded log collection and processing, message buffering and prioritization, built-in log rotation, and TLS/SSL transport.
9. Scribe:: a scalable log collector server developed by Facebook. Scribe can aggregate log data which is streamed in real time from a large number of clients. It uses Apache Thrift for protocol encoding, so its interface is compatible with pretty much any languages. While a proven solution, Scribe is not something you can deploy quickly as a turnkey. Also, note that Scribe is no longer updated and maintained.
10. Flume: a highly scalable and reliable service to transport and collect large volumes of streaming log data from any clients, and store them in backend storage such as Apache Hadoops’ HDFS.
In the Getting Started guide, you learned how to deploy a Linux distribution, boot your Linode and perform some basic administrative tasks. Now it’s time to harden your Linode to protect it from unauthorized access.
Update Your System–Frequently
Keeping your software up to date is the single biggest security precaution you can take for any operating system–be it desktop, mobile or server. Software updates frequently contain patches ranging from critical vulnerabilities to minor bug fixes, and many software vulnerabilities are actually patched by the time they become public.
Automatic Security Updates
There are opposing arguments for and against automatic updates on servers. Nonetheless, CentOS, Debian, Fedora and Ubuntu can be automatically updated to various extents. Fedora’s Wiki has a good breakdown of the pros and cons, but if you limit updates to those for security issues, the risk of using automatic updates will be minimal.
The practicality of automatic updates must be something which you judge for yourself because it comes down to what you do with your Linode. Bear in mind that automatic updates apply only to packages sourced from repositories, not self-compiled applications. You may find it worthwhile to have a test environment which replicates your production server. Updates can be applied there and reviewed for issues before being applied to the live environment.
Up to this point, you have accessing your Linode as the root user. The concern here is that roothas unlimited privileges and can execute any command–even one that could accidentally break your server. For this reason and others, we recommend creating a limited user account and using that at all times. Administrative tasks will be done using sudo to temporarily elevate your limited user’s privileges so you can administer your server without logging in as root.
Create the user, replacing example_user with your desired username, and assign a password:
useradd example_user && passwd example_user
Add the user to the wheel group for sudo privileges:
usermod -aG wheel example_user
Debian / Ubuntu
Create the user, replacing example_user with your desired username. You’ll then be asked to assign the user a password.
adduser example_user
Add the user to the sudo group so you’ll have administrative privileges:
adduser example_user sudo
With your new user assigned, disconnect from your Linode as root:
exit
Log back in to your Linode as your new user. Replace example_user with your username, and the example IP address with your Linode’s IP address:
ssh example_user@203.0.113.0
Now you can administer your Linode from your new user account instead of root. Superuser commands can now be prefaced with sudo; for example, sudo iptables -L. Nearly all superuser commands can be executed with sudo, and those commands will be logged to /var/log/auth.log.