Occasionally I type a password or other sensitive information into a shell prompt. Using bash history, the command can be removed.
# say we start with an empty bash command history
bash-3.2$ history
 1 history
# enter a command that requires a password
bash-3.2$ sudo rm -i some_file
Password:
# accidentally ^C and type your password
# into the prompt and hit enter
bash-3.2$ secret_password
bash: secret_password: command not found
# your password is now there for all to
# see in your bash history
bash-3.2$ history
 1 history
 2 sudo rm -i some_file
 3 secret_password
 4 history
# first option to fix it, delete the numbered entry from
# history and write to your ~/.bash_history file
bash-3.2$ history -d 3
bash-3.2$ history -w
# entry 3 will be removed entirely from your command history
bash-3.2$ history
 1 history
 2 sudo rm -i some_file
 3 history
 4 history -d 3
 5 history -w
 6 history
# the second option is to clear the entire history
# and write the changes to disk
bash-3.2$ history -c
bash-3.2$ history -w
# it's now pretty obvious that your history has been
# scrubbed clean, but at least your password is history!
bash-3.2$ history
 1 history -w
 2 history
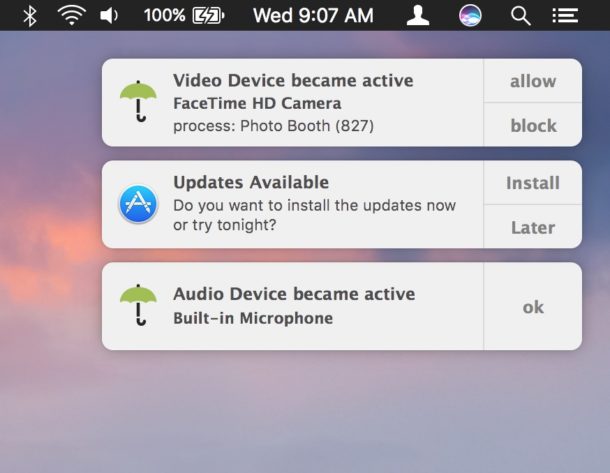
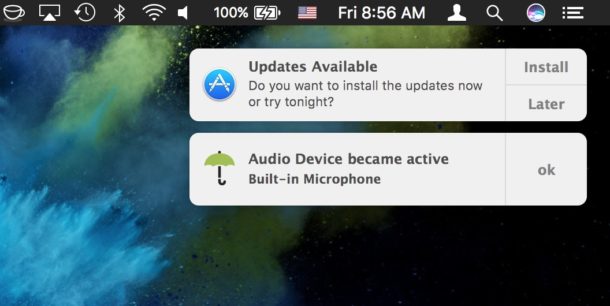
Though Mac users don’t usually have to worry excessively about “camfecting” malware and spyware, some security conscious users may find it nice to know if a process or application is attempting to access their computers web camera or microphone.
With the help of a free third party security utility called Oversight, you can have your Mac alert you anytime an application or process tries to activate either recording device on the computer.
The developer of Oversight explains why a tool like Oversight could be valuable to some users:
“One of the most insidious actions of malware, is abusing the audio and video capabilities of an infected host to record an unknowing user. Macs, of course, are not immune; malware such as OSX/Eleanor, OSX/Crisis, OSX/Mokes, and others, all attempt to spy on OS X users. OverSight constantly monitors a system, alerting a user whenever the internal microphone is activated, or the built-in webcam is accessed. And yes, while the webcam’s LED will turn on whenever a session is initially started, new research has shown that malware can surreptitious piggyback into such existing sessions (FaceTime, Sykpe, Google Hangouts, etc.) and record both audio and video – without fear of detection.”
Sound good? If so, it’s a free download that is easy to install on a Mac with either macOS or Mac OS X:
If you’re interested in this app, simply download Oversight and run the installer (it can be just as easily uninstalled later if you decide you do not need it).
Once installed, Oversight is small and lightweight running quietly in the background, and it will alert you anytime the Mac microphone or webcam FaceTime camera are attempting to be activated. You can then directly intervene and either allow the webcam or microphone access (for legitimate use), or deny it (for theoretical illegitimate use).
Keep in mind that Oversight does not differentiate between legitimate and illegitimate use of the webcam and microphone on your Mac, that is up to you. For example, you will get a notification alert that the microphone and FaceTime camera are trying to be accessed when you open an app like Skype, Photo Booth, FaceTime, or are recording a video on your Mac with the webcam, but since those applications legitimately use the computers microphone and camera they are probably nothing to be concerned about (assuming you have launched them yourself anyway). On the other hand, if out of the blue and with no provocation if you see a process has attempted to access your microphone, that could potentially be an unauthorized attempt to use the microphone and you could choose to reject it and block the device access with Oversight. Whenever possible, Oversight will attempt to notify you of the process name and PID, but sometimes you will see blank notifications of access anyway – again just think about what apps you are using and if they have any reason to use your camera or microphone, similar to how you can control this type of access in iOS for Photos, camera, and microphone.
This is a software solution which is quite a bit more fancy than the low-tech solution of putting tape on your web camera like the FBI Director does and many security professionals do. You could always use Oversight along with some tape too if you’re extra concerned about your Mac webcam or microphone access and want to be sure nothing fishy is going on from camfecting or otherwise.
While apps like Oversight could be considered overboard and unnecessary for many Mac users, others who are privacy conscious or in fields where higher security matters may find them to be helpful. I’ve personally noticed a particular web browser will occasionally attempt to access the microphone on my Mac from time to time without an obvious reason which I find to be… curious… and Oversight notified me each time. It’s not for everyone, but if you want to be notified when something is trying to use your Mac camera or microphone, check out the app yourself.
Fortunately, Mac Leopard users have a program called Time Machine that makes things a lot easier. But is Time Machine the perfect backup solution? I don’t think so. There are a couple of things that make Time Machine very unsuitable for me:
You need to get a seperate external hard drive that can only be used for Time Machine (and has to be formatted first)
That drive has to be formatted in HFS+, hence, without any (commercial) third-party plugins it’s not readable on Windows or Linux systems
You have to leave your drive on all the time to make sure Time Machine makes backups
You can’t make a list of things you want to have backed up, you can only exclude folders from your complete hard disk
Time Machine makes an exact copy of your hard drive
Especially that last ‘feature’ is very irritating to me. I have an external drive with about 300G of files, including lots of music and video files. My MacBook drive is only 80GB big, so i can never have the complete contents of my external drive on my MacBook. Let’s say i have 10GB of MP3 files, which i backup with Time Machine, then i remove about 5GB of files from my MacBook to free some space. What happens when the next backup round is happening? Exactly, the 5GB of files get deleted from the external disk as well. When i want to play a certain MP3 file from my external drive i now have to ‘restore’ and ‘look back in history’ to find it. Not very user-friendly.
Luckily, there is a very good (free) alternative to Time Machine that does exactly what i want with backups: it lets you specify which folders you want to backup, it doesn’t delete things on the backup drive when you delete files from your original drive, and it’s compatible with any external drive and can even backup files over a network. This piece of software is called rsync. Here’s how to use it.
rsync is a command-line utility shipped with every copy of Mac OS X. It originated from the UNIX/Linux world, where it has been part of most Linux distributions for many years. rsync is reliable, fast, and easily configurable. Try running it by opening up the Terminal.app (located in your Applications/Utilities folder) and running the command:
rsync
You’ll get an overview of all possible options. In essence the syntax is very simple:
rsync OPTIONS SOURCE DESTINATION
What you’ll probably want is a one-way transfer of all files in SOURCE to DESTINATION, where only files are copied that are not available on the DESTINATION disk or different. Aside from that you’ll want to include all subdirectories, links, permissions, date/time, groups, owner and devices. To do that simply use this easy-to-remember option list:
rsync -rlptgoD
Ha, just kidding! Fortunately there is another switch that does all of that with one switch, namely the archive switch:
rsync -a
So, let’s say you want to backup the files in your Documents directory to your external harddrive, which you appropriately named ‘backup’, then this would be the command:
rsync -a ~/Documents/ /Volumes/backup/Documents
For those of you who don’t use the Terminal very often: the tilde (~) is a shortcut for your home directory. If, for example, your name would be ‘Alice’ your home directory would probably be
Using TimeMachine with rsync: Over many years, I have dealt with scripts that do backup versioning, i.e., maintain multiple backups. Due to their flexibility, they have been complex to understand and configure. Here is a simple rsync-based tool with a different focus: The experienced systems administrator who wants to keep his system’s complexity down.
Backup in action: TimeMachine and rsync
It consists of a simple script, which you can call rsync-backup.sh and store wherever you like, e.g., in /usr/local/sbin. I will use these names and paths in the examples.
#!/bin/sh
# Usage: rsync-backup.sh <src> <dst> <label>
if [ "$#" -ne 3 ]; then
    echo "$0: Expected 3 arguments, received $#: $@" >&2
    exit 1
fi
if [ -d "$2/__prev/" ]; then
    rsync -a --delete --link-dest="$2/__prev/" "$1" "$2/$3"
else
    rsync -a                                   "$1" "$2/$3"
fi
rm -f "$2/__prev"
ln -s "$3" "$2/__prev"
During normal operation, it boils down to three simple statements:
rsync with --link-dest: Copying the contents of <src> to <dst>/<label>, reusing the files from the previous backup with hard links ((The non---link-destrsync does not use --delete to reduce the risk of accidentally deleting files when called with wrong parameters))
rm and ln: Remember this backup location for the next incremental backup.
Voilà – it doesn’t get much easier than that!
Of course, there is something missing: The actual backup policy. It is separated into cron, which I consider an advantage. Using this separation of duties, many policies can be implemented very easily and composed in a modular way:
Create daily backups for every weekday
You might know this from automysqlbackup or autopostgresqlbackup: A backup is created every day and overwritten after 7 days. This is achieved by adding the following file to /etc/cron.daily/:
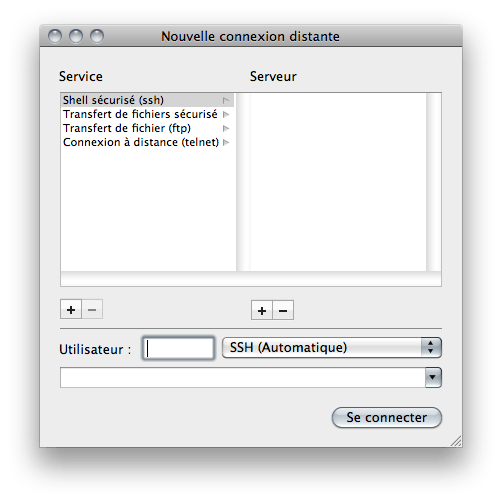
Putty est un petit soft pour Linux et Windows qui permet de gérer les connexions SSH de ses serveurs. Autant dire que c’est devenu mon meilleur ami depuis des années. Mais sur Mac, point de Putty… En effet, il n’y en a pas vraiment besoin car nativement via le terminal d’OSX, il est possible de sauvegarder ses paramètres de connexion. Pour cela, lancez un terminal, cliquez sur le menu Shell puis « Nouvelle connexion distante » pour ajouter vos paramètres de connexions à vos serveurs chéris.
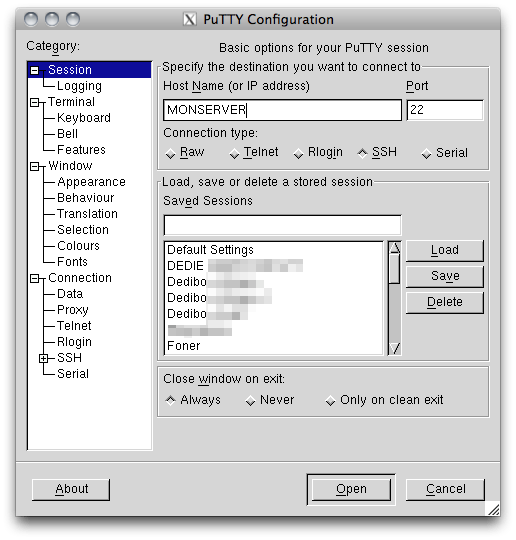
Puis juste pour le fun, et pour facilement passer de l’un à l’autre, je me suis mis en tête d’installer quand même Putty sous Mac OSX. Voici donc comment migrer un Putty Linux vers un Putty Mac (ou vice versa). Vous allez voir, c’est assez simple.
Tout d’abord, il faut installer XCode qui est le SDK OSX réservé aux développeurs. Rien de plus simple, il est en libre téléchargement ici.
Installez ensuite Mac Ports que vous trouverez ici. Mac Ports est un projet qui a pour but d’adapter sur Mac les grands classiques du logiciel open source tel que …. Putty (vous me suivez…) Ils en sont actuellement à plus de 6 000 logiciels portés. Pas mal !
Ouvrez ensuite un terminal et entrez la commande suivante : sudo port install putty
Laissez mouliner et hop, Putty sera installé sur votre ordinateur.
Récupérez ensuite le répertoire (caché) .putty dans votre /home/pseudo (sous Linux – Remplacez user par votre nom d’utilisateur) et placer le à l’identique dans le/Users/pseudo du Mac (et vice versa si vous voulez passer d’OSX à Linux)
Et voilà, le tour est joué ! Entrez la commande ‘putty’ dans un terminal et le logiciel se lancera avec tous vos paramètres.
De quoi gagner du temps, même si je pense qu’au final, c’est plus pratique de basculer progressivement de Putty vers le gestionnaire SSH natif d’OSX.
Petite parenthèse, si vous êtes sous Windows, vous pouvez exporter votre configuration Putty mais tout se passe en base de registre ce qui veut dire que vous ne pourrez faire de migration de Putty à Putty que sous Windows (et pas Windows <-> Mac ou Windows <-> Linux… En tout cas, pas à ma connaissance. Mais si vous avez une astuce à ce sujet, je serai ravi de la connaitre)
Faites Démarrer / Exécuter et entrez la commande suivante :
Récupérez ensuite le fichier putty.reg, placez vous sur le nouveau Windows et importez ce fichier dans la base de registre en double cliquant simplement dessus (ou en faisant « Fichier « -> « Importer » dans regedit). Et vous aurez récupéré votre conf Putty Windows.