Archive

Archives pour 10/2023

Collect & visualize your logs with Logstash, Elasticsearch & Redis

28/10/2023 Comments off

Source: michael.bouvy.net

Update of December 6th : although Logstash does the job as a log shipper, you might consider replacing it with Lumberjack / Logstash Forwarder, which needs way less resources, and keep Logstash on your indexer to collect, transform and index your logs data (into ElasticSearch) : check out my latest blog post on the topic.
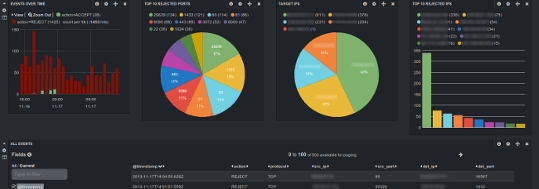
Kibana_medium

Kibana Dashboard


Even if you manage a single Linux server, you probably already know how hard it is to keep an eye on what’s going on with your server, and especially tracking logs data. And this becomes even worse when you have several (physical or virtual) servers to administrate.


Although Munin is very helpful monitoring various informations from my servers / VMs, I felt the need of something more, and bit less static / more interactive.

There are 3 kind of logs I especially wanted to track :

  • Apache 2 access logs
  • iptables logs
  • Syslogs

After searching arround on the internet for a great tool that would help me, I read about the open source log management tool Logstash which seems to perfectly suit a (major) part of my needs : logs collecting / processing.

For the purpose of this post, I will take the following network architecture and assume and I want to collect my Apache, iptables, system logs from servers 1/2/3 (“shippers”) on server 4 (“indexer”) and visualize them :

logstach-archi1

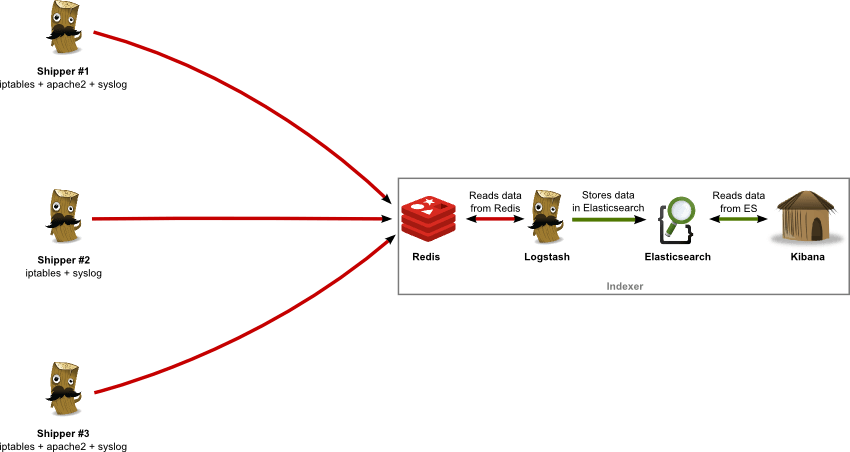
As you can see, I am using 4 complementary applications, the role of each one being :

  • Logstash : logs collector, processor and shipper (to Redis) on log “shippers” 1-3 ; logs indexer on server 4 (reads from Redis, writes to Elasticsearch)
  • Redis : logs data broker, receiving data from log “shippers” 1-3
  • Elasticsearch : logs data persistent storage
  • Kibana : (time-based) logs data visualization (graphs, tables, etc.)

Lire la suite…

Categories: Système Tags: , , ,

How to secure SSH login with one-time passwords on Linux

28/10/2023 Comments off

As someone says, security is a not a product, but a process. While SSH protocol itself is cryptographically secure by design, someone can wreak havoc on your SSH service if it is not administered properly, be it weak passwords, compromised keys or outdated SSH client.

As far as SSH authentication is concerned, public key authentication is in general considered more secure than password authentication. However, key authentication is actually not desirable or even less secure if you are logging in from a public or shared computer, where things like stealth keylogger or memory scraper can always a possibility. If you cannot trust the local computer, it is better to use something else. This is when « one-time passwords » come in handy. As the name implies, each one-time password is for single-use only. Such disposable passwords can be safely used in untrusted environments as they cannot be re-used even when they are stolen.

One way to generate disposable passwords is via Google Authenticator. In this tutorial, I am going to demonstrate another way to create one-time passwords for SSH login: OTPW, a one-time password login package. Unlike Google Authenticator, you do not rely on any third party for one-time password generation and verification.

What is OTPW?

OTPW consists of one-time password generator and PAM-integrated verification routines. In OTPW, one-time passwords are generated apriori with the generator, and carried by a user securely (e.g., printed in a paper sheet). Cryptographic hash of the generated passwords are then stored in the SSH server host. When a user logs in with a one-time password, OTPW’s PAM module verifies the password, and invalidates it to prevent re-use.

Step One: Install and Configure OTPW on Linux

Debian, Ubuntu or Linux Mint:

Install OTPW packages with aptget.

$ sudo apt-get install libpam-otpw otpw-bin

Open a PAM configuration file for SSH (/etc/pam.d/sshd) with a text editor, and comment out the following line (to disable password authentication).

#@include common-auth

and add the following two lines (to enable one-time password authentication):

auth       required     pam_otpw.so
session    optional     pam_otpw.so

16775121360_d1f93feefa_b

Fedora or CentOS/RHEL:

OTPW is not available as a prebuilt package on Red Hat based systems. So let’s install OTPW by building it from the source.

First, install prerequites:

$ sudo yum git gcc pam-devel
$ git clone https://www.cl.cam.ac.uk/~mgk25/git/otpw
$ cd otpw

Open Makefile with a text editor, and edit a line that starts with « PAMLIB= » as follows.

On 64-bit system:

PAMLIB=/usr/lib64/security

On 32-bit system:

PAMLIB=/usr/lib/security

Compile and install it. Note that installation will automatically restart an SSH server. So be ready to be disconnected if you are on an SSH connection.

$ make
$ sudo make install

Now you need to update SELinux policy since /usr/sbin/sshd tries to write to user’s home directory, which is not allowed by default SELinux policy. The following commands will do. If you are not using SELinux, skip this step.

$ sudo grep sshd /var/log/audit/audit.log | audit2allow -M mypol
$ sudo semodule -i mypol.pp

Next, open a PAM configuration file for SSH (/etc/pam.d/sshd) with a text editor, and comment out the following line (to disable password authentication).

#auth       substack     password-auth

and add the following two lines (to enable one-time password authentication):

auth       required     pam_otpw.so
session    optional     pam_otpw.so

Lire la suite…

How to run iptables automatically after reboot on Debian

27/10/2023 Comments off

reboot iptablesIf you have customized iptables rules, and would like to load the customized iptables rules persistently across reboots on Debian, you can leverage if-up.d scripts that are located in /etc/network/if-up.d. On Debian, any script that is marked as executable and placed in /etc/network/if-up.d gets executed when a network interface is brought up.

In order to run iptables automatically after reboot on Debian, do the following.

First, customize iptables as you wish, and then save the current iptables rule-set using iptables-save command.

$ sudo iptables-save > /etc/firewall.conf

The above command will dump the current iptables rule set into /etc/firewall.conf file which iptables-restore command can later use to restore the same rule set.

Now create the following if-up.d script called iptables that restores the saved iptables rule set.

$ sudo vi /etc/network/if-up.d/iptables
#!/bin/sh
iptables-restore < /etc/firewall.conf
$ sudo chmod  x /etc/network/if-up.d/iptables

Alternatively, you can add « iptables-restore < /etc/firewall.conf » command to /etc/rc.local, which gets executed at the end of system boot-up.

Source: Xmodulo

Sécuriser son serveur Linux

27/10/2023 Comments off

Sécuriser Linux

securiser linuxCe guide va vous apprendre à sécuriser un serveur et donc vous initier aux thématiques de la sécurité informatique. En quoi est-ce important ? Par définition, un serveur est ouvert sur le monde, un minimum de sécurité est donc intéressant afin de se prémunir des attaques les plus simplistes.

La marche à suivre sera donc la suivante :

  • présentation des failles ;

  • présentation des outils pour y pallier.

Bien entendu, je ne fais pas un cours complet de sécurité informatique, ce tutoriel est une initiation. Pour faire simple, c’est un peu comme fermer les volets la nuit.

Point de vue matériel, voilà ce qu’il vous faudra :

  • un serveur embarquant une distribution xBuntu ou Debian (pour les autres distribs, le principe sera le même, mais les commandes risquent d’être différentes) ;

  • un accès root (en ssh par exemple) et une console.

Tout le tutoriel se passe en ligne de commande afin de pouvoir être accessible à tous. Comme il faudra éditer des fichiers, veuillez vous assurer d’avoir un éditeur de fichier en ligne de commande (j’utiliserai personnellement nano qui est très simple).

C’est parti !

Filtrer le trafic via le firewall

Présentation

Le firewall (pare-feu en français) est l’élément indispensable pour sécuriser son serveur. Il va en effet filtrer tout le trafic en n’autorisant que les échanges permis par l’administrateur. Sans firewall correctement réglé, tous les trafics sont plus ou moins permis (c’est-à-dire qu’un attaquant peut faire ce qu’il veut chez vous) et ce genre de faille est détectable par un simple scan de ports.

Or, le noyau Linux offre déjà un pare-feu à l’utilisateur, qu’il est possible de configurer via le logiciel iptables (normalement contenu dans /sbin/iptables). S’il n’est pas installé :

apt-get install iptables

Nous allons maintenant détailler le fonctionnement d’un firewall – relativement simple. Un firewall analyse tout le trafic et vérifie si chaque paquet échangé respecte bien ses règles (critères de filtrage). Donc, il suffit de spécifier de bonnes règles pour interdire tout trafic superflu.

Les critères peuvent être divers (filtrer les ports, les protocoles, les adresses IP, etc). De base, nous allons spécifier nos règles sur les ports. Bien entendu, il faut être le plus strict possible quant au choix des règles ; c’est pourquoi, par défaut, tout firewall se règle en premier lieu en bloquant tout, absolument tout. Ensuite, nous allons « ouvrir » (autoriser le trafic) certains ports que nous voulons utiliser (par exemple pour un serveur web, nous allons ouvrir le port 80 afin que le site web soit accessible).

Déclaration des règles

Filtrage intégral

Suit la marche à suivre pour créer les règles :

1. Créons le script :

nano /etc/init.d/firewall

Et on y écrit : #!/bin/sh

2. On efface les règles précédentes pour partir sur de bonnes bases :

iptables -t filter -F
iptables -t filter -X

3. On bloque par défaut tout le trafic (si vous êtes en ssh, bien entendu, n’exécutez pas encore le script !) :

iptables -t filter -P INPUT DROP
iptables -t filter -P FORWARD DROP
iptables -t filter -P OUTPUT DROP

4. On ne ferme pas les connexions déjà établies :

iptables -A INPUT -m state --state RELATED,ESTABLISHED -j ACCEPT
iptables -A OUTPUT -m state --state RELATED,ESTABLISHED -j ACCEPT

Nous indiquons avec les paramètres -m et --state de ne pas fermer les connexions qui sont déjà établies.

5. On autorise le loopback (on ne va pas se bloquer nous-mêmes !)

iptables -t filter -A INPUT -i lo -j ACCEPT
iptables -t filter -A OUTPUT -o lo -j ACCEPT

Note : lo signifie localhost (le serveur lui-même).

Tout est bloqué, il ne nous reste plus qu’à ouvrir les ports utilisés.

Lire la suite…

How to configure virtual hosts in Apache HTTP server

26/10/2023 Comments off

Source: Xmodulo

Virtual hosting refers to the technique that allows a physical server to host more than one website domain (e.g., site1.com, site2.com). Virtual hosting is prevalent in shared web hosting environments, where typically hundreds or more of websites or blogs are packed on a single dedicated server to amortize server maintenance cost.

You are not a web hosting company? Sure, virtual hosting can still be useful to you. For example, you can place multiple websites of yours on one VPS that you rent out, saving on your VPS cost. To serve multiple domains on a VPS, you just need to configure as many virtual hosts on its web server, and point the domains to the static IP address of your VPS.

Due to its usefulness, virtual hosting is supported by all modern web server software such as Apache, Nginx, Lighttpd, IIS. In this tutorial, I will demonstrate how to create and enable virtual hosts in Apache HTTP server under Linux environment. There is slight difference in the configuration between Debian-based and Red Hat-based systems. I will highlight the difference along the way.

Before I start, I assume that Apache HTTP server is already installed on your Linux server. If you haven’t, refer to our tutorials for Debian or Red Hat based systems, and install Apache server before proceeding.

As an exercise, let’s create a virtual host for domain abc.com on Apache web server.

Step One: Create Document Root Directory for Abc.com Domain

Start by creating a directory which will hold the web pages for abc.com. This directory is known as « document root » for the domain. Following the common practice, let’s organize all document root directories under /var/www, and name them after the corresponding domains. Also, create a dedicated log directory for abc.com under /var/log.

$ sudo mkdir /var/www/abc.com
$ sudo mkdir /var/log/apache2/abc.com (Debian, Ubuntu, Mint)
$ sudo mkdir /var/log/httpd/abc.com (Fedora, CentOS, RHEL)

Create a test webpage for the domain:

$ sudo vi /var/www/abc.com/index.html
<html>
  <head>
    <title>Welcome to Abc.com</title>
  </head>
  <body>
    <h1>Sample page</h1>
    This page is powered by Apache Virtual Host!
  </body>
</html>

Change the ownership of the document root directory to the user that Apache web server runs as.

On Debian, Ubuntu or Linux:

$ sudo chown -R www-data:www-data /var/www/abc.com

On Fedora, CentOS or RHEL:

$ sudo chown -R apache:apache /var/www/abc.com

Lire la suite…

Categories: Logiciel Tags: ,