One of the interesting new tools in MySQL 5.1.4 is mysqlslap, a load emulator that lets you see how well a particular query set or table engine performs under high-load conditions.
A query that consumes too many database resources may be the result of designing tables incorrectly, choosing the wrong table type, or creating an inefficient query. When a query eats up a lot of database resources, it can negatively affect other application components. By using mysqlslap to stress test a server in a non-public environment, you will discover these errors sooner, allowing you to you avoid a database meltdown once your application goes live.
This tutorial shows how you can use mysqlslap to run stress tests involving multiple clients, custom queries, different table engines, and much more. Lire la suite…
When you are experiencing slow Internet access, you may want to test the Internet speed of your upstream ISP (often called « last mile » in the residential broadband networks) as part of troubleshooting. For that matter, Speedtest.net is probably the most widely used broadband speed testing website.
Underneath it, Speedtest.net loads JavaScript code in your web browser, which then automatically detects the closest Speedtest.net server from you, and measures download/upload speed by sending HTTP GET and POST requests to the server.
However, if you are trying to check Internet speed from a remote headless server, VPS or an otherwise desktop-less system, Speedtest.net’s Flash-based user-friendly interface would be no good. For those of you, there is a command-line interface (CLI) version of Speedtest.net, known as speedtest-cli. Here I will demonstrate how to use speedtest-cli to check Internet speed from the command line in Linux.
Install speedtest-cli on Linux
speedtest-cli is a simple CLI client written in Python for measuring bidirectional Internet bandwidth by using Speedtest.net infrastructure. It works with Python 2.4-3.4. Installing the latest speedtest-cli is nothing more than downloading the Python script.
It is straightforward to check your Internet speed with speedtest-cli. Running speedtest-cli command without any argument gets its job done.
$ speedtest-cli
This will automatically discover the closest Speedtest.net server (in terms of geographic distance), and report download and upload speed measured from the server.
If you want to share the speed test result, you can use « --share » option, which will allow you to share speed test result with others in an image format via Speedtest.net.
The following is a sample image automatically generated and uploaded to Speedtest.net by speedtest-cli.
Pour tout bon informaticien, le terme « partitionnement » n’est pas inconnu. Cependant, bien que le partitionnement d’un disque dur soit devenu une banalité, l’utilisation du partitionnement en base de données reste encore rare.
Faisons tout d’abord un rappel sur le partitionnement d’un disque dur. L’intérêt de créer différentes partitions est de pouvoir organiser les données : des partitions sont réservées aux fichiers des systèmes d’exploitation installés et d’autres pour les données personnelles (photos, téléchargements…).
Dans cet article, nous allons nous intéresser au partitionnement dans le domaine des bases de données, et plus exactement au partitionnement de tables. Le but est, comme pour les disques durs, d’organiser les données. Néanmoins, nous n’allons pas utiliser cette organisation pour simplifier nos requêtes, mais bien pour en améliorer les performances !
I-B. Les types de partitionnement
Deux grands types de partitionnement sont utilisés pour partitionner une table :
partitionnement horizontal : les enregistrements (= lignes) d’une table sont répartis dans plusieurs partitions. Il est nécessaire de définir une condition de partitionnement, qui servira de règle pour déterminer dans quelle partition ira chaque enregistrement.
Exemple : nous disposons d’une table Amis et nous choisissons de la partitionner en
deux partitions :
Les amis dont la première lettre du prénom est comprise entre A et M,
Les amis dont la première lettre du prénom est comprise entre N et Z.
Pour récupérer la liste complète de nos amis, il sera nécessaire de regrouper le contenu de nos deux partitions. Pour ce faire, une simple opération d’union d’ensembles suffit ;
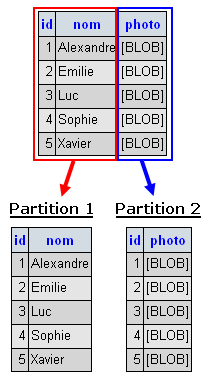
partitionnement vertical : les colonnes d’une table sont réparties dans plusieurs partitions. Cela peut être pratique pour écarter des données fréquemment utilisées d’autres auxquelles l’accès est plus rare.
Exemple : nous disposons d’une table Amis contenant les prénom et photo de chacun de nos amis. Les photos prenant de la place et étant rarement accédées, nous décidons de les écarter des autres données.
Comme vous pouvez le remarquer, les deux partitions contiennent l’identifiant des amis. Cela est nécessaire afin de garder le lien entre les données de chaque enregistrement. Ainsi, pour récupérer toutes les informations des amis, il suffit de faire une jointure entre les deux partitions.
Nous connaissons maintenant les deux types de partitionnement. Il est bien sûr possible d’utiliser un partitionnement vertical et un partitionnement horizontal sur une même table, ainsi que de partitionner sur plusieurs niveaux, c’est-à-dire définir des partitions de partitions.
I-C. Les avantages du partitionnement
Le partitionnement apporte plusieurs avantages à un administrateur de base de données. Voici les principaux intérêts du partitionnement :
pouvoir créer des tables plus grandes que la taille permise par un disque dur ou par une partition du système de fichiers : il est tout à fait possible de stocker des partitions à des endroits (partitions, disques, serveurs…) différents ;
pouvoir supprimer très rapidement des données qui ne sont plus utiles et utilisées : si ces données sont placées sur une partition séparée, il suffit de détruire la partition pour supprimer toutes les données ;
optimiser grandement certaines requêtes : les données étant organisées dans différentes partitions, le SGBD n’accède qu’aux données nécessaires lors des requêtes. Sans partitionnement, tous les enregistrements sont pris en compte.
Enfin, notons que le partitionnement de tables est généralement utilisé avec des bases de données réparties où les données sont placées sur des sites géographiques (éloignés ou proches) différents. Cet article se limite au partitionnement sur site local, mais les principes évoqués sont valides pour le partitionnement distant.
I-D. Notes à propos de MySQL
Dans MySQL, le partitionnement n’est géré de manière automatique qu’à partir de la version 5.1. Lors de la rédaction de cet article, MySQL 5.1 est encore en version bêta et par conséquent, il est possible que des bogues subsistent.
De plus, il est important de noter que seules les fonctionnalités de base du partitionnement seront disponibles dans la version finale de MySQL 5.1. Mais il est évident que les versions futures du SGBD apporteront leur lot d’améliorations.
If your application is performing lot of deletes and updates on MySQL database, then there is a high possibility that your MySQL data files are fragmented.
This will result in lot of unused space, and also might affect performance.
So, it is highly recommended that you defrag your MySQL tables on an ongoing basis.
This tutorial explains how to optimize MySQL to defrag tables and reclaim unused space.
1. Identify Tables for Optimization
The first step is to identify whether you have fragmentation on your MySQL database.
Connect to your MySQL database, and execute the following query, which will display how much unused space are available in every table.
mysql> use thegeekstuff;

mysql> select table_name,
round(data_length/1024/1024) as data_length_mb,
round(data_free/1024/1024) as data_free_mb
 from information_schema.tables
 where round(data_free/1024/1024) > 500
 order by data_free_mb;

+------------+----------------+--------------+
| table_name | data_length_mb | data_free_mb |
+------------+----------------+--------------+
| BENEFITS   |           7743 |         4775 |
| DEPARTMENT |          14295 |        13315 |
| EMPLOYEE   |          21633 |        19834 |
+------------+----------------+--------------+
In the above output:
This will display list of all tables that has minimum of 500MB of unused space. As we see above, in this example, there are 3 tables that has more than 500MB of unused space.
data_length_mb column displays the total table size in MB. For example, EMPLOYEE table size is around 21GB.
data_free_mb column displays the total unused space in that particular table. For example, EMPLOYEE table has around 19GB of unused space in it.
All these three tables (EMPLOYEE, DEPARTMENT AND BENEFITS) are heavily fragmented and it needs to be optimized to reclaim the unused space.
From the filesystem level, you can see the size of the individual table files as shown below.
The file size will be the same as what you see under “data_length_mb” column in the above output.
# ls -lh /var/lib/mysql/thegeekstuff/
..
-rw-rw----. 1 mysql mysql  7.6G Apr 23 10:55 BENEFITS.MYD
-rw-rw----. 1 mysql mysql   14G Apr 23 12:53 DEPARTMENT.MYD
-rw-rw----. 1 mysql mysql   22G Apr 23 12:03 EMPLOYEE.MYD
..
In this example, the EMPLOYEE.MYD file is taking up around 22GB at the filesystem level, but it has lot of unused space in it. If we optimize this table, the size of this file should go down dramatically.
Unless you are a MySQL performance tuning expert, it can be enormously challenging and somewhat overwhelming to locate and eliminate MySQL bottlenecks. While many DBAs focus on improving the performance of the queries themselves, this post will focus on the highest-impact non-query items: MySQL Server Performance and OS Performance for MySQL.
MySQL Performance Tuning
This post is a « best-of » compilation of the tricks and scripts I have found to be the most effective over the past decade. I’d like to write a 50 page article but am limiting this to 1 page.
For anyone serious about High Performance MySQL, I would highly highly recommend the fantastic book: « High Performance MySQL: Optimization, Backups, Replication, and more » – O’Reilly. I have spent many hours poring over it’s wisdom-filled pages and gaining much practical know-how.
MySQL Server Software
Each new MySQL server release contains ENORMOUS performance enhancements over previous versions. That is the absolute very first thing you should do: Upgrade your MySQL Server and Client libraries and keep them updated.
There are several « flavors » of MySQL believe it or not.. Most people use the stock MySQL Server. I, along with WikiPedia, Arch-Linux, and others, use MariaDB. MariaDB is a greatly enhanced 100% compatible replacement for the stock MySQL Server. It is based on the excellent work by the Percona project. The percona flavor of MySQL is the other truly improved version of MySQL to consider. I personally have spent a couple years using Percona, then I upgraded from Percona to MariaDB (which has a lot of Percona juju built in) and am no longer thinking about which version to go with. MariaDB is the bomb-diggity.
MySQL Engine
InnoDB not MyISAM. InnoDB may be surpassed by in-development engines like TokuDB. I ONLY use InnoDB, for everything.
Types of MySQL Servers to optimize
Seriously? Optimize EVERYTHING! The screenshots below are actual from one of my live servers. That server used to be 8GB RAM, but now as you may see in the screenshots, it is now only 2GB of RAM. I was able to save some serious $$$ by optimizing my server, without sacrificing speed… In fact I gained some speed in many instances.
I’ve used these optimization techniques on monster servers with 32GB of ram and many slaves, and also on a machine with 1GB of ram (running arch-linux).